background image

ENGLISH

9

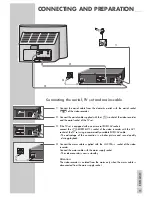
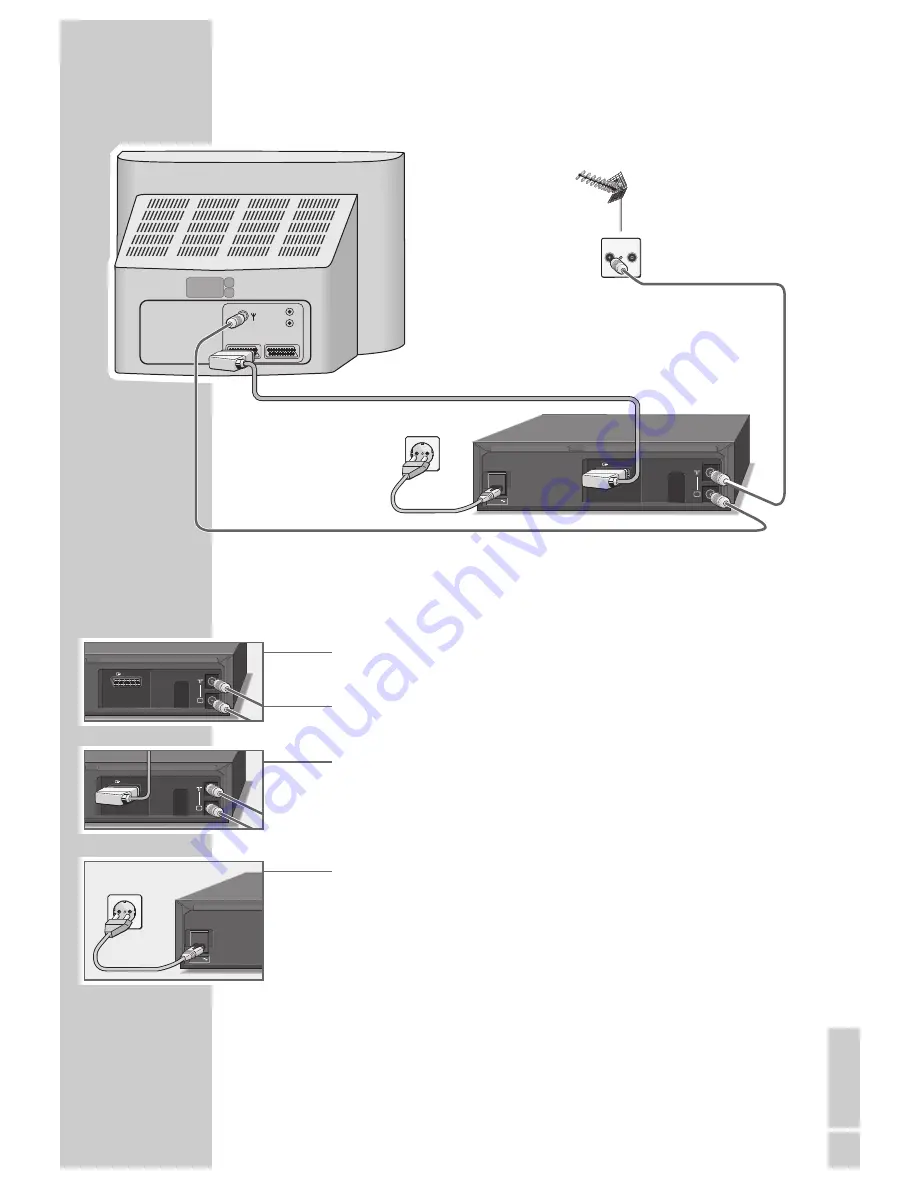
Connecting the aerial, TV set and mains cable

1

Connect the aerial cable from the domestic aerial with the aerial socket
»

Ä

Ä

« of the video recorder.

2

Connect the aerial cable supplied with the »

Ö

« socket of the video recorder

and the aerial socket of the TV set.

3

If the TV set is equipped with one or several EURO-AV sockets:
connect the »

X

EURO-AV 1

« socket of the video recorder with the AV 1

socket of the TV set using a commercially available EURO-AV cable.
– The advantage of this connection is a better picture and sound quality

during playback.

4

Connect the mains cable supplied with the »

AC IN

~

« socket of the video

recorder.
Connect the mains cable with the mains supply socket.
– The video recorder is now in standby.

Attention:

The video recorder is isolated from the mains only when the mains cable is
disconnected from the mains supply socket.

CONNECTING AND PREPARATION

_______

TV

EURO-AV1

TV

EURO-AV1

AC IN

TV

R

TV

EURO-AV1

AC IN

AV1

AV2

R

L

1

3

4

2

Summary of Contents for GV 29 VPS/5

Page 1: ...VIDEORECORDER GV 29 VPS 5 1 DEUTSCH ENGLISH ESKY MAGYAR...

Page 2: ...with the automatic tuning system ATS euro plus 14 Playback Basic playback functions Additional playback functions Continuous playback 16 Recording Two recording options The video programme system VPS...

Page 3: ...etting the time and date manually 28 Special Functions Selecting the MODE menu On screen display on off Activating the automatic switch off function NTSC playback Child lock Selecting the video record...

Page 4: ...V programme High speed drive With this high speed drive the fast rewind time of for example of an E 180 cassette is reduced to about 100 seconds Energy saver mode Very low enregy consumption in standb...

Page 5: ...sert any foreign objects into the cassette compartment This might damage the high value mechanism Never open the recorder Damage caused by unqualified work is not covered by the manufacturer s guarant...

Page 6: ...A Switches the video recorder off Selects programmes downwards Selects programmes upwards N N Ejects the cassette Starts recording rr During playback reverse picture search after stop fast rewind e St...

Page 7: ...cable to mains supply socket X EURO AV1 Euro AV connector for TV set Aerial socket for domestic aerial Aerial socket for TV set Rear side of the video recorder AT A GLANCE____________________________...

Page 8: ...Ends all drive mechanism functions and switches the vidoe rocorder to stop i INFO Switches to the menu and back to the TV picture RECORD Starts recording C C D D Select channels up down select variou...

Page 9: ...er with the AV 1 socket of the TV set using a commercially available EURO AV cable The advantage of this connection is a better picture and sound quality during playback 4 Connect the mains cable supp...

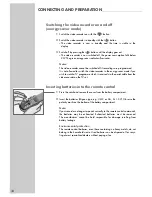
Page 10: ...eived via the aerial cable from the video recorder on the TV set Inserting batteries into the remote control 1 Press the catch and remove the cover from the battery compartment 2 Insert the batteries...

Page 11: ...example 4 Store the setting on the TV set 5 Press the DUB button to end the setting Improving the picture quality If the quality of the recorder picture is poor or the picture quality of one or more...

Page 12: ...the same time until the table appears 2 Initiate programming with the OK button The LANGUAGE table appears on the picture screen 3 Use the C C D D F F E E buttons to select the desired language 4 Pre...

Page 13: ...een updated automatically it must be set manually see chapter Setting the Time and Date on page 27 6 Press the OK button to end the setting Note Further settings such as manual channel search changing...

Page 14: ...and E 240 cassettes With other cassettes the display shows 2 Use the II button to switch to freeze frame pause Press repeatedly to advance the freeze frame step by step 3 Press the rr button during p...

Page 15: ...Plus Cassettes recorded on another video recorder may have a poor picture and or sound quality This is not a fault of your recorder 1 Press the E E button on the video recorder during playback The au...

Page 16: ...corded completely Notes on the video programme system Many TV stations broadcast an additional programme related VPS PDC signal which indicates the start and duration of each individual TV programme I...

Page 17: ...play mode press the SP LP button LP is displayed on the recorder 3 Start recording by a longer pressure on the RECORD button Note Entering the switch off time press the RECORD button then use the RECO...

Page 18: ...on number with one or two digits using the 0 9 buttons then start the new recording by pressing the RECORD button a longer time 4 End the recording with the button Locating certain recordings using th...

Page 19: ...compartment until it is fully pulled in If a cassette is already inserted switch on with the D D button If the recorder is in recording standby mode de activate this mode with the TIMER ON OFF button...

Page 20: ...mode the video recorder compares the remaining playing time with the length of the TIMER recording and selects automatically the longplay mode if necessary Note For TIMER recordings with VPS PDC the...

Page 21: ...ideo recorder is in recording standby mode Clearing programmed recording data 1 If recording standby is activated press the TIMER ON OFF button 2 Press the D D button The video recorder is switched on...

Page 22: ...while it is in recording standby mode 1 Press the TIMER ON OFF button 2 Press the D D button to switch the recorder on 3 Carry out the desired function Re activating the recording standby mode of the...

Page 23: ...h the OK button 6 Select the programme position to be exchanged with the marked position using the C C D D F F E E buttons then confirm with the OK button To re sort further programme positions repeat...

Page 24: ...een 3 Select the CHANNEL SORT line using the C C or D D button then activate it with the OK button The CHANNEL SORT table appears on the picture screen 4 Select the NAME line using the C C or D D butt...

Page 25: ...button to get a blue background instead of the TV picture 5 Select the SYSTEM line using the C C or D D button then select the TV system required B G with the F F button D K with the E E button 6 Sel...

Page 26: ...T line with the OK button The table for channel programming appears on the picture screen The PRESET line is marked 4 Use the F F or E E button to select the programme position which is to be skipped...

Page 27: ...in menu with the i INFO button 2 Select the INSTALLATION line using the C C or D D button then activate it using the OK button 3 Select the CLOCK line with the C C or D D button then activate it with...

Page 28: ...tch off function If this function is activated the video recorder switches off automatically after 2 or 6 hours 1 Select OFF POWER with the C C or D D button 2 Select OFF 2 HR or 6 HR with the F F or...

Page 29: ...D button 2 Select 2 with the E E button or 1 with the F F button then confirm with the OK button When selecting 2 the GV 29 is set to the remote control address 2 In order to control the GV 29 you no...

Page 30: ...the display between programme position channel number and special channel number i INFO Displays the DIALOG CENTER and switches in menu mode F F E E Volume control down up When in a menu cursor to the...

Page 31: ...eck by selecting the channel or defective aerial system to be recorded on the TV set or ask your neighbour if s he can receive this channel Recording not possible The cassette is protected against Cov...

Page 32: ...CIR PAL B G 625 lines CCIR PAL D K 625 lines CCIR MESEC B G 625 lines CCIR MESEC D K 625 lines System VHS Mains voltage 220 240 V 50 Hz Weight approx 3 3 kg Power consumption when recording approx 15...

Page 33: ...s Electr nicos Lda Rua Bento de Jesus Cara a 17 P 1495 Cruz Quebrada Lisboa 3 51 1 4 19 75 70 GRUNDIG ESPA A S A Solson s 2 planta baja B3 Edificio Muntadas Mas Blau E 08820 El Prat De Llobregat Barce...

Page 34: ...Grundig AG Kurgartenstra e 37 D 90762 F rth http www grundig de 1AC6P1P2052...

Reviews: