GV470S…
Allgemeiner T
eil / Genera
l
GRUNDIG
Servicetechnik
1 - 61
Synchro Edit Function
You can use this function to record over old recordings and
splice without losing scenes.
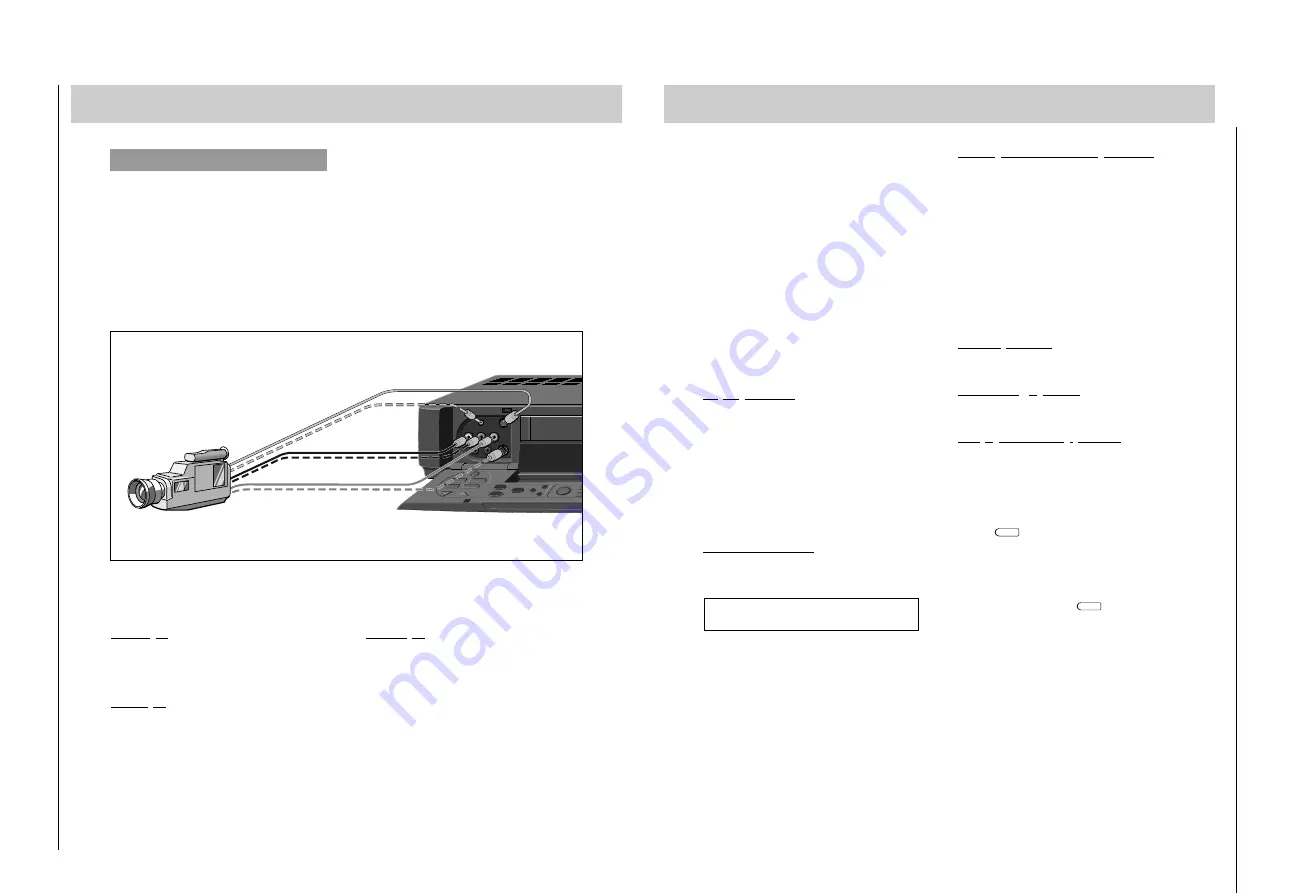
The camcorder is controlled by your recorder via a cable
connection.
You can also control the camcorder drive functions with the
control elements of your recorder (GV 470).
Camcorders suitable for this function are those equipped with
a 5-pin control socket as well as those equipped with a
2.5 mm
∅
socket.
7. Special Functions
MIC
U
L
R
AUDIO IN
VIDEO IN
S-VHS
SYNCHRO EDIT
1
2
8
OK
SET
CL
CHECK
EW/ED
TIMER
ON/OF
S-VHS
INSERT
DUBBING
MANUAL
U
Connecting
Open the front cover of the recorder.
Picture signal
Connect the VIDEO IN signal or the S-VHS IN socket of your
recorder with the corresponding picture signal socket of the
camcorder.
Sound signal
For camcorders with monotone sound, connect one of the L
AUDIO R IN sockets with the sound signal socket of the cam-
corder.
For camcorders with stereo sound, connect the L AUDIO R IN
sockets with the sound signal socket of the camcorder.
Control signal
For camcorders with a 5-pin socket, connect the SYNCHRO
EDIT 2 socket with the control signal socket of the camcor-
der.
For camcorders with a 2.5 mm
∅
socket, connect the
SYNCHRO EDIT 1 socket with the control signal socket of the
camcorder.
uu
Sound signal L/R
Picture signal
Control signal
Preparation
Switch on the TV set (serves as a control monitor) and select
the programme positon for the video recorder (AV programme
positon).
Open the front cover of the recorder.
Insert the cassette you want to copy in the camcorder, and
insert a cassette with sufficient playing time in the recorder
which is to record.
Re-recording
with synchronous control via the camcorder´s
5-pin socket or 2.5 mm
∅
socket
The Master Slave Edit function described in this section only
works for camcorders with the so-called “bus control”.
Master Slave Edit function means that the playback functions
of the camcorder can be operated with the control elements
of the video recorder.
Preparing re-recording
In the video recorder (GV 470) playback mode, locate the end
of the scene onto which the new recording is to be joined by
pressing the
K
button (playback pause).
Display on recorder: » II «.
Switch the recorder (GV 470) to recording pause by pressing
both
M ;
buttons.
Display on recorder: »
●
II «.
Continue to press the
a
button until »
CV
« (for VIDEO IN/
L-AUDIO-R IN sockets) or »
S I
« (for S-VHS IN/
L-AUDIO-R IN sockets) appears in the recorder´s display.
Master Slave Edit function
Press the
¢
MASTER SLAVE EDIT button to switch the con-
trol elements of the recorder to camera operation.
Display on recorder: »
CAMERA
«.
You can operate the following camcorder functions using the
control elements of the recorder:
Playback, Stop, Pause (with the
J
,
`
,
K
buttons),
Single Frame Advance, Forward/Reverse with the jog knob,
Picture search, and Fast Forward/Reverse with the shuttle
ring.
The recorder cannot be operated when its control ele-
ments are switched to the camcorder.
Searching for a scene and starting re-recording
In camcorder playback mode, search for the beginning of the
desired scene.
Switch to playback pause at the required point in the desired
scene.
Switch the recorder´s control elements back to recorder ope-
ration by pressing the
¢
MASTER SLAVE EDIT button.
The display »
CAMERA
« on the recorder goes out.
Start record/playback on the recorder (GV 470) with the
M ;
buttons.
After a brief exchange of data between the recorder (GV 470)
and the camcorder, the camcorder begins playback and your
recorder (GV 470) simultaneously begins recording »
●
«
and »
EDIT
« appear in the recorder´s display.
Concluding a recording
Press the
K
button.
Concluding copying function
Press the
`
button.
Changing the re-recording preroll time
You use this function to match the preroll times of the video
recorder and camcorder.
If the beginning of the scene is missing, or if the recording
begins too soon, you can adjust the times as follows:
Press the
¢
MASTER SLAVE EDIT button.
Display on the recorder: »
CAMERA
«.
Press the
button.
The preroll time appears in the recorder´s display, for
example, »
I :43
«.
Change the preroll time with the
l
%
or
&
button.
If the beginning of the desired scene comes too soon, press
the
&
button; if it comes too late, press the
l
%
button.
Store the setting by pressing the
button.
Conclude by pressing the
¢
MASTER SLAVE EDIT button.
MANUAL
MANUAL
7. Special Functions
Synchronous Re-recording
uu


