background image

37 

ENGLISH

CONNECTION AND PREPARATION

  _____________________

Additional information for units sold 

in the UK.

Units sold in the UK are suitable for operation from a 
240V ac, 50Hz mains supply.
The range of multi-system receivers is built to work in 
most European countries. However, the mains plug and 
socket system for the UK differs from many European 
countries.
This appliance has been supplied with a fitted, non-re-
movable, approved converter plug for use in the UK. 
This converter plug is fitted with a 5A rated fuse.

In case this appliance is supplied with a moulded 2-pin 
Euro plug only, which is unsuitable for UK operation, 
this must be cut off and immediately disposed of. An 
approved 13A, 3-pin UK plug should then be fitted by 
a qualified electrician.

Note:

The severed Euro plug must be destroyed to avoid 
a possible shock hazard should it be inserted into a 
socket elsewhere.
If a non-rewireable 3-pin plug or a rewireable 13A 
(BS1363) 3-pin plug is used, it must be fitted with 
a 5A ASTA or BSI approved BS1362 fuse. If any 
other type of plug is used it must be protected by a 
5A fuse either in the plug, or at the distribution bo-
ard. If this type of plug becomes defective, ensure 
that the fuse is removed before disposal, to eliminate 
potential shock hazard.

If it is necessary to change the fuse in the non-rewire-
able plug, the correct type and rating (5A ASTA or 
BSI approved BS1362) must be used and the fuse 
cover must be refitted. If the fuse cover is lost or da-
maged, the lead and plug must not be used until a 
replacement  is  obtained.  Replacement  fuse  covers 
should be obtained from your dealer.

Important:

The wires in the mains lead are colour coded in ac-
cordance with the following code:
BLUE – NEUTRAL
BROWN – LIVE
As the colours of the wires in the mains lead of your 
appliance  may  not  correspond  with  the  coloured 
marking identifying terminals in your plug, proceed 
as follows: 

Connect  the  BLUE  coloured  wire  to  plug  terminal 
marked with the letter “N” or coloured black.
Connect the BROWN coloured wire to the plug ter-

minal marked with the letter “L” or coloured red.
In no circumstance must any of the wires be connec-
ted to the terminal marked with the letter “E”, earth 
symbol “

V

”, coloured green, or green & yellow.

Replacement mains lead sets can be obtained from 
your local dealer, or by contacting Grundig Consu-
mer Relations (01788 570088) 
Moulded 3-pin lead set, suitable for UK use:
Ref: Leadset UK    8290-991-224
Moulded  2-pin  Euro  lead  set,  not  suitable  for  UK 
use:
Ref: Leadset Euro    8290-991-316

Summary of Contents for Oslo CDS 6690 USB

Page 1: ...HIFI MICRO SYSTEM Oslo CDS 6690 USB en de...

Page 2: ...tion 41 Selecting favourites 42 RDS station service 43 CD MODE 43 Selecting the CD input source 43 Inserting a CD 43 Playing back a CD 44 Repeating the current file or track 44 Selecting another file...

Page 3: ...7 The hi fi system is designed for use in dry rooms If you do use it outside please ensure that it is pro tected from moisture such as rain or water spla shes 7 Only use the hi fi system in a moderat...

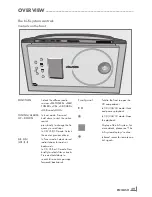
Page 4: ...mode Selects stored 5a aa radio stations forwards or backwards In CD USB or SD mode Press briefly to selects files or tracks Press and hold down to search for a certain passage forwards backwards OVE...

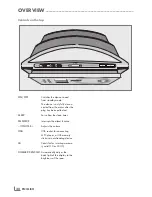
Page 5: ...ing the sleep timer SNOOZE Interrupts the alarm function VOLUME Adjusts the volume USB USB socket for connecting MP3 player a USB memory stick or a card reading device SD Card slot for inserting a mem...

Page 6: ...ins supply is to pull the plug out AUX Audio signal input for an exter nal device on the right hand side U Headphone socket for connect ing a stereo headphone set with a jack plug 3 5 mm on the right...

Page 7: ...MA and CD DA mode a file or a track is repeated MALL In MP3 WMA and CD DA mode all files or tracks of a CD are repeated MALBUM In MP3 WMA mode all files on an album are repeated INTRO In MP3 WMA and C...

Page 8: ...n a file or track DSC Selects the sound settings USER CLASSIC POP JAZZ and ROCK adjusts the equaliser BASS or TREBLE UBS Switches the Ultra Bass System on and off VOLUME Adjust the volume FSM Favourit...

Page 9: ...In CD USB SD mode TIMER Plays the introduction to the files or tracks on the data medium repeats a file or track all files or tracks of a CD USB SD or all files of an album In stand by mode Sets the s...

Page 10: ...system by pressing ON OFF 2 Connect the USB interface of the MP3 player to the USB socket on the hi fi system on the top using a standard USB cable or insert the USB plug of the USB memory stick in t...

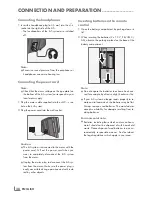
Page 11: ...bout the legal regulations which apply in your area CONNECTION AND PREPARATION______________________ Connecting the headphones 1 Insert the headphone plug 3 5 mm into the U socket on the right side of...

Page 12: ...pe of plug becomes defective ensure that the fuse is removed before disposal to eliminate potential shock hazard If it is necessary to change the fuse in the non rewire able plug the correct type and...

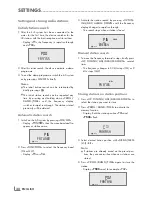
Page 13: ...or station name PI6 FM TUNER f 2 Press FUNCTION to select the frequency band FM or MW Display FM or MW SETTINGS_ _______________________________________________________________ 3 Activate the station...

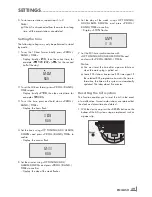
Page 14: ...onfirm Display the minutes flash I2 03 MON 5 Set the minutes using UP TUNING ADJ ALBUM DOWN and press PROG RAND TIME to confirm Display the day of the week flashes 6 Set the day of the week using UP T...

Page 15: ...options Selecting the input source 1 Select the input source by pressing FUNCTION Display FM TUNER MW TUNER CD SD CARD USB or AUX I2 24 CD GENERAL FUNCTIONS___________________________________________...

Page 16: ...ystem on and off 1 Press UBS to switch the Ultra Bass System on and off Display UBS B P02 FANTASY f UBS B Stereo mono reception When the hi fi system receives FM stereo stations appears in the display...

Page 17: ...s stays lit once RDS time synchronisation is complete Calling up RDS information When an RDS station is being received the frequency is displayed briefly and then the station name appears continuously...

Page 18: ...standard 12 cm CDs as well as 8 cm CDs on your device An adapter is not necessary Selecting the CD input source 1 Press FUNCTION to select CD as the input source If there is no CD in the compartment t...

Page 19: ...so select files tracks in stop mode Searching for a passage within a file or track 1 During playback press 5a aa or s6 and hold it down until you find the passage you want to hear If 5a aa or s6 are r...

Page 20: ...ack 2 Select the repeat function by pressing INTRO REP TIMER until MALL appears in the dis play The CD is repeated from the beginning 3 24 008 003 MALL e 3 To quit the function press INTRO REP TIMER r...

Page 21: ...p 2 Selecting and storing tracks CD DA only 1 Press PROG RAND TIME to call up the func tion Display track display 00 and P 0I PROG flashes P 0I CD TK 00 PROG 2 Select a track with 5a aa or s6 and pres...

Page 22: ...aa Display 0 00 the track is played again from the start Selecting another track 1 During playback press 5a aa or s6 repeatedly until the desired track or file is reached Playback of the selected trac...

Page 23: ...nnection for a USB extension cable and is not designed for direct connection to a computer 7 The USB socket of this device is a standard socket Due to rapid advances in technology and new manufacturer...

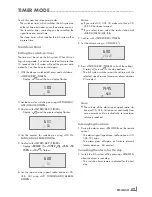
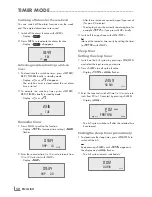
Page 24: ...activated for the next day Your hi fi system has three timer modes The switch on timer which switches the hi fi system on at the set time and wakes you with an alarm or music The reminder timer remind...

Page 25: ...ime in 10 minute intervals from 10 to 120 minutes with NAP Display NAP 09 34 NAP 00 After the set time has expired a signal tone sounds for max 90 minutes The display shows the currently remaining tim...

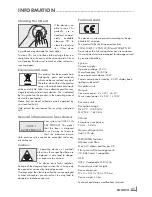
Page 26: ...here are employed it may lead to danger ous exposure to emissions This device emits laser radiation Because of the danger of eye injuries the unit may only be opened or serviced by trained personnel...

Page 27: ...ic electrical discharge Switch off the hi fi system disconnect the power cable and plug it in again after a few seconds or press RESET The remote control does not work The batteries are flat Replace t...

Page 28: ...www grundig com 52 10 72011 411 1500...

Reviews: