background image

Please note the following instructions when setting up the system:

The hi-fi system is designed for the playback of audio signals. Any
other use is expressly prohibited.

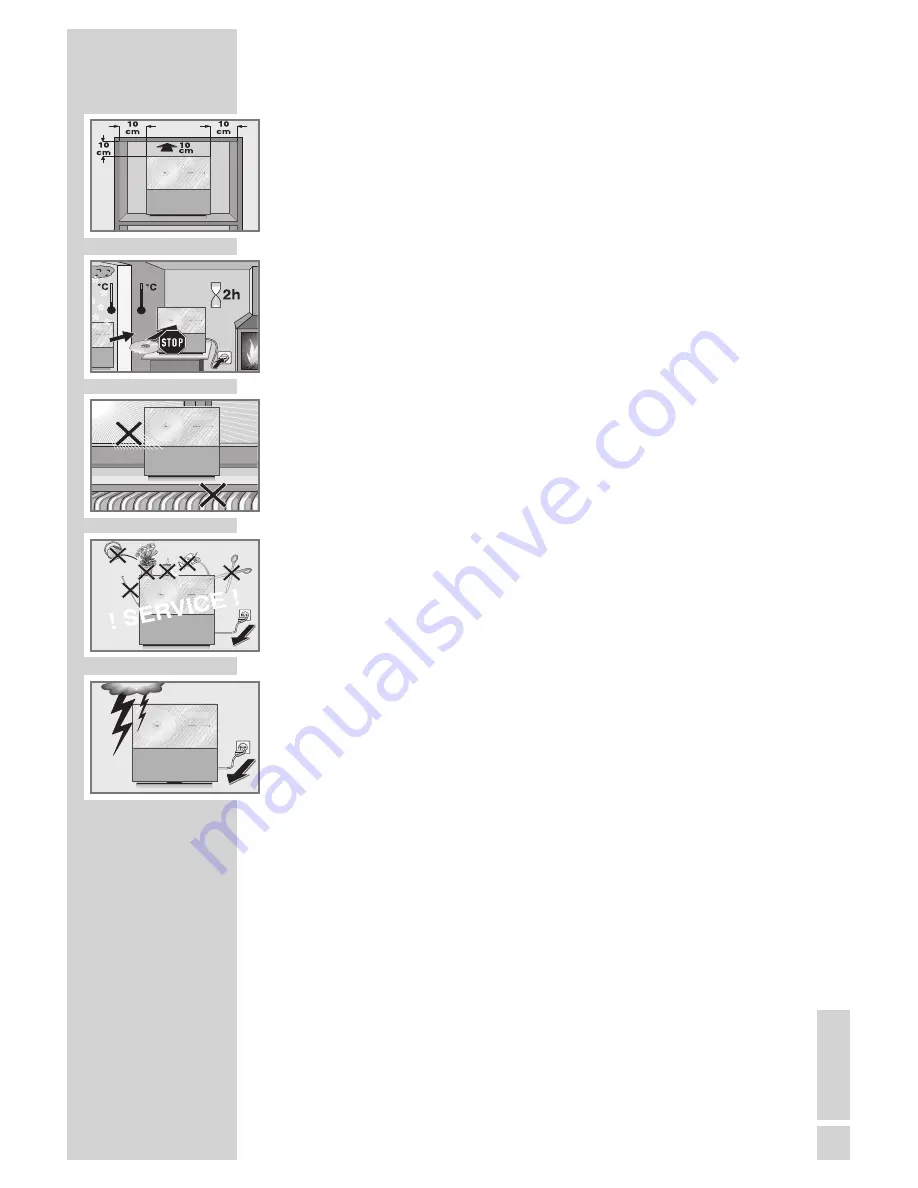
If you want to set up the hi-fi system on wall shelves or in cupboards,
please ensure that it is adequately ventilated. There must be at least
10 cm of space at the side, above and behind the hi-fi system. The
ventilation should not be impeded by covering the ventilation ope-
nings with items such as newspapers, table cloths, curtains, etc.

When setting up the hi-fi, remember that furniture is often coated with
various types of varnish and plastic, which often contain chemical
additives. These additives may cause corrosion to the feet of the unit.
This may leave stains on the surface of the furniture which can be
difficult or impossible to remove.

If the hi-fi system is exposed to sudden changes in temperature, for
example when taken from the cold into a warm room, wait at least
two hours before using it.

The hi-fi system is designed for use in dry rooms. If you do use it out-
doors, make sure it is protected from moisture such as dripping or
splashing water.  

Only use the device in a moderate climate.

Do not place the hi-fi system close to heating units or in direct sunlight,
as this will impair cooling.

The hi-fi sytem shall not be exposed to dripping or splashing and
that no objects filled with liquids, such as vases, shall be placed on
the device.

Do not insert any foreign objects in the CD compartment. Do not
place any objects such as burning candles on the hi-fi system.

Do not open the hi-fi system casing under any circumstances.
Warranty claims are excluded for damage resulting from improper
handling.

Thunderstorms are a danger to all electrical devices. Even if the hi-fi
system is switched off, it can be damaged by a lightning strike to the
mains or the antenna cable. Always disconnect the mains and
antenna plugs during a storm and, if necessary, the LAN plug.

Note:

Do not connect any other equipment while the device is switched
on. Switch off the other devices as well before connecting them.
Only plug the device into the mains socket after you have connected
the external devices.
Make sure the power plug is freely accessible.

SET-UP AND SAFETY

------------------------------------------------------------

5

EN

GLISH

Summary of Contents for Ovation 2i CDS 9000 WEB

Page 1: ...INTERNET MICRO HIFI SYSTEM Ovation 2i CDS 9000 WEB...

Page 2: ...for FM radio stations 17 Setting the time 18 Further settings for FM radio stations 19 Restoring the settings Reset 20 Registering the Ovation 2i with the WLAN router 22 23 GENERAL FUNCTIONS 22 Switc...

Page 3: ...ating all tracks of a CD Repeat All 35 Playing back tracks in random order 35 Playing the start of each track Intro 36 Creating a playlist 38 USB MODE 38 Playing back tracks from an MP3 WMA player or...

Page 4: ...em using a UPnP server via LAN or WLAN audio streaming Data formats such as MP3 WMA and CDDA can be played back using the CD drive The MP3 and WMA data formats can also be played back via the USB inpu...

Page 5: ...rooms If you do use it out doors make sure it is protected from moisture such as dripping or splashing water Only use the device in a moderate climate Do not place the hi system close to heating units...

Page 6: ...ck of the hi system and remove the hi system s stand 2 Screw the device part B of the wall bracket with the four supplied round head screws C exactly see four threaded holes to the back of the hi syst...

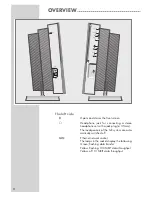
Page 7: ...medium and treble speakers each in their own casing create an outstanding sound experience The hi system controls The front of the device g Standby indicator under the front screen Lights up red when...

Page 8: ...o headphone set with a jack plug 3 5 mm The loudspeakers of the hi system are auto matically switched o LAN Ethernet network socket The lamps in the socket display the following Green ashing data tran...

Page 9: ...ain menu select the operating modes CD FM Internet radio etc For navigation in menus In tuner mode select preset channels In MP3 mode switch to select albums and titles 9 Starts playback of a CD 9 8 F...

Page 10: ...ts the hi in the event of a malfunction AC Connection socket for power cable The only way to completely disconnect the hi system from the mains supply is to discon nect the power cable FM ANTENNA Ante...

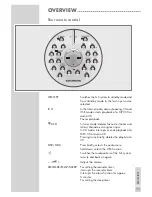
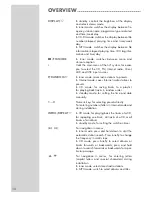
Page 11: ...ers characters during text input In CD mode interrupts or ends playback of a MP3 CD or audio CD Pressing twice brie y deletes the playlist of a CD DSC UBS Press brie y selects the audio menu hold down...

Page 12: ...acks to a playlist for playing back tracks in random order In standby mode for setting the time and date manually 1 0 Numeric keys for selecting presets directly For entering numbers letters in Intern...

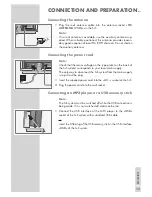
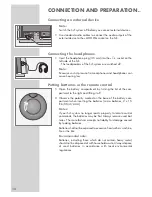
Page 13: ...ponds to your local mains supply The only way to disconnect the hi system from the mains supply is to pull out the plug 1 Insert the supplied power cord into the AC socket on the hi 2 Plug the power c...

Page 14: ...g the lid of the com partment to the right and lifting it o 2 Observe the polarity marked on the base of the battery com partment when inserting the batteries micro batteries 2 x 1 5 R 6 UM 4 AAA Note...

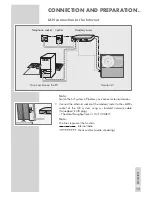
Page 15: ...dem router to the LAN socket of the hi system using a standard network cable Twistedpair RJ45 plug The data throughput level is 10 100 MBIT Note The lines represent the function Internet radio Music a...

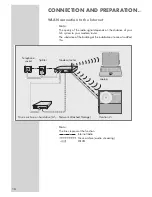
Page 16: ...nce of your hi system to your modem router The substance of the building at the installation site can also a ect this Note The lines represent the function Internet radio Music archive audio streaming...

Page 17: ...with i and selecting Setup with S In the setup menu select Auto Tuning System with S and con rm with 9 Con rm the Start function with 9 The search started and previously stored stations are deleted S...

Page 18: ...h stops when a station is found Manual station search 1 Start the manual station search in radio mode by pressing 8 or 9 brie y The frequency changes in steps of 50 kHz Storing stations as presets You...

Page 19: ...You should execute the system reset function if the Ovation 2i has been connected to another network 1 Press i to open the main menu 2 Select menu item Setup with S or A and con rm with 9 3 Select men...

Page 20: ...ack of the device 2 Call the main menu of the Ovation 2i with i 3 Select menu item Setup with S or A and con rm with 9 4 Select menu item Network Config with S or A and con rm with 9 Display Initializ...

Page 21: ...item Automatic DHCP with S or A and con rm with 9 Display Enable Proxy Note If you do not have a proxy server installed in your network select No If you have a proxy server installed in your network...

Page 22: ...desired input source FM Internet Radio Client USB AUX or CD with A or S and con rm with 9 Adjusting the volume 1 Adjust the volume with Display brie y Volume Min 1 to 39 above Max Muting You can switc...

Page 23: ...value is stored Switching the Ultra Bass System on and o 1 Select the UBS sound setting by pressing and holding down DSC UBS 2 Switch the ultra bass system on and o with 8 or 9 Display UBS ON or UBS...

Page 24: ...o navigate through these selections easily 1 Press i to open the main menu 2 Select the desired menu item with S or A 3 Con rm the selected menu item and thereby the function with 9 4 Switch back up o...

Page 25: ...rn to the station selection and then select the radio station with S or A and confirm with 9 To switch backwards in the menu structure press DISPLAY R and select the desired menu with 8 Searching for...

Page 26: ...the desired menu with 8 Selecting Internet radio stations which the Internet provider has added recently 1 Select menu item New Stations with S or A and con rm with 9 The rst three new radio stations...

Page 27: ...choice 1 Select a radio station see previous chapter and highlight it with P RANDOM 2 Select presets 1 to 9 with the numeric keys 1 to 9 Select presets 10 to 40 by rst entering the tens with the nume...

Page 28: ...To switch backwards in the menu structure press DISPLAY R and select the desired menu with 8 Selecting manually added Internet radio stations You can nd out how you set these radio stations in the ch...

Page 29: ...ve the Ovation 2i must be enabled on the PC or the hard drive The UPnP server must be approved in any rewalls that may be installed Several UPnP servers can be used in parallel 1 Press i to open the m...

Page 30: ...entering the tens with the numeric key 0 and then the units with 1 to 9 Display CH and for example 25 with the frequency and the station name Stereo mono reception If the hi system is receiving a ste...

Page 31: ...automatically updated with this time signal if you have ac tivated this function display CT please also refer to the chapter on setting the time on pages 17 18 Time synchronisation can take several mi...

Page 32: ...tact the customer services of your CD burner or software manufacturer or look for relevant infor mation for example on the Internet When you are making audio CDs observe all legal guidelines and ensur...

Page 33: ...of the current le then the le name and the elapsed playing time of the le Display in CD DA mode the number of the current track and the elapsed playing time of the track 2 Pause playback by pressing...

Page 34: ...ayback of the track starts automatically after a short time Displaying information MP3 only With this function you can call up information on the artist album and track as well as switch to the date a...

Page 35: ...tracks of the CD inserted are repeated when the Repeat All function is selected Playing back tracks in random order 1 Start playback with e II 2 Select the function by pressing P RANDOM Display RND Al...

Page 36: ...line select the desired le with 8 or 9 and save with P RANDOM 3 To store more tracks repeat step 2 Selecting and storing tracks CD DA only 1 Call the function with P RANDOM Display the playlist the a...

Page 37: ...Deleting the playlist 1 Open the front screen of the hi system or In playlist mode press 7 CLR or Select another input source via the main menu CD MODE 37 ENGLISH...

Page 38: ...ease wait After wards the folders of the USB medium are displayed The last line shows the number of the selected folder and the available folders Note In no USB source is connected No Device appears i...

Page 39: ...A or S 3 Press 9 and enter the minutes of the switch on time with A or S 4 Press 9 twice and select the desired alarm tone signal radio station or CD with A or S Notes If you select CD make sure a CD...

Page 40: ...d You can switch o the alarm function over the weekend The entered alarm times are saved 1 With the device switched o press and hold down INTRO REPEAT 2 Press 9 twice and switch o the switch on timer...

Page 41: ...r 9 to 00mins Sleep timer Setting the sleep timer 1 Switch on the hi system with ON OFF and select the desired input source 2 Call the function with SNOOZE NAP SLEEP Display SLEEP and 00mins 3 Set the...

Page 42: ...ating lists of favourites You can copy radio stations which the V Tuner Internet service makes available for GRUNDIG customers into one or more favourites lists This gives you swift access to your fav...

Page 43: ...vourites group Radio stations can only be played back in MP3 or WMA format 3 Enter the name of a new favourites group in the entry eld and con rm with the button or Open the name eld select the desire...

Page 44: ...ate a new favourites group or add the selected radio station to an existing favourites group Radio stations can only be played back in MP3 or WMA format 3 Enter the name of a new favourites group in t...

Page 45: ...ss www grundig radiosetup com The GRUNDIG INTERNET RADIO TUNING SERVICE page is displayed 3 Enter your e mail address and password and con rm 4 Click the My Added Stations line or if radio stations ar...

Page 46: ...and con rm with 9 The cursor is at the rst place of the name 7 Delete the current name by moving the cursor to the last position with 9 and deleting the characters individually with 7 CLR 8 Select the...

Page 47: ...t other information with S You can switch back the the previous information by pressing A You receive information on the name of the device the rmware the hardware etc Device Name Firmware Version Boo...

Page 48: ...rk key with the numeric keys 1 0 The sequence of entries of the numeric key 2 for example is 2 A B C After the input the cursor moves to the next input position Special characters and capital letters...

Page 49: ...he last character the next menu Enable Proxy is dis played Note If you do not have a proxy server installed in your system select menu item No with S or A and con rm with 9 Continue the setting from s...

Page 50: ...ved select menu item No with S or A and con rm with 9 The settings are cancelled 16 After successful registration the menu items Internet Radio and Favorites are displayed access to the Internet has b...

Page 51: ...tp ec europa eu enterprise rtte weblinks htm INFORMATION System Power supply Operating voltage 230 V Mains frequency 50 60 Hz Max power consumption 28 W Power consumption in standby 6 W Ampli er unit...

Page 52: ...s INFORMATION CLASS 1 LASER PRODUCT Problem No sound The hi system does not react when the buttons are pressed The remote control does not work Poor radio reception Tracks on a CD are skipped CD Rs or...

Page 53: ...tting on the same channel change channel settings on the router then repeat the registration proce dure p 20 Indicates a search in the network for the selected radio station When this is displayed nav...

Page 54: ...ct is prohibited without a license from NEMS and BridgeCo or an au thorized subsidiary This product is protected by certain intellectual property rights of Microsoft Corporation Use or distribution of...

Page 55: ...be based on completely dif ferent protocols to communicate with each other In the home area a combination of the router and the DSL modem are used as an Internet gateway Hardware version Hardware in t...

Page 56: ...vel but only limited access to the Internet If such a computer network has a private IP address range it forms an intranet which cannot be ac cessed from the Internet as the Internet routers ignore pr...

Page 57: ...The Wi Fi Alliance is an organisation that has taken on the task of cer tifying products from di erent manufacturers on the basis of the IEEE 802 11 standard and thereby ensuring that di erent wirele...

Page 58: ...Grundig Multimedia B V Atrium Strawinskylaan 3105 NL 1077 ZX Amsterdam http www grundig com 07 32...

Reviews: