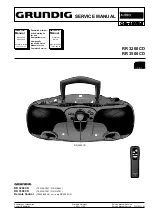
RR 3200 CD / RR 3500 CD
Allgemeiner T
eil / General Section
GRUNDIG
Service
1 - 5
GB
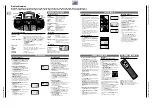
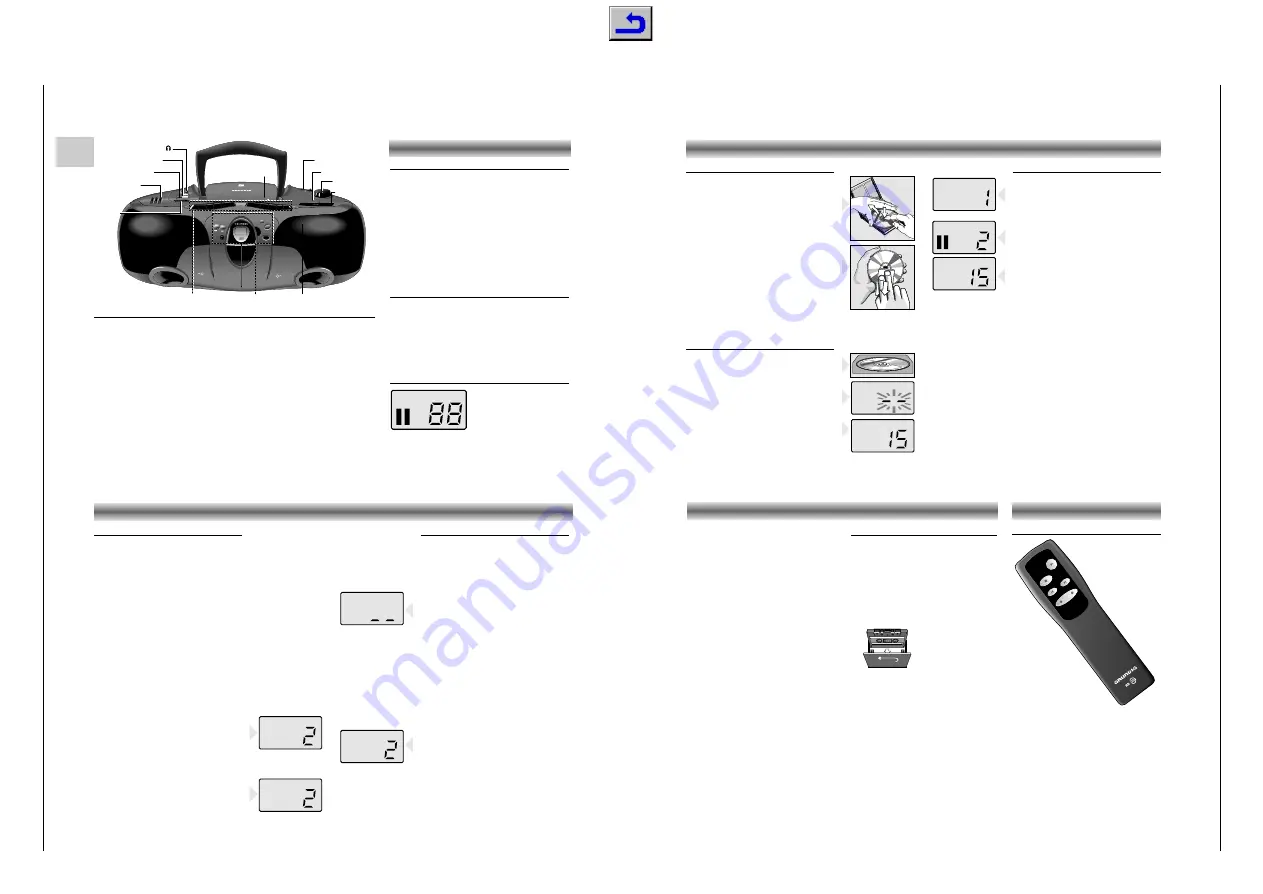
CONTROLS
TOP AND FRONT PANEL
VOLUME
– to adjust the volume.
GRAPHIC EQUALIZER
– three band graphic equalizer to adjust the tone.
FUNCTION
–
CD
: to switch to CD mode/power ON.
–
TAPE
: to switch to TAPE mode/power OFF.
–
RADIO
: to switch to RADIO mode/power ON.
FM MODE / RECORD MODE
– to switch to
FM STEREO
or
FM MONO
mode.
– to switch to the desired dubbing mode:
–
HIGH SPEED DUBBING
–
NORMAL REC
–
MIC. REC
.
p
– connection for headphones (impedance 8-32 ohms).
OPEN/CLOSE
– to open the CD door.
BAND
– to select between FM, MW, and LW waveband.
FM STEREO
6
– lights up when receiving FM stereo stations.
TUNING
– to tune to a radio station.
DIAL SCALE
BUILT-IN MIC
– microphone under the speaker grill.
CASSETTE CONTROL
Controls deck A
PAUSE
;
– to interrupt playback.
STOP/EJECT
9
/
/
– to stop and eject the cassette.
F.FWD
5
– fast forward.
REW
6
– fast rewind.
PLAY
1
– to start cassette playback.
Controls deck B
PAUSE
;
– to interrupt playback/recording.
STOP/EJECT
9
/
/
– to stop and eject the cassette.
F.FWD
5
– fast forward.
REW
6
– fast rewind.
PLAY
1
– to start cassette playback.
REC/CD SYNCHRO
– to start recording.
CD CONTROL
PLAY/PAUSE
2;
– to start and interrupt playback.
STOP
9
– to stop playback.
REPEAT
– to repeat one/all tracks.
PREVIOUS
∞
/ NEXT
§
– to skip and search
backward/forward.
PROG.
– to program track numbers in the
memory.
CD DISPLAY
Track number
: PLAY
;
: PAUSE
PGM
: programming
REP 1
: repeat one
REP
: repeat all
ER
: error
PGM
REP 1
,,,,,,
,,,,,,,,,,,,,,,,,,
,,,,,,,,,,,,,,,,,,,,,,,,,
,,,,,,,,,,,,,,,,,,,,,,,,,
,,,,,,,,,,,,,,,,,,,,,,,,,
,,,,,,,,,,,,,,,,,,,,,,,,,
,,,,,,,,,,,,,,,,,,,,,,,,,
,,,,,,,,,,,,,,,,,,,,,,,,,
,,,,,,,,,,,,,,,,,,,,,,,,,
,,,,,,,,,,,,,,,,,,,,,,,,,
,,,,,,,,,,,,,,,,,,,,,,,,,
,,,,,,,,,,,,,,,,,,,,,,,,,
,,,,,,,,,,,,,,,,,,,,,,,,,
,,,,,,,,,,,,,,,,,,,,,,,,,
,,,,,,,,,,,,,,,,,,,,,,,,,
,,,,,,,,,,,,,,,,,,,,,,,
,,,,,,,,,,,
,,,,,,,,,,,,,,,
,,,,,,,,,,,,,,,,,,,,,,,,,,,
,,,,,,,,,,,,,,,,,,,,,,,,,,,,,
,,,,,,,,,,,,,,,,,,,,,,,,,,,,,
,,,,,,,,,,,,,,,,,,,,,,,,,,,,,
,,,,,,,,,,,,,,,,,,,,,,,,,,,,,
,,,,,,,,,,,,,,,,,,,,,,,,,,,,,
,,,,,,,,,,,,,,,,,,,,,,,,,,,,,
,,,,,,,,,,,,,,,,,,,,,,,,,,,,,
,,,,,,,,,,,,,,,,,,,,,,,,,,,,,
,,,,,,,,,,,,,,,,,,,,,,,,,,,,,
,,,,,,,,,,,,,,,,,,,,,,,,,,,,,
,,,,,,,,,,,,,,,,,,,,,,,,,,,,
,,,,,,,,,,,,,,,,,,,,,,,,,,,,
,,,,,,,,,,,,,,,,,,,,
,,,,,,,,
PREVIOUS
NEXT
REMOTE SENSOR
PLAY PAUSE
STOP
PROG
B
RECORD PLA
Y
FM
MW
LW
FM
STEREO
TUNING
REPEAT
A
PLAY
HI SPEED
DUBBING
FM MONO
FM STEREO
POWER
VOLUME
CD TAPE RADIO
GRAPHIC EQUALIZER
FM 91 94 96 100 104 106
108 MHz
LW
15
17
21
23
26 29
kHz
RR 3200
CD RADIO CASSETTE RECORDER WI
TH C
D
C D S Y N C
H R O STA RT R ECORDING
OPEN
CLOSE
GRAPHIC
EQUALIZER
VOLUME
FUNCTION
FM/RECORD MODE
CASSETTE CONTROL
TUNING
OPEN/
CLOSE
BAND
CD CONTROL
BUILT IN MIC
DIAL SCALE
FM STEREO
6
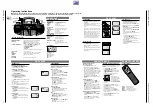
PLAYING A CD
Selecting another track during play
• Press
PREVIOUS
∞
or
NEXT
§
until the
required track number appears in the display.
– The selected track begins to play.
Starting with a particular track
• Press
PREVIOUS
∞
or
NEXT
§
until the
required track number appears in the display.
• Press
PLAY/PAUSE
2;
.
– Play starts from the selected track.
Searching for a passage during play
• Hold
PREVIOUS
∞
down to search
backwards to the beginning.
• Hold
NEXT
§
down to search forwards to the
end.
The searching speed is determined by how long
a key is pressed:
– the first two seconds fairly slowly, with sound;
– then at maximum speed, with no sound.
Repeating a track
• Press
REPEAT
before or during play.
–
REP 1
lights up; the track will now be repeated
continuously.
• Press
REPEAT
twice to stop the track being
repeated.
Repeating the CD
• Press
REPEAT
twice before or during play.
–
REP
lights up; the CD will now be repeated
continuously.
• Press
REPEAT
again to stop the CD being
repeated.
CD PLAYER
REP
REP 1
PGM
PGM
PROGRAMMING
By programming the player you can play up to
20 tracks in any desired order. If you exceed the
maximum of 20 tracks, the program function will
start again from the beginning.
Storing a program
• In STOP mode, press
PROG.
.
The display will show
PGM
and
__
.
• Select the first desired track using
PREVIOUS
∞
or
NEXT
§
.
• Store this track by pressing
PROG.
again.
• Select and store in this way all desired titles.
Checking the program
• In STOP mode, press
PROG.
repeatedly.
– The display shows in sequence all
programmed track numbers.
– Then,
PGM
__
appears again.
• Press
PROG.
one more time.
– The display will show the first track of the
program again.
Playing a program
• Press
PLAY/PAUSE
2;
.
– Play starts with the first track of the program.
– After the last track playback stops.
– The display shows the first track of the
program.
Note:
• Press
STOP
9
to stop playback.
• While playing a program, it is possible to use
PREVIOUS
∞
or
NEXT
§
to select the
desired programmed tracks.
Erasing a program
• Press
STOP
9
twice or press
OPEN/CLOSE
straight away.
– The program has now been erased.
CD HANDLING
• Use only Digital Audio CDs which have the
symbol
+
.
• To take the CD out of its box easily, press the
centre spindle while lifting the CD.
• Never write on a CD or attach any sticker to
the CD.
• Always hold the CD at the edge and always
store it in its box after use with the label facing
up.
• To remove dust and dirt, breathe on the CD
and wipe it with a soft, lint-free cloth in a
straight line from the center towards the edge.
Cleaning agents may damage the CD.
• Do not expose the CD to rain, moisture, sand,
or to excessive heat. (E.g. from heating
equipment or in motor cars parked in the sun.)
CD PLAYER
PLAYING A CD
• Press
PLAY/PAUSE
2;
to start playback.
– The display shows the track number.
• Adjust the sound using the
VOLUME
control.
• Set the tone color with the 3-band
GRAPHIC
EQUALIZER
.
• For brief interruptions, press
PLAY/PAUSE
2;
.
–
;
is shown on the display.
• To resume playback, press
PLAY/PAUSE
2;
again.
• To stop playback, press
STOP
9
.
– The total number of tracks will then appear on
the display.
– The CD player also goes to position STOP:
– by pressing
OPEN/CLOSE
;
– when the end of the CD is reached;
– if the batteries run down or if the power sup-
ply is interrupted.
• To take out the CD, open the CD door by
pressing
OPEN/CLOSE
.
• Open the CD door only if the CD-player is in
position STOP.
INSERTING A CD
• Set the
FUNCTION
switch to
CD
.
• Press
OPEN/CLOSE
to open the CD door.
• Insert the AUDIO CD, printed side facing up.
• Close the cover.
– The CD-player scans the contents list of the CD
After that, the total number of tracks appears
on the display.
6. OYE
MI CA
NTO (H
ear My
Voic
e)
7. DON
'T WA
NNA L
OSE Y
OU
8. GET
ON YO
UR FE
ET
9. YOU
R LOV
E IS B
ED FO
R ME
10. CU
TS BO
TH W
AYS
11. OY
E MI C
ANTO
(Span
ish Ve
rsion)
12. S
I VOY A
PERD
ERTE
EPC 46
5145 2
BIEM/STEMRA
STERE
O
All rig
hts
o
f th
e p
ro
du
ce
r a
nd
o
f th
e o
wn
er o
f th
e re
co
rd
ed
w
ork
re
se
rv
ed
. U
na
uth
oris
ed
c
op
yin
g,
pu
blic
p
erfo
rm
an
ce
, b
ro
ad
ca
stin
g, h
irin
g o
r re
nta
l o
f th
is re
co
rd
in
g p
ro
hib
ite
d. M
ad
e in
A
us
tria
1. AY,
AY, I
2. HER
E WE A
RE
3. SAY
4. THIN
K ABO
UT YO
U NOW
5. NOT
HIN' N
EW
C O M
P A C T
D IGIT
A L AU
D IO
1
2
OIOIOI OI OIOIO
I OIOIOIOI
OIOI OIOIOIOI O
IOI
OIOIOO OIOI
OIOI OIOIO OIO
I
OIOIOIOOIO OIO
I OI
Recording from the CD-player
(CD synchro recording)
• Set the
FUNCTION
switch to
CD
.
• It’s not necessary to start the CD player se-
parately: by pressing
REC./CD SYNCHRO
the
CD player starts automatically.
– If the CD player is in STOP position, recording
will start from the beginning of the CD (or from
the beginning of the programmed selection).
• To start a recording in the middle of a track,
play the CD in the normal way.
• Start recording by pressing
REC./CD
SYNCHRO
as soon as the desired passage is
reached.
Recording from the radio
• Set the
FUNCTION
selector to
RADIO
.
• Select the wave band using the
BAND
switch.
• Tune to desired radio station using the
TUNING
control knob.
• In case of FM radio recordings, set the
FM
MODE
switch to the desired position.
• If during the recording of an MW/LW station,
a whistling sound is heard, this sound can be
suppressed by setting the
BEAT CANCEL
switch
to another position.
Mono recording from the built-in microphone
• Set the
FUNCTION
switch to
TAPE
• Set the
RECORD MODE
switch to
MIC. REC
position.
• Set the
VOLUME
control to the minimum
volume level (during microphone recording ,
monitoring is not possible).
CASSETTE DECK
DUBBING - Copying from deck A to B
When dubbing it is recommended to use fresh
batteries or to connect the set to the AC power
supply.
• Set the
FUNCTION
switch to
TAPE
• Set the
RECORD MODE
switch to:
–
NORMAL REC
: for normal speed copying;
–
HIGH SPEED DUBBING
: for high speed
copying.
Do not use this switch during dubbing.
• Press both
STOP/EJECT
9
/
/
buttons and insert a
recorded cassette into
deck A and a cassette
which is suited for
recording into deck B.
• Press
PAUSE
;
followed by
REC./CD SYNCHRO
on deck B.
• To start dubbing, press
PLAY
1
on deck A.
• Press
PAUSE
;
on deck B if you wish to omit
undesired passages.
– Playback of deck A continues.
• Press
PAUSE
;
again to restart dubbing.
• If, during dubbing, you press
PAUSE
;
on
deck A, a blank part will be recorded on the
cassette in deck B.
• Press both
STOP/EJECT
9
/
/
buttons if you
wish to stop dubbing.
– The set is then switched off.
Operating Instructions
Note: This chapter contains excerpts from the operating instructions. For further particulars please refer to the
appropriate user instructions the part number of which is indicated in the relevant spare parts list.
REMOTE CONTROL
(only RR 3500 CD)
PLAY
2
– to start CD playback
STOP
9
– to stop CD playback
NEXT
™
– to select the next CD track
PREV
¡
– to select the previous CD track
VOLUME –/+
– to adjust the volume
STOP
PREV.
NEXT
PLAY
VOLUME

