background image

ENGLISH

19

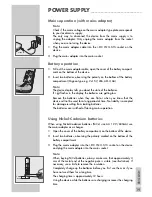
Mains operation (with mains adapter)

Note: 

Check if the mains voltage on the mains adapter type plate corresponds
to your local mains supply.
The only way to disconnect the device from the mains supply is to
unplug the adapter. Only unplug the mains adapter from the socket
when you are not using the device.

1

Plug the mains adapter cable into the »

DC IN 4.5V

« socket on the

device.

2

Plug the mains adapter into the mains socket.

Battery operation

1

Pull out the mains adapter cable, open the cover of the battery compart-
ment on the bottom of the device.

2

Insert two batteries, observing the polarity on the bottom of the battery
compartment (Mignon type, e.g. 2x1.5V, LR6, AM3; AA).

Note: 

The device display tells you about the state of the batteries.
If »

i

« flashes in the display, the batteries are getting low.

Remove the batteries when they are flat or when you know that the
device will not be used for a long period of time. No liability is accepted
for damage resulting from leaking batteries.
The batteries are switched off during mains operation.

Using Nickel-Cadmium batteries

When using Nickel-Cadmium batteries (NiCd, size AA 1.2 V/600mA) use
the mains adapter as a charger.

1

Open the cover of the battery compartment on the bottom of the device.

2

Insert two batteries, observing the polarity marked on the bottom of the
battery compartment.

3

Plug the mains adapter into the »

DC IN 4.5V

« socket on the device

and plug the mains adapter into the mains socket.

Note: 

When buying NiCd batteries, always make sure that approximately 3
mm of the metal end at the negative pole is visible (see illustration). If
necessary, use a knife to remove the insulation.
Completely charge up the batteries before you first use them or if you
have not used them for a long time.
The charging time is approximately 12 hours.
Using the device while the batteries are charging increases the charging
time.

POWER SUPPLY

___________________________________

DC IN 4.5V

3 mm

min

Summary of Contents for SQUIXX CDP 4200 AS 45

Page 1: ...PORTABLE CD PLAYER Squixx CDP 4200 AS45...

Page 2: ...onctions suppl mentaires 28 Vue d ensemble 34 Programme musical 30 Alimentation en courants 35 Informations 31 Pr paratifs 114 Service 37 Particolarit 43 Funzioni di base 38 Sicurezza 44 Funzioni supp...

Page 3: ...gned for outdoor sports The anti shock system ensures uninterrupted music playback even during sporting activities and under extreme conditions To do this the anti shock system is equipped with A sign...

Page 4: ...revent dust from collecting on the lens Never open the device casing The manufacturer accepts no liability for damage resulting from improper handling Maintenance If the device is unable to scan CDs p...

Page 5: ...ular passage PLAY PAUSE II Switches the device on and starts CD playback Switches to pause 5 a a a R SKIP Press briefly to select the previous track Hold down to search for a particular passage PROG C...

Page 6: ...buttons The display t1 Repeating a single track tALL Repeating all tracks on the CD HOLD The buttons are disabled i Flashing means the batteries are becoming low PROG Creating or playing a track memor...

Page 7: ...e device will not be used for a long period of time No liability is accepted for damage resulting from leaking batteries The batteries are switched off during mains operation Using Nickel Cadmium batt...

Page 8: ...12 cm CDs it can also play 8 cm CDs without an adapter Do not attach adhesive labels to CDs Keep the surfaces of CDs clean When burning audio files onto CD Rs various problems may arise which may lead...

Page 9: ...at track Playback begins with the first track 2 To pause playback press PLAY PAUSE II The track playing time flashes Press PLAY PAUSE II to resume playback 3 Press STOP to end playback Note Playback s...

Page 10: ...ess MODE four times during playback Display RAND flashes 2 Press PLAY PAUSE II to start the function Display RAND and the titles on the CD are played back in random order 3 Press STOP to quit the func...

Page 11: ...PROG to save the track Display for example 00 02 Note Repeat steps 3 and 4 to save more tracks If you try to store more than 20 tracks the first track you saved is dis played Playing back the track me...

Page 12: ...er is designed in such a way as to ensure that the maximum permissible emission value cannot be exceeded under any circumstances If operating devices or methods other than those specified here are emp...

Page 13: ...ted The batteries are flat The HOLD switch is in the ON position The mains adapter is not prop erly connected The CD compartment is not properly closed Moisture has collected on the lens The CD has no...

Page 14: ...90471 N rnberg 49 9 11 7 03 0 GRUNDIG SCHWEIZ AG Steinacker Stra e 28 CH 8302 Kloten 41 1 8 15 81 11 GRUNDIG PORTUGUESA Com rcio de Artigos Electr nicos Lda Rua Bento de Jesus Cara a 17 P 1495 Cruz Q...

Page 15: ...Grundig AG Beuthener Str 41 D 90471 N rnberg http www grundig com 72011 402 2000...

Reviews: