background image

ENGLISH

SET-UP­AND­SAFETY

­-----------------------------------------------------------------------------------

Please note the following information when set-

ting up your television set.

7  

This television set is designed to receive and 

display  video  and  audio  signals.  Any  other 

use is strictly prohibited.

7  

Best viewing distance is 5 times the diagonal 

length of the screen.

7  

External light falling on the screen impairs pic-

ture quality.

7  

To assure sufficient ventilation make sure there 

is enough space around the television set in 

the wall unit.

7  

The  television  set  is  designed  for  use  in  in-

doors.  If  you  do  use  it  at  outdoors,  please 

ensure that it is protected from humid environ-

ments such as rain or splashing water as these 

will create risk of safety.

7  

Never use the television set in humid environ-

ments.

7  

Do not put objects containing liquid such as 

vase on the television set. The liquid in it may 

spill and cause risk of safety.

7  

Place the television set on a solid, level sur-

face.

7  

Do not place objects such as newspapers on 

the television set or cloth or similar items be-

neath it. 

7  

Do not place the television set close to heating 

units or under direct sunlight, as this will impair 

cooling. 

7  

Higher ambient temperature will shorten the 

service life of the television set.

7  

Do not open the television set under any cir-

cumstances. Safety risk may arise and also the 

guarantee of the product can be void if the 

television set is opened.

7  

Make sure that the power cord or the AC/DC 

adaptor (if supplied) is not damaged.

7  

Television set can only be operated with the 

power cable or the AC/DC adapter supplied 

with the product.

7  

If the mains plug of the television is grounded, 

always  make  sure  that  it  is  connected  to  a 

grounded socket.

7  

Plug the device into the mains socket only after 

you have connected the external devices and 

the antenna.

7  

Make sure that the mains plug/socket of the 

television is comfortably accessible.

7  

Do  not  connect  any  other  equipment  while 

the device is switched on. Switch off the other 

equipment as well before connecting it.

7  

Thunderstorms are a danger to all electrical 

devices. Even if the television is switched off, 

it can be damaged by a lightning strike to the 

mains or the antenna cable. Always discon-

nect  the  mains  and  antenna  plugs  during  a 

storm.

7  

Clean the television screen and cabinet with 

a soft and dry or slightly damp cloth. Do not 

use wet cloth or detergent (glass cleaners, co-

logne and all cleaning agents alike). Only use 

plain water to dampen the cloth.

7  

When deciding where to install the television 

set, do not forget that most furniture surfaces 

are coated with various types of lacquer or 

plastic  which  contain  chemical  additives. 

These may cause corrosion to the feet of the 

television, thus resulting in stains on the surface 

of the furniture.

7  

Screen of your LCD/LED television conforms 

to the highest qaulity standards and has been 

controlled with regard to pixel faults.


Despite the great care taken in manufacturing, 

technological reasons make it impossible to 

completely discount the possibility that some 

pixels may be faulty. Provided they are within 

the  thresholds  specified  by  the  DIN  norm, 

pixel faults of this kind cannot be regarded as 

a defect as defined by the warranty.

Summary of Contents for Toronto 55 CLE 6545 AL

Page 1: ...EN Toronto 55 CLE 6545 AL ...

Page 2: ...dden network 40 SMART Inter ctive TV 3 0 FEATURE 40 SMART Inter ctive TV 3 0 internet ap plications 41 Creating a Grundig Application Store account 42 Logging in with Grundig Application Store account 43 Grundig Application Store 47 Playing the video music and image files with home network connection 47 Selecting the digital media server 48 Playback 48 Other playback options 49 USB RECORDING 49 In...

Page 3: ...80 OPERATION WITH COMMON IN TERFACE 80 What is common interface 80 Inserting the CA module 80 Access control for CA module and smart cards 81 SPECIAL SETTINGS 81 Searching for all digital television chan nels from a satellite automatically 82 Searching for digital television channels from a satellite manually 82 LNB Settings 83 Motor antenna setup DiSEqC 1 2 84 Searching for television channels fr...

Page 4: ...rated with the power cable or the AC DC adapter supplied with the product 7 If the mains plug of the television is grounded always make sure that it is connected to a grounded socket 7 Plug the device into the mains socket only after you have connected the external devices and the antenna 7 Make sure that the mains plug socket of the television is comfortably accessible 7 Do not connect any other ...

Page 5: ...n 7 If you want to use a wall bracket for your television make sure you read the assembly instructions for the wall bracket carefully or have your specialist dealer mount it for you 7 When buying the wall bracket make sure that all the fastening points needed on the television are there on the wall bracket and that they are all used when it is mounted 7 If wall hanger is not going to be used use y...

Page 6: ...rogramme with the remote control in a fast and simple way Programme is recorded to the external data medium 7 You can record any digital TV channel you have chosen if no limitation has been im posed by the broadcaster TV channel is transformed by your television and saved to a USB external data medium GENERAL INFORMATION You can recall and play saved programs from the archive While a recording is ...

Page 7: ...herefore you are recommended to watch your TV in the lowest brightness and contrast levels 7 Devices that contain and serve video music or image files are called Server This tele vision receives video music and image files from the server through home net work allowing you to access and play such media even when your television is located in a different room then the server A DLNA compatible devic...

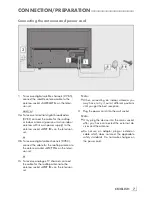
Page 8: ...channels DVB C connect the cable for the rooftop antenna to the antenna socket ANT IN on the televi sion set or 2c To receive analogue TV channels connect the cable for the rooftop antenna to the antenna socket ANT IN on the television set Note 7 When connecting an indoor antenna you may have to try it out at different positions until you get the best reception 3 Plug the power cord into the wall ...

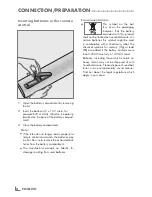
Page 9: ...manufacturer accepts no liability for damage resulting from used batteries Environmental note 7 This symbol on the bat tery or on the packaging indicates that the battery provided with this product shall not be treated as household waste On certain batteries this symbol might be used in combination with a chemical symbol The chemical symbols for mercury Hg or lead Pb are added if the battery conta...

Page 10: ...3 5 mm jack External audio output with headphone RCA converter PC Audio IN Audio signal input for PC Audio signal input YUV signal PC IN VGA socket video signal input for PC Video signal input YUV signal AV1 S VHS Euro AV socket CVBS sig nal RGB signal video sig nal input for S Video camera with Scart S VHS converter ANT IN Antenna socket SATELLITE Satellite antenna socket HDMI4 ARC HDMI socket au...

Page 11: ...sired menu item Set to Volume Navigation Set to Channel Navigation Open Input Source Menu Go to Standby Access function setting by pressing Moving the switch up down selects the func tion setting HDMI3 HDMI socket audio video signal input HDMI LAN Network cable connection socket HDMI2 HDMI socket audio video signal input HDMI HDMI1 HDMI socket audio video signal input HDMI USB2 HDD USB Harddisk so...

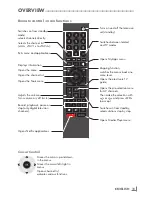
Page 12: ...on off mute Zapping function switches the menus back one menu level Opens the menu Opens the Tools menu Switches between teletext and TV modes Opens MyApps menu Switches on from standby selects stations step by step Adjusts the volume Displays information Exits menu and applications Opens the channel list Opens the electronic TV guide Switches on from standby mode selects channels directly Selects...

Page 13: ... Show answers in teletext mode starts the forward picture search in the file browser Starts recording in digital TV op eration recording only via external data media 8 Starts playback in the file browser Starts playback in the DLNA menu Time shift during live signal in digital TV operation only via external data media Pauses the file executed on the DLNA menu 7 Selects the split screen function in...

Page 14: ...d manually There are various options when using WLAN Automatic connection all data regarding connection settings IP Ad dress Netmask Gateway and DNS are obtained from modem automatically Depending on the router you can use the fol lowing options Option WPS PBC Push Button Configura tion Connecting with a WPS PIN Connecting by entering the network pass word Manual connection all data regarding conn...

Page 15: ... WPS chapter page 35 Auto page 15 step 8 Manually chapter page 33 Auto page 16 step 13 Manually Chapter page 37 Button Chapter page 35 PIN Chapter page 35 Channel Editor page 18 Setting TV channels page 16 step 22 DVB T page 17 step 31 DVB C page 17 step 26 DVB S page 16 step 22 Auto page 17 step 26 Manually chapter page 85 Auto page 16 step 22 Manually chapter page 82 Auto page 17 step 31 Manuall...

Page 16: ... to confirm Home Mode contains preconfigured TV settings that provide energy savings conforming EUP SETTINGS Enhanced if you will use the television for a demo presentation increased image and volume settings are used in this mode Increased mode consumes more energy 7 Press OK to confirm Next Network Settings is displayed Note 7 If you want to connect your television to the home network continue a...

Page 17: ...e displayed 20 Press green to check the performed settings and also if the local network and internet connection has been established Testing Please wait message will be displayed and if the connection is established Connection To Gateway Success Internet Connection Success messages will be displayed 21 To switch to Source Setup menu press blue Note 7 Continue searching for TV channels with point ...

Page 18: ...earching The Automatic Channel Search menu appears and the search for TV channels begins The scan is complete as soon as the Search is completed appears 30 Select the Channel Editor with red Tuning terrestrial digital television channels DVB T 31 Select the option Air with or and press OK to confirm Important 7 The antenna power supply 5V may only be switched on if the antenna is an active indoor ...

Page 19: ...ning the Programme Table 1 Open the menu with MENU 2 Activate the Settings menu with OK 3 Select the option Source Setup with or and press OK to confirm 4 Select the line Channel Editor with V or Λ and press OK to confirm Channel Editor menu is displayed Important 7 Programme table and favourite lists are stored separately for all sources satellite cable and air 7 Programme table of the current so...

Page 20: ...firm 4 To confirm deletion process press green or to cancel deletion process press red button 5 To exit the Channel Editor menu press EXIT Moving the channels in the chan nel organizer to different channel positions 1 In the Channel Editor menu select the channel s you want to move with V Λ or and highlight the televi sion channel by pressing OK Channel is marked with 2 Press yellow Tools menu is ...

Page 21: ... in more than one favourites list Each favourite list can contain maximum 255 channels SETTINGS Notes 7 You can delete channels from the favourites list Press yellow select the favorites list the channel is in with V or Λ and press OK to confirm Select the channel s you want to delete with V Λ or and highlight the channel by pressing OK Press yellow and select the line Re move from Fav with V Λ an...

Page 22: ...end the setting Renaming AV channels You can rename AV channels according to the device you have connected For example for a PC which you have connected to HDMI1 source of TV with HDMI cable you can name the source as PC 1 Open Input Source menu with 2 Select the AV source you will rename with or and press blue Rename menu is displayed 3 Press OK and delete the old name step by step with red 4 Sel...

Page 23: ...amic back lighting is switched to OFF This setting also directly impacts power consumption Dynamic Backlight Here the device opti mally adjusts the back lighting for the picture content by regulating the back lighting de pending on the average picture brightness If a picture has predominately dark areas then the black level displayed is improved by downward adjustment of the back lighting in this ...

Page 24: ...f intermediate pictures and is only avail able for devices from 32 It is displayed with a PPR of 400 Picture Perfection Rate If the adjustment value is too high this may result in ghosting with poor transmission due to the incorrect computation of the intermedi ate pictures 7 Nois Reduction Reduces the visible snow by displaying the picture a little less sharply and creating a slight blurring Shou...

Page 25: ...sound fluctuations and vol ume increases 1 Select the line Night Mode with V or Λ 2 Activate On or deactivate the night mode by pressing or Note 7 Night Mode appears in menu if SRS has been selected in Sound Mode Note 7 Other settings are available under Ad vanced Select the line Advanced with V or Λ and press OK to confirm Stereo dual channel If the device receives two channel programmes e g a fi...

Page 26: ... 2 Select the line AVL with V or Λ and then select On with or Note 7 AVL item is active in the menu when Sound Mode is selected as User or Standard Mode Restore default settings 1 Select the line Enhanced by pressing V or Λ and press to confirm 2 Select the line Sound standard settings by pressing V or Λ and press to confirm 3 Press green to confirm the security query or press red to cancel the fu...

Page 27: ... To save energy you can turn off the screen in Radio mode see CONVENIENCE FUNCTIONS on page 66 Selecting stations from lists You can select stations from various lists e g ALL FAV1 FAV4 1 Press FAV to recall the favorite list menu Select Favorite menu is displayed 2 Select the channel list with or and open it with OK 3 Select the channel with or and press OK to confirm 4 Press EXIT to exit the cha...

Page 28: ...2 Select the language with V or Λ and press OK to confirm 3 Press EXIT to end the settings TELEVISION OPERATION Zoom function With this function you can enlarge the picture on the television 1 Open the Tools menu with TOOLS 2 Select the line Zoom with V or Λ 3 Select zoom setting with or and confirm with OK Image is enlarged as center focused 4 To navigate in the enlarged picture press red and mov...

Page 29: ... pictures fragments etc Log on to the RoviGuide If you use the Electronic TV guide for the first time you must log on 1 Press GUIDE to start Electronic TV guide Terms and Conditions is displayed 2 With V display Terms and Conditions select the push button I Agree and press OK to confirm 3 Enter the postal code with 1 0 4 Confirm the log on with OK The Electronic TV guide in Offline mode In the off...

Page 30: ...in Online mode Search and Suggestions options comes in the electronic programme guide in the online mode as different from the offline mode A lot of content can be received via the Internet with these options such as programme information channel logos information about actors pic tures fragments etc only for digital channels 1 Press GUIDE to start Electronic TV guide Electronic TV guide is displa...

Page 31: ...mpletely and with the correct geom etry 4 3 format The picture is shown in 4 3 format LetterBox format The letterbox setting is especially suitable for programmes in 16 9 The black borders which are usually at the top and bottom of the screen are eliminated 4 3 pic tures fill the screen The transmitted pictures are enlarged but are slightly cropped at the top and bottom The pic ture geometry remai...

Page 32: ...plications weather forecast applications and some specific applications Network connection You can establish a wired or wireless connection between your television and the local network If you want to use a wired network connection please start with the instructions here If you use a wireless network connection please follow the instructions in the Wireless network connection section on page 34 No...

Page 33: ...onfiguration menu is dis played Network Configuration Timer Applications TV Settings Back Exit Connect Test Connection Change Area Change Connection Type Wired Network Configuration Auto Advanced OK 4 Select the line Change Connection Type V or Λ and press OK to confirm 5 Select the option Wired with or and press OK to confirm NETWORK SETUP 6 Select the line Network Configuration with V or Λ and u...

Page 34: ...figuration Timer Applications TV Settings Back Exit Connect Test Connection Change Area Change Connection Type Wired Network Configuration Manual IP Address 192 168 000 164 DNS 192 168 000 001 Netmask 255 255 254 000 Gateway 192 168 000 001 8 Select the line IP Address with V Enter IP address with 1 0 9 Select the line DNS with V Enter IP address with 1 0 10 Select the line Netmask with V Enter Ne...

Page 35: ...A application on a wireless local network and in a SMART Inter ctive TV 3 0 application on a network with inter net connection depends on the number of users on the network as it is the case in every wireless network 7 It is recommended to switch off the equip ment that are not in use in home network in order to avoid unnecessary network traffic 7 Placing the modem or wireless network shar er on a...

Page 36: ...n AUTO Advanced 8 With red select Connect to establish modem connection Push the WPS button on your Access Point message is displayed 9 Press the WPS button on the router 10 To continue after pressing the WPS button on the access point press green The Connection to Gateway Success message will be displayed 11 Press green to make sure that the network connection is established with the current sett...

Page 37: ... 13 Press EXIT to end the setting Connecting automatically by enter ing the network password Use this method for establishing a connection if your router does not support WPS PBC or WPS PIN entry 1 Open the menu with MENU 2 Activate the menu item Settings with OK 3 Select the menu item Network Configura tion with or and press OK to confirm Network configuration menu is dis played Network Configura...

Page 38: ...ic IP address you must enter the IP Address Netmask Gate way and DNS values manually You can get IP Address Netmask Gateway and DNS values IPS from your Internet Service Provider 1 Open the menu with MENU 2 Activate the menu item Settings with OK 3 Select the menu item Network Configura tion with or and press OK to confirm Network configuration menu is dis played 4 Select the line Change Connectio...

Page 39: ...ine Select Access Point with Λ or V and press OK to confirm Select Access Point menu is displayed by scanning available wireless networks 14 Select the network that you want to connect with V Λ or and confirm with OK Wireless connection password screen is displayed Note 7 For device to discover the wireless modem on the network the network name should support ASCII characters 15 Select the require...

Page 40: ...lect to delete the character entered and press OK to confirm 8 Confirm the SSID by pressing green 9 Select the line Security Type with V or Λ and select the required option WEP WPA or WPA2 with or Note 7 If the WPA option is selected the security protocol AES or TKIP must be selected on the line Encryption This depends on the settings on the router 10 Confirm the setting with red The network is no...

Page 41: ... or entirely remove those applications with their own decision Grundig cannot be held re sponsible for such changes 7 Grundig reserves the right to make all chang es such as modifications restrictions exten sions transfers and removals on internet applications provided through your SMART Inter ctive TV 3 0 7 In Login process of some applications it may be required to connect to the web page of the...

Page 42: ...ore account You must register to access all applications in Grundig Application Store 1 Press to open MyApps menu Grundig Smart App registry screen is displayed 2 Press V Λ or and select REGISTER to start registration and press OK 3 Enter your Name Surname Phone optional Place of Birth and Gender Select the letters for the information with V Λ or and confirm with OK After you ve entered the data u...

Page 43: ... V to select Enter and press OK Enter to display Application Synchronization 5 Use V Λ and to select the applications that you want to synchronize and confirm with OK Use V Λ and to select Synchronize and confirm with OK 6 After the downloading is completed press OK Grundig My Apps menu will be displayed Selecting internet applications 1 Press to open MyApps menu My Apps menu will be displayed Cat...

Page 44: ...net applications 1 Select the desired category in Grundig Online Applications with V or Λ and press to pass to application field or select the application you want with criterion Most Popular Highest Rated Release Date or if you want to select the application by searching directed select the push button Search with V Λ and confirm with OK and select the search criterion with the Virtual keyboard 2...

Page 45: ...elect categories with or 2 Select the application you want to rate in My apps menu with V Λ or 3 Actiade the tools menu by pressing blue select the option Rate with or and press OK to confirm 4 Press Λ once and select the rating with or To save application rating select Rate with V and press OK to confirm 5 Press OK to finish the process Adding Internet applications to favorites You can add freque...

Page 46: ...pplications do not support all play ing options and playing options may vary among different applications 1 8 starts playing in the applications 2 pauses playing in the applications 3 7 stops playing in the applications 4 In the applications press 3 or 4 to start picture search 5 In the applications press 5 or 6 to skip forward backward Categories Tools Exit Online Store My apps 1 2 3 4 5 6 6 V Λ ...

Page 47: ... 2 Select the menu item Web Browser with or and press OK to confirm Web Browser is displayed 3 Select URL entry area with Λ or V and press OK to confirm Virtual keyboard will be displayed 4 Enter the address and confirm with blue Notes 7 Cookies are turned on in the web browser as default thismeansthatthewebpagesthatare visited will store some data on your device If you don t want to store any dat...

Page 48: ...uaranteed that it will run in full compatibil ity with software without a DMS certificate 7 Perform the following steps for a sample DMS setup Open Windows Media Player11 on a PC with Windows operating system installed In Library tab select Media Sharing tick on the Share my media box on the window that appears and then select OK The new window displays the IP numbers of connect ed devices To enab...

Page 49: ...cate AAC_ADTS_320 LPCM MP3 WMABASE and WMAFULL 7 Image files played through DMS device sup port following formats that have obtained DLNA certificate JPEG_LRG JPEG_ MED and JPEG_SM MULTIMEDIA SERVER MODE Playback 1 Select the content folder on DMS device with V Λ or and press OK All titles are displayed to confirm 2 Select the desired title with V Λ or 3 Press 8 to start playback Other playback op...

Page 50: ... DTV by PRnP player Some recorded files may not play correctly on USB Media Player Possible limitations when using an external data medium Depending on the broadcasting station you may experience various restrictions on some functions from some television stations GRUNDIG has no influence on these restrictions 7 Recording a programme on the external data medium can be disabled by the broad caster ...

Page 51: ...the USB2 HDD USB interface of the television 7 If you are using a power cable for the ex ternal hard disk that you have connected to the USB2 HDD USB interface then the power cable of the external hard disk must also be unplugged when the TV is turned off 7 You must not disconnect the USB Device from the TV while a file on the USB Device is being read by the TV USB recording settings Selecting the...

Page 52: ...OK to confirm 2 Select the desired partition with or 3 Switch back with BACK or press EXIT to end the setting Testing external data media You can test the external data media to see if it is suitable for the required functions 1 In the Disk Management menu select the line Disk with V or Λ If there are more then one external data media select the desired data media with or 2 Select the line Partiti...

Page 53: ...d To pause press 3 Press 7 to exit the Time Shift function The message Live Broadcast appears The scenes in the time shift memory are deleted Recording programmes You can record the programmes Programmes are recorded onto the external data media and the archive is managed via television A memory of 44 MB up to 110 MB is required for a 1 minute record Other recordings in the archive can be watched ...

Page 54: ...en menu with MENU Select the menu item Schedule List with and confirm with OK Press green change the data and and save it with blue Notes 7 A warning is displayed before the timer re cording starts and counts down for 10 sec onds to allow you to switch to the channel At the end of 10 seconds the channel to be recorded appears automatically 7 If the timer recording starts during playback playback s...

Page 55: ...er is programmed 11 Press EXIT to end the menu Notes 7 A warning is displayed before the timer re cording starts and counts down for 10 sec onds to allow you to switch to the channel At the end of 10 seconds the channel to be recorded appears automatically Editing the timer You can edit programmed timers 1 Open the menu with MENU 2 Select the menu item Schedule List with or and press OK to confirm...

Page 56: ...ecording You can either watch the current programme that is being recorded or a previously recorded programme while recording takes place 1 Select the channel with 1 0 or P P and press to start the record ing 2 To display PVR content press red but ton 3 Select the programme you want to watch with V or Λ and start playback with 8 4 Press 7 to stop playback 5 Press 7 to stop recording 6 Confirm with...

Page 57: ... the MPEG 1 standard developed by MPEG Motion Picture Expert Group AAC indicates the Advanced Audio Coding and is developed by MPEG AAC provides higher audio quality with the same data rate bit rate WMA Windows Media Audio is a compres sion standard developed by Microsoft for audio data These formats enable audio files to be saved on storage devices with a sound quality similar to that of a CD Fil...

Page 58: ...vice from the TV while a file on the USB Device is being read by the TV 7 A bi directional data transfer as defined for ITE Information Technology Equipment de vices in EN 55022 EN 55024 is not pos sible 7 USB transfer is not an operating mode in it self It is only an additional function 1 Connect the USB2 HDD USB interface on the television and the related data output on the external device exter...

Page 59: ... Menu navigation USB OPERATION Settings in the USB setup menu Selecting the menu 1 Open the menu with MENU 2 Select the menu item Media Player with or and press OK to confirm 3 Select the external data medium with or and press OK to confirm 4 Select the Media Options with green 5 Select the line Disk Management with V or Λ and press OK to confirm Note 7 Additional operations are explained in the f...

Page 60: ...edia Player menu is displayed 3 Select the external data medium with or and press OK to confirm Media Player menu of the selected exter nal data medium is displayed Note 7 If the content of the external data medium is not displayed press yellow to re fresh 4 Select the push button Type with Λ and and press OK to confirm 5 Select the desired type Movie Music or Photo with or and press OK to confirm...

Page 61: ...onal playback functions Depending on the file formats used the follow ing additional functions are possible Selecting partition only supported video files 1 During playback select the next chapter with 2 During playback select the previous chap ter with Selecting titles only supported video files 1 During playback select the next title with Λ 2 During playback select the previous title with V Play...

Page 62: ...playback press 8 Turn the picture display only picture files The pictures can be rotated by 90 1 During playback switch on the control panel with OK 2 Use or to select and press OK The picture rotates 90 clockwise Repeat functions Options One the selected track is repeated once Sequence selected tracks are repeated consecutively Random selected tracks are repeated in a mixed order None repetition ...

Page 63: ...he teletext page number with 1 0 and then press 6 As soon as the page is found the page number is displayed 2 Press 6 to switch to the teletext page Increasing character size If you have difficulty reading the text on the screen you can double the character size 1 To enlarge the character size of a teletext page press 5 repeatedly Page stop A multiple page may contain several sub pages which are a...

Page 64: ...7 The range of subjects and selection of indi vidual subjects depend on the programme provider 7 Numeric buttons 1 through 0 are used for additional functions 2 Press green yellow or blue to select the desired topic field This service provided by ARD includes Das Er ste1Mediathek along with teletext restructured graphically with high definition images ZDF service includes ZDF mediathek and other p...

Page 65: ...h V Λ or and press red to set it as the primary audio language or green to set it as the secondary audio language Primary and secondary languages ap pear on the upper left corner of the menu 4 Press BACK to go back one menu level or press EXIT to end the setting Changing the subtitle language only for digital television channels You can disable subtitles select subtitle lan guage and assign a seco...

Page 66: ...ansmitted at the same time as the normal sound with digital television stations This depends on the programme being broadcast 1 From the Accessibility Settings menu use V or Λ to select the line Audio Description 2 Select On with or 3 Select the line Audio Description Volume with V or Λ and use or to adjust volume 4 Press BACK to go back one menu level or press EXIT to end the setting Accessories ...

Page 67: ...s BACK to go back one menu level or press EXIT to end the setting CONVENIENCE FUNCTIONS Store logo view This function is intended for feature introduction at stores When On is selected feature logos are displayed 1 From the Advanced Settings menu use V or Λ to select the line Shop Logo Display 2 Select Yes with or Note 7 Set the function to No with or to switch off 3 Press BACK to go back one menu...

Page 68: ...en to install the software The new software will be loaded Warning 7 Television will restart after update Do not turn your television s power off during up dates Note 7 For automatic checking of software update select from Source Setup menu Ad vanced Settings the line OAD with V or Λ Use or to select On Software update Internet only for digital television channels 1 From the About menu use V or Λ ...

Page 69: ...es in the main menu are deleted CONVENIENCE FUNCTIONS Timer settings 1 Open menu with MENU button 2 Activate the menu item Settings with OK 3 Select the menu item Timer Apps with or and press OK to confirm Timer Applications menu is displayed Timer Applications Parental Guidance Network Configuration Back Exit Change Area Sleep Timer Off Auto On Auto Off Advanced Note 7 Additional operations are e...

Page 70: ...blue to save the setting 5 Press BACK to go back one menu level or press EXIT to end the setting Date and time settings 1 Open menu with MENU button 2 Activate the menu item Settings with OK 3 Select the menu item Timer Apps with or and press OK to confirm 4 Select the line Advanced with V or Λ and press OK to confirm Note 7 Additional operations are explained in the following sections Auto tuning...

Page 71: ...ompt 3 Select the access level with or 4 Press BACK to go back one menu level or press EXIT to end the setting Note 7 When the TV is in review buffer mode the parental rating of the program in the live broadcast is applied on the content being watched rather than the actual parental rat ing of the content being watched As a re sult a parental rated content being watched in the review buffer mode w...

Page 72: ...he menu item Source Setup with or and press OK to confirm 4 Select the line Channel Editor with V or Λ and press OK to confirm 5 Select the channel to be blocked with V Λ or and highlight with OK Channel is marked with 6 Activade the Tools menu with yel low 7 Select the line Channel Lock with V or Λ and press OK to confirm 8 Enter the PIN code 1234 with 1 0 in the password prompt 9 Confirm the ent...

Page 73: ...ce e g DVD player your television will switch to the HDMI source that the external device is con nected to your TV should be open Selecting the menu language When you select menu language on your TV menu language of the external device will change as well If your DVD player supports Switching off the device from standby mode After switching your television to standby your external device e g DVD p...

Page 74: ...in the menu as an option that can be selected in every device type Deck Control and Tuner Control options change depending on the external device connected 7 Apply trial and error method to determine the functions of the remote control buttons for the selected control type 7 Refer to the user manual of the DIGILINK compatible device for its functions 7 Press EXIT to end the setting Switching the d...

Page 75: ...ect your external devices to depends on the sockets the external device is equipped with and the signals which are available 7 Note that with many external devices the res olution of the video signal must be adapted to the input sockets on the television check the external device s instruction manual You can find out which values you need to set by referring to the guidelines in the sec tion about...

Page 76: ... using cinch cables video signal 2 Connect the PC Audio IN sockets on the television to the corresponding sockets on the external device using cinch cables audio signal USING EXTERNAL DEVICES Using the Euro AV socket 7 Suitable devices Digital satellite receiver DVD player recorder set top box game con sole video recorder decoder 7 Video signal CVBS RGB 7 Audio signal stereo analog 7 Channel posit...

Page 77: ...the sound settings for the headphones 1 Open the menu with MENU 2 Activate the menu item Settings with OK 3 Select the menu item Sound Settings with or and press OK to confirm Sound Settings menu is displayed 4 Select the line Advanced with V or Λ and press OK to confirm 5 Select the line Headphone Volume with V or Λ 6 Adjust the volume with or 7 Press EXIT to end the setting Note 7 Prolonged list...

Page 78: ...Press or to select On USING EXTERNAL DEVICES Notes 7 The internal speakers of the television are switching off automaticaly 7 The volume of the AV receiver you can adjust with the remote control of the television 7 For switching off the HDMI ARC function se lect Off with or 7 The ARC function will be deactivated while switching off the television and the internal speakers are active again 12 Press...

Page 79: ...rundig WiFi USB dongle to the USB1 or USB2 HDD socket of your television in order to connect the television to a wireless network 2 Open the menu with MENU 3 Select the menu item Screen Share with or and press OK to confirm Liveshare menu is displayed 4 Start Liveshare application from your laptop PC or mobile device and select your televi sion Liveshare will begin in a short while and the screen ...

Page 80: ...th MENU 2 Activate the menu item Settings with OK 3 Select the menu item Source Setup with or and press OK to confirm Source Setup menu is displayed PC MONITOR MODE Source Setup Sound Settings Parental Guidance Back Exit Change Area Auto Adjust Auto Adjust Mode Off Position 0H 0V Size 0 Phase 0 4 Select the function and setting you want using V or Λ and set with or Options Auto Adjust for automati...

Page 81: ...To see which CA module is in the Common Interface slot go to the CA Module sub menu 7 When you insert a CA module into the CI slot on the television for the first time wait a few moments until the television has regis tered the CA module Access control for CA module and smart cards 1 Open the menu with MENU 2 Activate the menu item Settings with OK 3 Select the menu item Source Setup with or and p...

Page 82: ...ther you want to search for only digital channels Digital or only radio channels Radio or both Digital Radio and press OK to select and mark or unmark the Digital and or Radio items 8 Select Scan Type To select whether you want to search for only free digital television channels Free only scrambled digital television channels Scrambled or both Free Scrambled press or and press OK to select and mar...

Page 83: ...earching The Digital Searching menu appears and the scan for TV channels begins Note 7 The search can be aborted with EXIT 8 Press EXIT to end the setting LNB Settings Notes 7 The following description about the LNB set tings premise a substantial expertise about the satellite systems Ask your specialist dealer 7 Your TV supports SCR system Single Chan nel Router If you are using SCR satellite sys...

Page 84: ...ion use or to make the 1 4 2 4 3 4 or 4 4 selection for the satellite that corresponds to relevant DiSEqC posi tions DiSEqC 1 1 switch allows for receiv ing from maximum sixteen satellites at the same time SPECIAL SETTINGS From LNB selection use or to make the selections between 1 16 and 16 16 for the satellite that corresponds to relevant DiSEqC positions 8 Press EXIT to end the setting Motor ant...

Page 85: ...ill mode to saved position Store Current Position Stores antenna s current position Select setting with red button select recording position with or and confirm with green button Reset DiSEqC 1 2 Limit Resets the limit positions set for the antenna 3 Press EXIT to end the setting Searching for television chan nels from the cable provider automatically 1 Open the menu with MENU 2 Activate the menu ...

Page 86: ...nt channel list The Digital Searching menu appears and the scan for TV channels begins The search is complete as soon as the message Search is completed appears Note 7 The search can be aborted with EXIT 9 Switch to the Channel Editor with yel low or press EXIT to end the setting Searching for television chan nels from the cable provider manually 1 Open the menu with MENU 2 Activate the menu item ...

Page 87: ...be added to it then press green 7 If red is pressed the saved channels will be deleted from the current channel list The Digital Searching menu appears and the scan for TV channels begins The search is complete as soon as the message Search is completed appears SPECIAL SETTINGS Note 7 The search can be aborted with EXIT 10 Switch to the Channel Editor with yel low or press EXIT to end the setting ...

Page 88: ...channels The analogue television stations are listed in the channel list after the digital television stations Note 7 Plug the rooftop antenna cable for ana logue television stations into the ANT IN socket on the television 1 Open the menu with MENU 2 Activate the menu item Settings with OK 3 Select the menu item Source Setup with or and press OK to confirm Source Setup menu is displayed 4 Select ...

Page 89: ...ith V or Λ To select S special channel or C chan nel options press or 9 Select the line Channel with V or Λ To enter the channel number step by step press or or enter it directly with 1 0 or start a automatic scan with green or yellow Note 7 The current system is displayed in the Sys tem If the colour and or sound is not func tioning correctly select System with V or Λ Select the required setting ...

Page 90: ...annel name with green Note 7 To enter other channel names repeat steps 1 to 6 Creating a list of favourites analog channels You can select your favourite channels and save them in up to four lists FAV1 to FAV4 1 In the Channel Editor menu select the channel s you want to add in the favor ites list with V Λ or and highlight the television channel by pressing OK Channel is marked with 2 Activade the...

Page 91: ...tion allows turning off Hbb TV feature thus warnings shall not be displayed on chan nels with Hbb TV feature 1 Open the menu with MENU 2 Activate the menu item Settings with OK 3 Select the menu item Source Setup with or and press OK to confirm Source Setup menu is displayed 4 Select the line Advanced with V or Λ and press OK to confirm 5 Select the line Hbb TV with V or Λ 6 Select the option Off ...

Page 92: ...ol 1 1 control 1 2 control Reception range Satellite Ku band 10700MHz 12750MHz Modulation DVBS QPSK DVBS2 QPSK 8 PSK IF band 950 MHz 2150 MHz Signal level 25dBm to 65 dBm Cable Full band 110MHz 862MHz Modulation 16QAM 32QAM 64QAM 128QAM and 256QAM Symbol rate 4 0Msym s to 7 2Msym s Digital DVB T VHF UHF Band width 7 MHz and 8 MHz FFT size 2k 8k Modulation 16QAM 64QAM QPSK Security range 1 4 1 8 1 ...

Page 93: ...ons 2011 65 EU Directive on limitations on use of certain hazardous materials on electric elec tronic domestic and office equipment Network interfaces This product is intended for connection to the ADSL network Disposing of the packaging The packing materials are dangerous for chil dren Keep the packing materials out of the reach of children The packing of your product is manufactured from recycla...

Page 94: ...tting op tion is available Select the correct colour standard Problem at station Test with an another channel Picture but no sound Volume set to minimum Turn up or switch on the volume Teletext missing or faulty Problem at station Test with an another channel Television station has no tele text or antenna system Test another channel for fine tun ing and ghosts Station signal too weak Check the ant...

Page 95: ...our modem has Internet connection Videos in video applica tions are lagging during playback in wireless con nection Internet connection speed is low Low Internet speed is a problem that is related with the speed of your subscription or a failure in the Internet infrastructure Contact with your service provided ISP Videos in video applica tions are lagging during playback in cable con nection Inter...

Reviews: