background image

ENGLISH

CONNECTION­AND­PREPARATION

­---------------------------------------

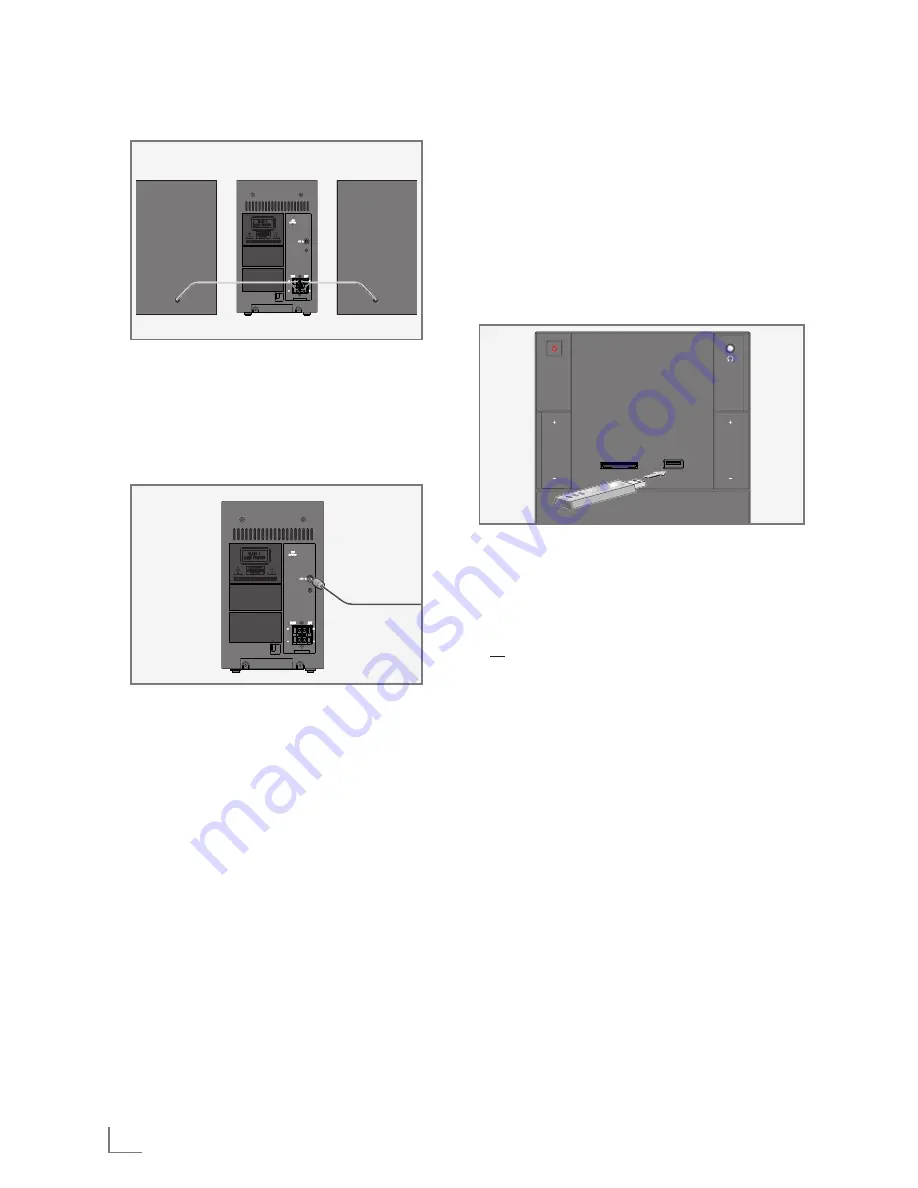
Connecting­the­loudspeakers

1

 Insert the wires of the loudspeaker cable into 

the terminals »

RIGHT+/–

« and »

LEFT+/–

«.

– Connect the cables marked in red to the red 

terminals.

Connecting­external­devices

Note:

7  

Switch the hi-fi system off before you connect 

external devices.

1

 Use  standard  audio  adapter  to  connect  the 

audio  outputs  of  the  external  device  to  the  
»

AUX­In

« (ø 3.5 mm) socket on the back of 

the hi-fi system.

Connecting­an­MP3­player­or­a­

USB­memory­stick

The hi-fi system supports most MP3 players and 

USB memory sticks.

Caution:

7  

The hi-fi system must be switched off while 

the USB connection is being made. If it is not 
switched off, data can be lost.

SOURCE

PRESET

VOLUME

UBS

OPEN

UMS 2020

SD CARD

USB

1

 Switch off the hi-fi system by pressing »

8

«. 

2

 Connect the USB interface of the MP3 player 

to the »

USB

« socket on the hi-fi, using a stan-

dard USB cable;

  or
  insert the USB plug of the USB memory stick in 

the »

USB

« socket on the hi-fi system.

Notes:

7  

To remove the MP3 player or the USB mem-

ory stick, switch off the hi-fi system and pull 
out the cable for the data medium.

7  

The USB socket on the hi-fi system does not 

support a connection for a USB extension 
cable and is not designed for directly con-
necting to a computer.

Summary of Contents for UMS 2020

Page 1: ...EN MICRO H F SYSTEM UMS 2020...

Page 2: ...Stereo mono reception 13 RDS information 14 CD MODE 14 Selecting the CD input source 14 Inserting and playing CDs 15 Pausing and resuming playback 15 Repeat actual track 15 Selecting another track 15...

Page 3: ...gned for use in dry rooms If you do use it outdoors make sure it is protected from moisture such as dripping or splashing water 7 Only use the hi fi system in a moderate climate 7 Do not place the hi...

Page 4: ...ck or a card reading device Display of the hi fi system for more details please see the section The hi fi system displays Infra red sensor for remote control signals U Headphone socket for connecting...

Page 5: ...ips to the beginning of the current next track Fast searches back and forward within a track In clock timer mode adjusts the hours and minutes for the clock timer function OVERVIEW RIGHT Terminals for...

Page 6: ...USB SD mode starts and pauses playback SLEEP Setting the sleep time DISPLAY In tuner mode changes the RDS informations In CD USB SD mode displays the current track number and remaining time during pla...

Page 7: ...CD USB SD mode current track is repeated REP ALL In CD USB SD mode all tracks are repeated ALBUM In CD USB SD mode all files in the current album are repeated In tuner mode a stereo station is being r...

Page 8: ...yers and USB memory sticks Caution 7 The hi fi system must be switched off while the USB connection is being made If it is not switched off data can be lost SOURCE PRESET VOLUME UBS OPEN UMS 2020 SD C...

Page 9: ...e inserted into the hi fi system in a dry and clean condition 7 Never remove memory cards during opera tion This can damage the memory card This type of damage will invalidate your warranty Removing t...

Page 10: ...by other objects Putting batteries in the remote control 1 2 3 1 Open the battery compartment by pressing down on the catch and then remove the lid 2 Observe the polarity marked on the base of the bat...

Page 11: ...DISPLAY on the remote control for 2 seconds Display CT ON flashes 4 Switch the RDS time synchronisation off or on with with 3 or 4 on the hi fi system or 5 or 6 on the remote control Notes 7 The curr...

Page 12: ...ontrol press one of the buttons CD USB SD TUNER CASS or AUX Display CD USB CARD 100 60 frequency of the radio sta tion CASS or AUX Adjusting the volume 1 Adjust the volume with VOLUME on the hi fi sys...

Page 13: ...rong enough the station name appears after a short time Viewing RDS information If an RDS station is being received information can be opened up in the display 1 Press DISPLAY repeatedly to cycle thro...

Page 14: ...ut source 1 Press SOURCE on the hi fi system repeat edly or press CD on the remote control Display CD If there is no CD in the compartment NO DISC appears in the display after a short time If a CD has...

Page 15: ...2 To quit this function press REP on the remote control or REPEAT on the hi fi system repeat edly until REP disappears from the display Repeating all tracks of a CD Repeat All 1 During playback press...

Page 16: ...ashes and 01 is dis played briefly 2 Press 3 or 4 on the hi fi system or 5 or 6 on the remote control to select your desired track number and confirm it with PROG Display PROG flashes and 02 is dis pl...

Page 17: ...s 7 The USB socket of this device is a standard socket Due to rapid developments in tech nology and new manufacturers appearing every day the compatibility of USB memory sticks can only be partially g...

Page 18: ...tape except if pause function has been activated 5 To pause playback press II and resume playback by pressing II again 6 End playback with 7 J Note 7 The source cannot be changed while play ing or rec...

Page 19: ...ent 5 Press to start recording Playback of the file starts automatically after 7 seconds 6 To pause press II Press again to resume 7 To stop recording press 7 J CASSETTE MODE Recording from the radio...

Page 20: ...ith TIMER SET Press 5 or 6 to set the minutes and con firm with TIMER SET Display the source appears 4 Select the desired sound source TUNER CD USB or SD with 5 or 6 Confirm your desired mode with TIM...

Page 21: ...also clean the heads by playing a clean ing tape once Technical data This device is noise suppressed according to the applicable EU directives This product fulfils the European directives 2004 108 EC...

Page 22: ...protect the environment by recycling used products General information on laser devices This device is a CLASS 1 LASER PRODUCT This means that the laser is designed in such a way as to ensure that th...

Page 23: ...nd cannot be heard or is of poor quality Adjust the volume Disconnect the headphones Check that the speakers are connected correctly Check if the stripped speaker wire is clamped The left and right so...

Page 24: ...Grundig Intermedia GmbH Beuthener Strasse 41 90471 N rnberg www grundig com 72011 411 2500 12 42...

Reviews: