


ENGLISH
17
If run with the installed rechargeable nickel
cadmium batteries, use the charging station with
the mains adapter as a charger.
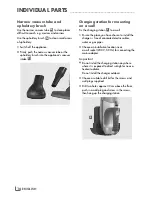
Charging
If run with the installed rechargeable nickel cad-
mium batteries, use the charging station with the
mains adapter as a charger.
1
Remove the accessory used.
2
Insert the appliance in the charging station
so that it precisely fits.
– The charging contacts of the appliance and
the charging station touch each other.
3
Plug the mains adapter into the wall socket.
– The charging process begins, the charging
indicator
lights up red.
– The charging indicator remains lit until the
appliance is removed from the charging stati-
on or the mains adapter plug is disconnec-
ted.
– If charging has finished the red charging
indicator goes out.
Note
7
Fully charge the batteries before using for the
first time or if the batteries have not been used
for a long time.
(20 hours).
7
Charge the appliance at room temperature.
Lower or higher temperatures have a negative
effect
on the life of the batteries.
7
The ambient temperature should be between
5˚C and 40˚C.
7
After charging the running time is
8 minutes.
E
J
Switching on and off
1
Remove the appliance from the charging stati-
on .
2
Depending on the requirements, insert one of
the accessories into the appliance's vacuum
intake .
3
Switch on the appliance by pushing forward
switch .
4
Switch off the appliance by pushing back
switch .
5
Remove the accessory used.
6
Insert the appliance in the charging station
so that it precisely fits.
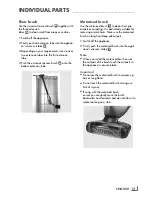
Empty dust container and clean
1
Hold the appliance vertically with the vacuum
intake facing
downward.
2
Press pushbutton
and remove the dust con-
tainer from underneath.
3
Remove the holder and filter
from the dust
container.
Note
7
You can wash the filter from time
to time with hot soapy water.
After washing, allow the filter to completely
dry.
4
Empty the dust container
, wash out and
dry.
Note
7
Allow the dust container to completely dry
before you replace it in the appliance.
5
Hold the appliance vertically facing upwards.
6
Press button
.
7
Replace the dust container
, ensure that
both plug-in contacts of the dust container are
precisely inserted in the correct position.
8
Release button
. Ensure the latch clicks into
place.
D
A
D
A
B
D
C
J
F
F
C
J
USE
________________________________________________________________________
Summary of Contents for VCH 7630
Page 1: ...HAND VACUUM CLEANER VCH 7630 de en...
Page 2: ...2 ________________________________________________________________________________...
Page 4: ...4 ________________________________________________________________________________...
Page 13: ...Grundig Multimedia B V Atrium Strawinskylaan 3105 NL 1077 ZX Amsterdam http www grundig com...


