background image

ENGLISH

SET-UP­AND­SAFETY

­-----------------------------------------------------------------------------------------------

Please note the following information when set-

ting up your television set.

7  

This television set is designed to receive and 

display video and audio signals. 

Any other use is expressly prohibited.

7  

The ideal viewing distance is 5 times the 

screen diagonal.

7  

External light falling on the screen impairs 

picture quality.

7  

To assure sufficient ventilation make sure there 

is enough space around it in the wall unit.

7  

The television set is designed for use in dry 

rooms. If you do use it in the open, please en-

sure that it is protected from moisture, such as 

rain or splashing water.

7  

Do not expose the television set to any mois-

ture. Do not place any vessels such as vases 

on the television, as they may spill liquid, thus 

presenting a safety risk.

7  

Place the television set on a solid, level sur-

face. Do not place any objects such as news-

papers on the television set or cloth or similar 

items beneath it. 

7  

Heat build-up can be dangerous and shortens 

the operating life of the television set. For rea-

sons of safety, have a specialist remove any 

dirt deposits in the set from time to time.

7  

Do not place the television set close to heat-

ing units or in direct sunlight, as this will impair 

cooling. 

7  

Do not open the television set under any cir-

cumstances. Warranty claims are excluded 

for damage resulting from improper handling.

7  

Make sure the power cord or the power sup-

ply unit (if provided) are not damaged.

7  

The television set may only be operated with 

the mains cable/adapter supplied.

7  

Thunderstorms are a danger to all electrical 

devices. Even if the tele vision set is switched 

off, it can be damaged by a lightning strike 

to the mains or the antenna cable. Always 

disconnect the mains and antenna plugs dur-

ing a storm.

7  

Clean the screen with a soft, damp cloth. 

Only use plain water.

7

  Clean the cabinet of your LCD television with 

the enclosed cloth. Only use plain water. 

7  

Please note when deciding where to put the 

device that furniture surfaces are covered by 

various types of lacquer and plastic, most of 

which contain chemical additives. These may 

cause corrosion to the feet of the device, thus 

resulting in stains on the surface of the  

furniture which can be difficult or impossible 

to remove.

7  

The screen of your LCD television meets the 

highest quality  standards and has been 

checked for pixel faults.

7  

Despite the great care taken in manufacturing, 

technological  reasons make it impossible to 

completely discount the possibility that some 

pixels may be faulty.

7  

Provided they are within the thresholds speci-

fied by the DIN norm, pixel faults of this kind 

cannot be regarded as a defect as defined by 

the warranty.

7  

To prevent the spread of 

fire, keep candles or other 

open flames away from this 

product at all times.

7

  Do not connect any other equipment while 

the device is switched on. Switch off the other 

equipment as well before connecting it.

7

  Only plug the device into the mains socket 

after you have connected the external devices 

and the antenna.

7

  Make sure the power plug is freely acces-

sible.

Caution:

7

 If you want to use a wall bracket for your 

television, make sure you read the assembly 

instructions for the wall bracket carefully or 

have your specialist dealer mount it for you.

7

  When  buying  the  wall  bracket,  make  sure 

that all the fastening points needed on the 

television are there on the wall bracket and 
that they are all used when it is mounted.

Summary of Contents for Vision 4 26-4931 T

Page 1: ...6 Zoom function 16 Zap function 16 Electronic TV guide 17 Changing the picture format 18 TELETEXT MODE 18 TOP text or FLOF text mode 18 Normal text mode 18 Additional functions 19 CONVENIENCE FUNCTION...

Page 2: ...switched off it can be damaged by a lightning strike to the mains or the antenna cable Always disconnect the mains and antenna plugs dur ing a storm 7 Clean the screen with a soft damp cloth Only use...

Page 3: ...mote control buttons are explained Receiving digital stations To receive digital stations you need a digital rooftop or indoor antenna passive or active indoor antenna with its own power supply Unlike...

Page 4: ...he ANT IN socket on the television Note 7 When connecting an indoor antenna you may have to try it out at different positions until you get the best reception 2 Plug the mains cable into the wall sock...

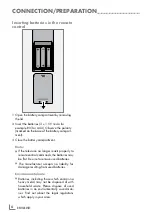
Page 5: ...partment Note 7 If the television no longer reacts properly to remote control commands the batteries may be flat Be sure to remove used batteries 7 The manufacturer accepts no liability for damage re...

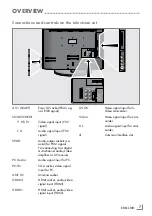
Page 6: ...PCM signals For connecting to a digital multi channel audio video amplifier or AV receiver PC Audio Audio signal input for PC PC IN VGA socket video signal input for PC ANT IN Antenna socket HDMI2 HDM...

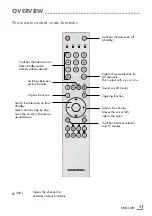
Page 7: ...or P to select and confirm with V or V MENU Opens the main menu Select menu item with P or P Activate the function with V or V Set the function with V or V Switch off the menu with MENU V V Adjust th...

Page 8: ...h the television on from standby selects stations step by step move the cursor in the menus up and down Switches the television off standby Opens the pre selection for AV channels Then select with V o...

Page 9: ...hold in teletext mode M Switches to operation of a GRUNDIG digital receiver GRUNDIG digital receiver with hard disk PDR GRUNDIG DVD player GRUNDIG DVD recorder or GRUNDIG AV re ceiver OVERVIEW Press...

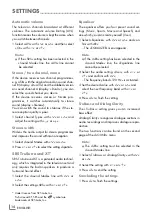
Page 10: ...ge your antenna 3 Select the Active Antenna Power with V or Press or to switch on the antenna voltage On 4 Select Auto Tuning with V or and confirm with Country Selection is active 5 Press or to selec...

Page 11: ...le menu select the television channel with V or 2 Press to switch to the symbol and press to highlight the television channel The channel is marked with Note 7 Channels can be enabled again Press V or...

Page 12: ...um contrast 7 You can only select the MPEG NR func tion on digital and AV presets 7 MPEG NR reduces any interference from artefacts pixel blocks from digital stations with MPEG compression such as fro...

Page 13: ...hich is integrated in the television set and only requires the built in speakers to produce a Surround Sound effect 1 Select the Sound Mode line with V or 2 Select the setting SRS with or Equaliser Th...

Page 14: ...irm 3 Switch back to the television channel with 1 0 Switching between digital and ana logue channels 1 Open the INPUT Source menu by press ing AV 2 Press V or to select DTV digital pre sets or ATV an...

Page 15: ...i to quit the zap function Electronic TV guide The electronic program guide offers an overview of all programmes that will be broadcast in the next week for digital stations only 1 Press TV G to see p...

Page 16: ...al sources from a set top box on the Euro AV socket the picture fills the screen completely and with the correct geom etry 4 3 format The picture is shown in 4 3 format LetterBox format The letterbox...

Page 17: ...As soon as the page is found the page number is displayed 2 Press PIP to switch to the teletext page Increasing character size If you have difficulty reading the text on the screen you can double the...

Page 18: ...This function enables you to delete the station lists and all custom settings 1 Select Restore Factory Defaults with V or and press to confirm 2 Select the Yes button with or and confirm the reset fu...

Page 19: ...and press to confirm The Block Programme menu appears 2 In the Block Programme menu press V or to select the channel and press green to confirm In the Block Programme menu the symbol D is displayed af...

Page 20: ...ess to confirm 2 Select Activate with V or and press or to choose when the television should switch on 3 Select Hour with V or and enter the time with or 4 Select Minute with V or and enter the time w...

Page 21: ...Switch off the function by pressing or to set it to Off 3 Press to end the setting Setting the time zone The television automatically detects the local dif ference to Greenwich Mean Time the selected...

Page 22: ...ect your external devices to depends on the sockets the external device is equipped with and the signals which are available 7 Note that with many external devices the res olution of the video signal...

Page 23: ...e external device using a EURO AV cable video and au dio signal Note 7 If this function is activated the decoder con nected to the AV1 socket provides a de coded audio video signal 1 Open the menu wit...

Page 24: ...e PC channel with V or and press to confirm Settings for the PC 1 Open the menu with The PICTURE menu is displayed 2 Select the PC SETUP menu with or and confirm with 3 Select the function or setting...

Page 25: ...e Common Interface slot go to the CA Module sub menu Access control for CA module and smart card 1 Open the menu with The PICTURE menu is displayed 2 Select the CHANNEL SETUP menu with or and confirm...

Page 26: ...etup The television station can be set directly or using the search Switching the television to ana logue channels 1 Open the INPUT source menu by press ing AV 2 Select input source ATV with V or and...

Page 27: ...at steps 4 to 8 9 Press to end the setting Fine tuning analogue television sta tions The television automatically tunes itself to the best possible reception You may need to fine tune it manually in a...

Page 28: ...z red 3 Select letters or numbers with V or move to the next position with or and repeat 4 Store the channel name with Note 7 To enter additional channel names repeat steps 1 to 4 Skipping television...

Page 29: ...ion channel with V or 2 Push the television channel with or into the favourites list 1 to 4 and save it with The position in the favourites list is marked with You can enter the same channel in more t...

Page 30: ...he channel which is currently active Remember this when aligning your antenna using the signal level display 4 Press to end the display Automatic software update Only for digital television channels I...

Page 31: ...cm 26 81 cm 32 Max resolution WXGA 1366 x 768 Weight approx 8 9 kg Vision 26 approx 11 4 kg Vision 32 Service information for dealers The television set may only be operated with the mains adapter su...

Page 32: ...setting Automatic or manual channel setting fine tuning Antenna Have antenna cable or system checked No colour Colour intensity at maximum Turn up the colour TV standard setting if setting option is...

Page 33: ...e of plug is used it must be protected by a 5A fuse either in the plug or at the distribution board If this type of plug be comes defective ensure that the fuse is removed before disposal to eliminate...

Page 34: ...www grundig com 09 28 72011 733 7000...

Reviews: