background image

Computer Control Screen 

(CCS)

 Instructions

Your GSC™ comes complete with a full colour LCD computer control screen (CCS)

This manages features such as speed settings, driving lights, forward and reverse in addition to giving a full GSC™ 
information readout, which includes:

  • Backlit, bright, high intensity colour LCD screen.
  • Current Speedometer
  • Parking Indicator
  • Reverse Indicator
  • Battery life indicator
  • Headlight Indicator
  • Wifi Indicator
  • Remote On / Off Indicator
  • Trip Meter
  • Odometer
  • Voltmeter

To turn on the Golf Skate Caddy™ insert the supplied key into the lock,  this is positioned just 
behind the curved handle and thumb control and turn to the “ON “ position. This will 
immediately switch on the CCS.  

A WELCOME screen will now show.

www.golfskatecaddy.com

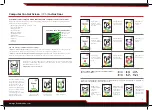
Your GSC™ default speed is 
set to speed 1. In order to 
change the top speed setting 
use the “Speed up “ 

” or 

Speed down “ 

” button. 

Refer to the following screen 
shots to see different speed 
setting. Note that the 
coloured speed icons change 
colour as you move to 
different speed settings. 

Default setting 

speed 1 selected 

indicated in green

Parking Indicator 

indicates green 

speed 1 setting

Speedometer 

readout in green

Your CCS has 4 function buttons


• Lights On/ Off


• Speed Down


• Speed Up


• Reverse / Forward

The CCS has two combination menu settings

• 

Combo 1

 – 

Limit top speed of GSC™

 by pressing top, left and bottom buttons simultaneously  to enter sub menu. 

Choose desired top speed 1,2,3, or 4 by pressing – or + buttons then long press top button to set.

• 

Combo 2

 – 

Choose between Mp/h and Km/h by pressing top

, right and bottom buttons simultaneously to enter 

sub menu. Use bottom button to switch between imperial or metric then long press top button to set.

Press right + 
button to select 
speed 2 indicated 
in yellow

Parking indicator 
indicates yellow 
speed 2 setting

Speedometer 
readout in
yellow

Press right + 
button to select 
speed 3 indicated 
in purple

Parking indicator 
indicates purple 
speed 3 setting

Speedometer 
readout in
purple

Press right + 
button to select 
speed 4 indicated 
in red

Parking indicator 
indicates red 
speed 4 setting

Speedometer 
readout in red

Volts

 - Shows 

voltage and state 
of battery
42.5v+ :
Fully Charged
35.5v :
Requires charging.

Trip

 - Shows total 

distance travelled 
whilst GSC™ is 
switched on. 
Resets when
GSC™ is
switched off.

ODO

 - Shows 

total distance 
travelled during 
the lifetime of 
the GSC™. This 
cannot be reset.

The Golf Skate Caddy™ has 4 top speed settings.

These are as follows:

Your CCS scrolls through the following information automatically every 3 seconds, volts, trip and odometer and is 
visible on the top right hand corner of the LCD screen. 

• Speed 1  -  3mp/h  -  5km/h

• Speed 2   -  6mp/h  -  10km/h

• Speed 3   -  9mp/h  -  15km/h

• Speed 4   -  12mp/h  -  20km/h

7

6

Summary of Contents for 30ah V2

Page 1: ...GSC 30ah V2 S TA N D U P G O L F C A R T ...

Page 2: ...ntrol screen CCS instructions Page 6 7 Specifications and features Page 8 Ancillary components Page 9 Terms conditions of warranty Page 10 Know your ability ride with care Page 11 2 4GHz wireless controller Page 12 Basic operations Page 13 Being in control and safety Page 14 Battery maintenance Page 15 General maintenance Page 16 17 Trouble shooting Page 18 19 3 ...

Page 3: ...t find a quality fully featured product like our Golf Skate Caddy anywhere else Australian designed and developed innovative reliable practical great fun tested internationally and enjoyed across the world You will also appreciate the benefits and safety of our 4 wheel steer product achieving greater balance and safety to enjoy your golf day UNPACKING THE GSC Please check carefully that all items ...

Page 4: ...e CCS has two combination menu settings Combo 1 Limit top speed of GSC by pressing top left and bottom buttons simultaneously to enter sub menu Choose desired top speed 1 2 3 or 4 by pressing or buttons then long press top button to set Combo 2 Choose between Mp h and Km h by pressing top right and bottom buttons simultaneously to enter sub menu Use bottom button to switch between imperial or metr...

Page 5: ...speed settings 5km h 10km h 15km h and 20km h ANCILLARY COMPONENTS Sand Divot Seeder Pourer Your GSC comes standard with a sand divot seeded pourer this simply fits into the compartment on the right side of the GSC at the front Simply unscrew the lid and fill with sand or dirt at your golf club and when creating a turf divot simply pour content over hole to protect fairway Removable Seat You GSC co...

Page 6: ...romagnetic park brake in order to engage this simply release the trigger controller to engage braking You should ALWAYS park your GSC adjacent to the hill never directly up or down www golfskatecaddy com TERMS AND CONDITIONS WARRANTY For your 1 year GSC product warranty including 1 year on your lithium NMC battery to be effective you need to have your original purchase order or receipt of sale GSC ...

Page 7: ...art during the first 2 3 metres of travel prior to maximum torque delivery This is a great safety feature as the rider does not feel as if the GSC would runaway from them if the trigger controller was inadvertently fully engaged Soft start is also kind to the grass and does not allow the GSC to engage in wheel spin and burn the grass or fairway NEVER STAND FACING FORWARD AS THE GSC IS NOT DESIGNED...

Page 8: ...BATTERY FOR EXTENDED PERIODS WITHOUT CHARGE MAY CAUSE DAMAGE ALWAYS ENSURE ONE FULL CHARGE EVERY 30 DAYS TO MAINTAIN YOUR BATTERY IN PROPER WORKING ORDER OR SWITCH OFF ISOLATOR SWITCH ON BATTERY AND CHARGE EVERY 60 90 DAYS DO NOT FORGET Do Not Puncture battery Do not dispose of battery in fire or trash Do not expose battery to heat or direct sunlight Dispose of battery only at suitable battery disp...

Page 9: ...hese instructions Remove the drive wheel by undoing the axle nut and washers Grab the wheel with both hands turn clockwise and pull up on the wheel to remove from the axle Remove the cowling panel by undoing the two allen screws to expose the belt Inspect and replace the belt Replace cowling panel Place the wheel back over the axle with two hands rotate the wheel clockwise and place some downward ...

Page 10: ... check To check your charger plug into a partially used battery if your charge light remains green and does not turn red then your charger needs to be replaced Always ensure that when you plug in your charger and the red light illuminates your charger fan starts to operate failure for fan to start may cause overheating of charger and permanent damage Your fan will not operate if green light is vis...

Page 11: ...www golfskatecaddy com The Future of Golf is Here ...

Reviews: