


BASIC OPERATION
If this is your first time riding the GSC™, we suggest that you start off in speed mode 1, this is the default starting speed
of the GSC™ and will allow you to only reach a maximum speed of around 4-5km/h giving you the confidence that you
will not fall off. We suggest that you take the GSC™ initially to a nice quiet open space like a park so that you can get
a feel for the vehicles braking, acceleration, speed and handling. Once you feel confidant you can work up to assist 3
or 4.
Refer to the section at the start of the manual on operation of the GSC™ computer controller screen on how to
change your speed modes
.
The GSC’s™ suspension was designed to work at its best with the full weight of a golf bag secured into the front caddy
section. This gives the rider counter weight when turning and helps loosen up the suspension so please ensure that
when you are riding the GSC™ you always have your golf bag and clubs on board.
Attention!
Your GSC™ is powerful and demands common sense and respect for safety reasons. The GSC™ is a simple
vehicle to master, most riders can become proficient within 5-10 minutes of riding the GSC™ for the first time.
Stand on the GSC™ with your toes facing the edge of the board. With the hand closest to the handle to steady
yourself, grab the handle securely but not too tight and with your thumb move the slider forward to accelerate gently,
pulling back on the slider will activate the rapid brake. The correct stance for forward movement is to ensure you have
60-70% of your weight on the front foot for 1-2 seconds then share the weight across both feet. As you brake, shift
60-70% of your weight to the rear foot until you stop.
In order to maximize your turning ability, you should shift your weight to the rear foot momentarily whilst you position
the ball of your foot or heel to the left or right edge of the board re-transferring your weight back to the front foot.
Pressing down and transferring your front foot to the left or right edge of the GSC™ in this way will maximize weight
leverage allowing you to steer more easily. You will notice initially that your GSC’s turning circle will improve after a
little while as the red suspension bush and front springs "settle or bed in”, this can take between 18 - 36 holes of golf
- during this “break in” period please take sharp turns slowly and carefully.
Accelerate and brake accordingly with care.
MOST IMPORTANT:
Very SLOWLY and with CONSTANT SMOOTH
PRESSURE, pull the trigger toward you to accelerate then SLOWLY release the trigger to slow to a stop, GENTLY push
the trigger away from you, this will engage the braking system and bring you to a complete stop. Take time to become
familiar with accelerating and braking. Smooth action with the trigger controller is the key.
Never pull the trigger too quickly, or release it too suddenly without due care. Stepping on your GSC™ and pulling the
trigger too hard before setting your stance means you could be thrown-of backwards if you do not have the correct
operating method. When travelling at speed, pushing the trigger forward too harshly (engaging the braking system),
could throw you off headfirst if you do not use the correct operating method. Know your limits do not take
unnecessary risks. Just like driving any vehicle always brake in advance.
The GSC™ comes with soft start, a unique feature that allows the computer to control the amount of torque to the
wheels, allowing a “soft graduated start” during the first 2-3 metres of travel prior to maximum torque delivery. This is
a great safety feature, as the rider does not feel as if the GSC™ would runaway from them if the trigger controller was
inadvertently fully engaged. Soft start is also kind to the grass and does not allow the GSC™ to engage in wheel spin
and burn the grass or fairway.
NEVER STAND FACING FORWARD AS THE GSC™ IS NOT DESIGNED TO BE RIDDEN THIS WAY.
SYNCHRONIZING YOUR GSC™
TO ITS VARIABLE SPEED 2.4GHz HAND CONTROLLER
Operation of the GSC™ thumb and remote control
Your GSC™ has two modes of operation, which are linked via a wireless communication protocol.
• Wireless remote control • Hard wired thumb controller
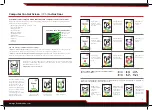
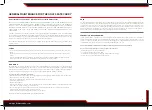
Remote Control Operation
The Golf Skate Caddy™ is supplied with an intelligent wireless remote control. This has the following features:
• Top Button - Instant on / 1 second press - off button
• Integrated LCD Screen
• Bottom left button - forward / reverse button
• Bottom right button - speed up / speed down button with dual function long press lights on/off
Syncing your remote to the Golf Skate Caddy™
Turn off all other GSC™ units close by with 15 metres. Turn on remote control, then long push
the left and right buttons together. You will see the word “pairing” appearing on the remote
LCD screen, you will have 30 seconds to then switch on the GSC™ you want to pair. Once
finished the remote will be locked to that GSC™
Switching on the remote control whilst the GSC™ is on will automatically switch off the thumb controller, and allow all
acceleration and braking to be controlled by the remote control. You can still activate speeds 1, 2, 3 or 4, forward
/reverse and lights either via the CCS or the remote control.
Pulling the remote control trigger towards you will initiate a smooth acceleration. Pushing the trigger away from you
will activate the rapid brake cycle.
Braking distances for both remote and thumb controller
Speed 1 drag brake
4m (13ft)
Speed 1 rapid brake
2m (6ft)
Speed 2 drag brake 6m (20 ft)
Speed 2 rapid brake 3m (10ft)
Speed 3 drag brake 9m (30 ft)
Speed 3 rapid brake 4.5m (15ft)
Speed 4 drag brake 12m (40ft)
Speed 4 rapid brake 7m (23ft)
The remote LCD has 2 concentric rings, the outer ring shows the charge of the main GSC™ battery, the inner concentric
ring shows the charge of the remote internal battery. A centre speedometer shows current speed whilst travelling. A
small forward / reverse icon is visible top centre of the screen.
The remote control has a micro USB connection used for charging the internal battery. Use the supplied micro USB
cable and plug this into one of the dual USB charging ports on the GSC™ main pole to fully charge the remote control.
The remote control should be charged after every 36 holes of golf.
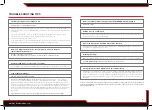
Thumb Controller Operation
The Golf Skate Caddy™ is supplied with a hard wired thumb controller / handle. This has the following features:
• Ergonomic ambidextrous cushioned handle
• Illuminated thumb slider
• Move slider forward - progressive smooth acceleration
• Move slider backwards - progressive smooth rapid brake
Operation of the Golf Skate Caddy™ with its unique handle and integrated thumb controller allows
accurate acceleration and braking whilst allowing a stable support for you to hold on to. The controller
employs a sophisticated technology which when released initiates a controlled drag brake to gently
bring the GSC™ to a stop or reduce speed confidently. For a more rapid controlled brake simply pull
back on the thumb controller. Always assess your path ahead and accelerate or brake according to
your situation... A little practice in speed 1 or 2 and you will be whizzing around the fairway in no time.
www.golfskatecaddy.com
13
12


