3
How to Use
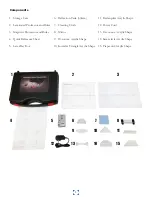
Your laser optics kit contains a variety of components that you can use to experiment. Each piece in the kit can
be used in combination with others to manipulate your lasers. Page 2 of this guide will be referenced to call out
each piece when necessary. How you use your kit is up to your imagination, but the following instructions will
provide you with a baseline understanding of each piece’s use:
Using Your Laser Ray Box
1. Gather your laser ray box (
#5
) and its power cord (
#12
).
2. Plug your power cord into a wall outlet, and then plug its other end into to port on your laser ray box.
3. Press the small red switch in the bottom left corner of the face of the box to turn it on.
(Caution:
Pay attention
when turning your laser ray box on to make sure it is not pointing in the direction of anyone’s eyes. Lasers can
cause damage to eyes.
)
4. Use the silver toggle switch on the box to choose how many lasers your box produces. The upright, center
position of the switch will produce a single laser from the middle of the box. When the switch is toggled up
towards the top of the box, the middle three lasers will turn on. When it is toggled down towards the bottom
of the box, all five lasers will turn on. All lasers on the box are parallel and equally spaced apart. Using the single
beam will allow you to easily measure specific angles of refraction and reflection. The multi-laser settings are
useful for visually comparing the paths the lasers take when they come into contact with different shapes and
angles.
Using You Acrylic Shapes
1. Chose which shape(s) (
#6, #9, #10, #11, #13, #14, #15
) you wish to use to obstruct your laser’s path.
2. Clean your shape(s) with your cleaning cloth (
#7
) to make sure any smudges and dirt don’t affect your lasers.
3. Place your shape down onto your workstation with its frosted side in contact with the table. This will allow you
to see the laser pass through the shape.
Using Your Mirror
1.
Decide how you want to configure your kit’s flexible mirror (
#8
). Using the two posts on either side of the
mirror, you can choose whether you want a flat reflecting surface, a concave reflecting surface, or a convex
reflecting surface. For a flat surface, make sure the notches in the posts that hold your mirror are facing each
other, and then tighten the mirror into position using the tightening screws on the underside of the posts. For a
concave or convex surface, twist the posts until the notches on the posts both angle upwards so that the mirror
held between them has an even curve, and then tighten the screws on the posts.
(Note:
Do not bend your
mirror too harshly, as you can cause permanent damage to it.
)
2. Clean your mirror with your cleaning cloth (
#7
) to make sure any smudges and dirt don’t affect your lasers.
Experimenting with Your Mirror and Shapes
1.
Turn your laser box on. Determine if you will be measuring specific angles or comparing laser paths in relation
to where they come in contact with the shape(s) you chose.
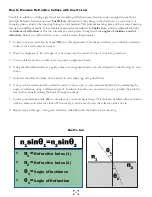
2. Use your quick reference sheet (
#4
) to help you determine how you want to watch your laser(s) behave
according to the obstructions you place in front of them.
3. Experiment with using multiple shapes and your mirror to see what paths you can make your laser(s) take.
4. Place your protractors and rulers (
#2 and #3
) beneath your shapes if you wish to measure the effects different
shapes have on your lasers’ paths.


