background image

-

11

NS3000 Series User Manual    rev.01 

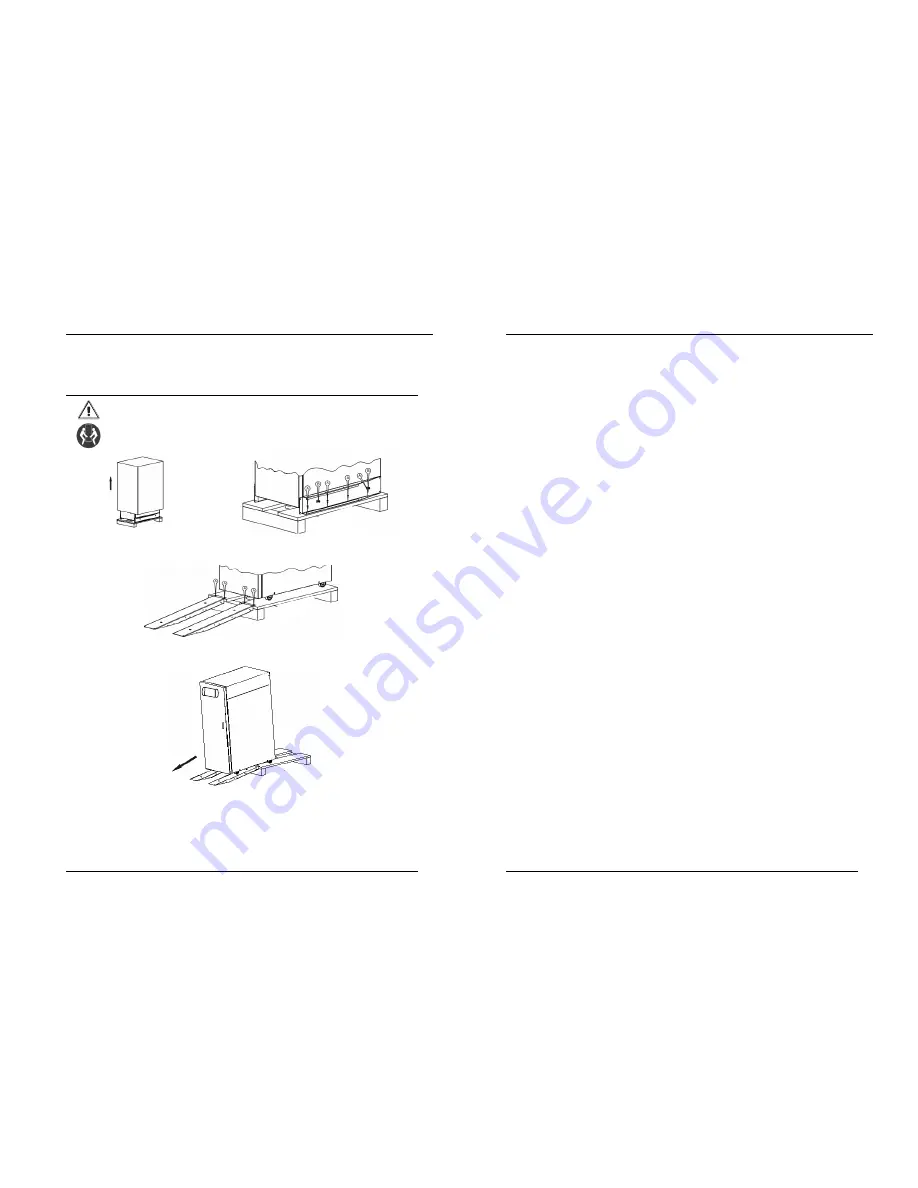
REMOVING THE UPS FROM THE PALLET 

Fig 2-1 UPS Packing Diagram


CAUTION!  TO  AVOID  HARMING  PEOPLE  AND/OR  DAMAGING  THE  EQUIPMENT,  FOLLOW 

CAREFULLY THE FOLLOWING INSTRUCTIONS. 


SOME OF THESE INSTRUCTIONS NEED TO BE CARRIED OUT BY TWO PEOPLE. 


Cut the straps and remove the cardboard box by 
sliding it upwards. 

§


Remove the 2 brackets securing  the  UPS to  the pallet  by unscrewing  the 
screws. 


§

  The previously removed brackets can also be used as slides. Secure the slides to the pallet by using the type A screws, making sure 

they are aligned with the wheels.   


§


Screw the brake rod completely, so to separate it from the pallet   

§


Make sure that the door is firmly closed. 

§


CAUTION! Push the UPS from the rear with great care. Given the weight of the equipment, 

this operation needs to be carried out 

by two people

NOTE : It is recommended to keep all parts of the packaging for further use


Tip: Dismantle the bolts that connect the cabinet and wooden pallet after disassembly, then lift the cabinet to installation position. The 

dismantlement should be careful so as not to scratch the body.   

-

12

NS3000 Series User Manual    rev.01 

Verify the product label and confirm the correctness of the equipment. The equipment label is attached on the back 

of front door. The UPS model, capacity and main parameters are marked on the label. 

Warm Tips: Please dispose the wasted materials in accordance with environmental protection requirements 

after disassembly. 

To prolong the service life, the place chosen for the UPS must guarantee: 

l


Easy wiring 

l


Sufficient space for operation   

l


Air sufficient enough to dispel heat produced by UPS 

l


Against ambient corrosive gases 

l


Against excessive humidity and heat sources 

l


Against dust 

l


With the current fire prevention requirements 

l


The  operating  environment  temperature  is  within  20


-25


.  The  batteries  are  at  maximum  efficiency  in  this 

temperature range (for information about the battery storage and transportation as well as the environment, please 

refer to table 8-2) 

2.3.2 UPS Composition 


10KVA~30KVA cabinet   

2.3.3 Operation Space 

As UPS has no ventilation grills at either side, no clearances are required for the sides. 

To enable routine tightening of power terminations within the cabinet, it is recommended that clearance around the 

front and  back  of the  equipment should  be  sufficient  to  enable  free  passage  of  personnel  with  the  doors  fully  opened. 

The back door of the cabinet is more than 800mm from the wall or other cabinets.   

Distance from the back 

 200mm 

2.3.4 Front and Back Access 

The component layout of the UPS supports front and back access for servicing, diagnosing and repairing the UPS, 

thus reducing the space requirement for side access. 

2.3.5 Final Positioning   

When  the  equipment  has  been  finally  positioned,  ensure  the  adjustable  feet  is  set  so  that  the  UPS  will  remain 

stationary and stable. 

2.3.6 Cable Entry 

A lower incoming line is used for 10KVA~30KVA UPS. 

2.4 Protective Devices 

For safety concerns, it is recommended  to install  external circuit breakers or  other  protective devices  for  the input 

AC supply of the UPS system.   

We suggest to choose the input automatic break Bigger than internal automatic Breaker and D curve for the selectivity 

with internal UPS protection. 

This  section  provides  generic  practical  information  for  qualified  installation  engineers.  The  installation  engineers 

should have the knowledge of the regulatory wiring standards, and of the equipment to be installed. 

Summary of Contents for NS3000 10 kVA

Page 1: ...1 NS3000 Series User Manual Rev 01 UPS NS3000 10 20 30kVA USER Manual 2 NS3000 Series User Manual Rev 01...

Page 2: ...te the static switch if excessive voltage is present at the bypass input when the bypass source is deenergized If this function is not installed and enabled there must be a warning label on the extern...

Page 3: ...al rev 01 3 2 3 Auto Restart Mode 29 3 2 4 Bypass Mode 29 3 2 5 Maintenance Mode 29 3 2 6 ECO Mode 29 3 2 7 Frequency Converters Mode 29 3 2 8 Parallel connection redundancy mode 30 3 3 Battery Manage...

Page 4: ...s any mistake for accessories contact with shipper or provider 1 3 Environment Checking Before installing UPS please check these items as below 1 Is the UPS operation environment temperature above 25...

Page 5: ...sary a system of extractor fans should be installed to aid cooling air flow An air filter should be used when the UPS is to operate in a dirty environment and should be regularly cleaned to maintain a...

Page 6: ...l Against ambient corrosive gases l Against excessive humidity and heat sources l Against dust l With the current fire prevention requirements l The operating environment temperature is within 20 25...

Page 7: ...supply the installed device should l Sensitive to DC Class B or class A in the network l Insensitive to transient current pulses l Have an average sensitivity that is adjustable between 0 3A 1A 14 NS3...

Page 8: ...epartment After the equipment has been finally positioned and secured connect the power cables as described in the following procedures 1 Verify that all the external input distribution switches of th...

Page 9: ...2 5 A Pay attention all cable are marked and have different color 6 Connect the battery according fig 2 5 A don t connect A and B cable in the shelf 1 7 In shelf 1 on the left connect the cable mark...

Page 10: ...d be double insulated with a typical 0 5 to 1 5 mm 2 cross section area for a maximum connection length between 25 and 50 meters 2 6 1 Dry Contact Interface of Battery and Environmental Temperature De...

Page 11: ...Note 1 The emergency stop action within the UPS will shut down the rectifier inverter and static bypass However it does not internally disconnect the mains input and batterypower supply To disconnect...

Page 12: ...neral warning dry contact interface diagram Table 2 7 Position Name Purpose J9 1 ALARM_NC Integrated warning relay normally closed will be open during warning J9 2 ALARM_NO Integrated warning relay no...

Page 13: ...25 NS3000 Series User Manual rev 01 2 7 Installation Diagram 26 NS3000 Series User Manual rev 01 a 10KVA 30KVA terminal block NS3030 NS3010 NS3020...

Page 14: ...ss module can be removed for maintenance Fig 3 1 System principle framework 28 NS3000 Series User Manual rev 01 3 1 2 Bypass During normal system operation the load is connected to the inverter but in...

Page 15: ...e output frequency The range of output frequency is 40Hz 70Hz Under this mode static bypass is unavailable but battery can be selected according to the actual requirements of battery mode Frequency Co...

Page 16: ...4 1 Typical 1 N parallel operation system Note when the load exceeds the capacity of the single device we recommended an external manual Bypass The cables for the parallel operation provide double in...

Page 17: ...Warning Please confirm that UPS output rotating switch point to UPS with anti misoperation stop plate for rotating switch is fixed well 1 Close UPS bypass input switch and input switch in turns The LC...

Page 18: ...aution Before making this operation read messages on display to be sure that bypass supply is regular and the inverter is synchronous with it so as not to risk a short interruption in powering the loa...

Page 19: ...chapter introduces the functions and operation instructions of the parts on UPS operator control and display panel in detail and provides LCD display information including LCD display types detailed...

Page 20: ...tus indicator Steady red Failure 6 1 2 Audible Alarm buzzer There are two different types of audible alarm during UPS operation as shown in table 6 3 Table 6 3 Description of audible alarm Alarm Purpo...

Page 21: ...rface you can select each function and press ENTER press ENTER again it will display Confirm interface 6 2 5 State Display The alarm page as below press left and right arrow to select STA in homepage...

Page 22: ...inverted power supply status Bypass power supply The system is in bypass power supply status No power supply System no output Battery equalized charging Battery is in boost charging Battery float char...

Page 23: ...hows the power is normally supply by the bypass 8 Open maintenance bypass switch and close mains input switch the inverter automatically starts and UPS operates in the normal mode after 60 seconds 9 C...

Page 24: ...harge V cell 2 4V cell selectable from 2 3V cell 2 45V cell Constant current and constant voltage charge mode Battery Charging Power Max Current kW 10 UPS capacity selectable from 0 20 UPS capacity NS...

Page 25: ...eutral cable A 1 7 In Frequency2 Hz 50 60 Switch time between bypass and inverter ms Synchronized switch 1ms Bypass voltage tolerance Vac Upper limit 10 15 or 20 default 20 Lower limit 10 20 30 or 40...

Reviews: