background image

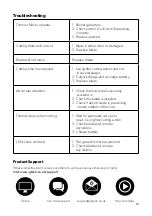
Troubleshooting

support@gtech.co.uk

Live chat support

Online

How to Videos

Product Support

If these initial tips don’t solve your problem, we have various other ways to help.

Visit: www.gtech.co.uk/support

15

Trimmer fails to operate

1. Recharge battery.

2. Check switch. It will click if operating 

correctly.

3. Blade is jammed

Cutting blade will not cut

1. Blade is either worn or damaged. 

2. Replace blade.

Blade will not move

Replace blade

Cutting time has reduced

1. Use lighter cutting action and cut  

in several stages.

2. Fully discharge and recharge battery.

3. Replace blade.

Abnormal vibrations

1. Check the hub screw is securely 

screwed in.

2. Check the blade is installed.

3. Check if any obstacle is preventing 

normal rotation of the hub.

Trimmer stops when cutting

1. Wait for automatic cut out to  

reset. Use lighter cutting action.

2. Check blade and remove  

any debris.

3. Charge battery.

LEDs show solid red

1. The grass trimmer has jammed.

2. Check blade and remove  

any debris.

Summary of Contents for ST20/GT3.0

Page 1: ...OPERATING MANUAL Cordless Grass Trimmer Model number ST20 GT3 0...

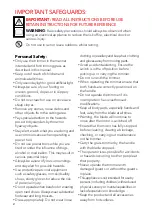
Page 2: ...uipment such as safety glasses non skid safety shoes sturdy gloves to reduce the risk of personal injury Do not operate when barefoot or wearing open toed shoes Always wear substantial footwear and lo...

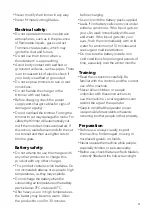
Page 3: ...expose to high temperatures as they may explode Donotchargethebatterywhenthe surroundingairtemperatureorthebattery packisbelow0 Corabove45 C After heavy use or in high temperatures the battery may bec...

Page 4: ...airer When not in use store the machine out of the reach of children Service Do not use the trimmer if the switch does not turn it on or off Any power tool that cannot be controlled by the switch is d...

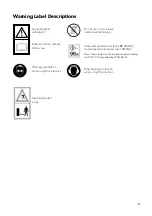
Page 5: ...raining Wear hearing protection when using this product General hazard safety alert Keep bystanders away Wear eye protection when using this product Measured sound power level 88 28dB A Guaranteed so...

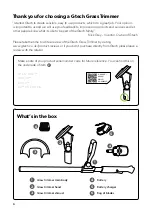
Page 6: ...Gtech Grass Trimmer I started Gtech to create sensible easy to use products which do a great job Your opinion is important to us and we will use your feedback to improve our products and services and...

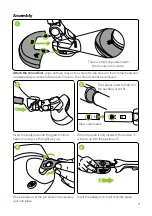
Page 7: ...pole into the grass trimmer head ensuring it is the right way up When the pole is fully inserted the button 1 will pop up into the aperture 2 Insert the battery which will click into place Hook a bla...

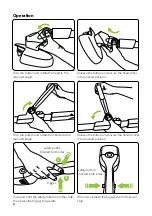
Page 8: ...top Push the button and rotate the head to the required angle Release the button and ensure the head clicks into a locked position Push the button and rotate the handle to the required angle Release t...

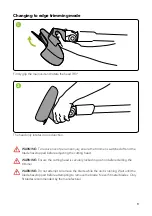
Page 9: ...locked in position before starting the trimmer WARNING Do not attempt to remove the blade while the unit is running Wait until the blade has stopped before attempting to remove the blade Never fit met...

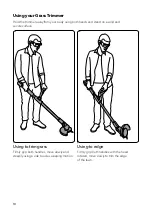
Page 10: ...n a solid and secure surface 10 Using your Grass Trimmer Firmly grip both handles move slowly and steadily using a side to side sweeping motion Firmly grip both handles with the head rotated move slow...

Page 11: ...d you The trimmer may throw out stones and debris at high speed Take care not to overload the trimmer Attempting to force the trimmer to cut may damage the motor To prevent overloading cut long or dif...

Page 12: ...e battery 1 1 2 Checking the battery charge status Press the button to check how much charge there is in the battery The number of lit LEDs shows the charge When there is no power left the final LED w...

Page 13: ...this manual Charging the battery Plug the charger into an ordinary plug socket While charging the LEDs will progressively pulse until all four are lit The battery can be charged from flat in 4 hours...

Page 14: ...ndition of the cutting edges of the blade and that the blade fixings are secure Do not use water solvents or polishes to clean the trimmer Wipe clean with a dry cloth Do not use abrasive materials to...

Page 15: ...d 2 Replace blade Blade will not move Replace blade Cutting time has reduced 1 Use lighter cutting action and cut in several stages 2 Fully discharge and recharge battery 3 Replace blade Abnormal vibr...

Page 16: ...ours Battery charger output 21 6V 0 5A Battery charger input 100 240V 50 60Hz Battery charger type K12V216050B Measure sound power level LwA 88 75 dB A K 3 56 dB A Guaranteed sound power level LwA d 9...

Page 17: ...cycling facility The product contains a Li Ion battery which should not be disposed of with general household waste The battery should be disposed of properly with the product at a recycling facility...

Page 18: ...onents Faulty installation except where installed by Gtech If it is modified in any way Repairs or alterations carried out by parties other than Gtech or its authorised agents If you are in doubt as t...

Page 19: ...easured Sound Power Level 88 75 dB A K 3 56dB A Declared Guaranteed Sound Power Level 96 dB A Notified Body for EC Directive 2000 14 EC amended by 2005 88 EC SNCH 11 rue de Luxembourg L 5230 Sandweile...

Page 20: ...CPN3526 Grey Technology Limited Brindley Road Warndon Worcester WR4 9FB email support gtech co uk telephone 01905 345891 www gtech co uk...

Reviews: