background image

Go-Mini User Manual

1.

Config................4

2.

Water................14

3.

Create Model.........26

4.

Edit Model...........30

5.

Create Disable.......32

6.

Edit Disable.........35

7.

Sensors..............38

8.

Logs.................39

9.

Alarms...............41

Table of Contents

1

Summary of Contents for Go-Mini

Page 1: ...Go Mini User Manual 1 Config 4 2 Water 14 3 Create Model 26 4 Edit Model 30 5 Create Disable 32 6 Edit Disable 35 7 Sensors 38 8 Logs 39 9 Alarms 41 Table of Contents 1...

Page 2: ...Config 0 2 a b c 3 d e f 4 g h i 5 j k l 6 m n o 7 p q r s 8 t u v 9 w x y z Log F1 No Yes Home Change Crop Run Model Disable F2 Boom Sensors Alarm F3 Test Greenhouse Technology Inc Go Mini Network Co...

Page 3: ...but hasn t configured anything software wise 1 Joe Configures his Network Clock 05 37 24hr 10 20 17 MM DD YY Config 1 Clock 2 Network Units 3 Sensors 4 Utilities 5 About Config 0 1 First Joe Sets the...

Page 4: ...ange Clock 05 37 24hr 10 20 17 MM DD YY 1 Config 0 4 g h i Config 0 Clock 10 40 24hr 10 20 17 MM DD YY 1 1 1 8 t u v 1 7 p q r s Clock 10 40 24hr 11 18 17 MM DD YY Yes Clock 10 40 24hr 11 18 17 MM DD...

Page 5: ...e Boom 1 Address 002 Type Boom Status Inactive Network Units 1 Boom 1 2 Boom 2 3 Boom 3 4 Boom 4 1 A couple of things to change here the name of the unit needs to be more memorable And the boom needs...

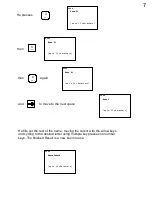
Page 6: ...01 up to 12 characters 4 g h i and to move to the next space Name Hoom 1 up to 12 characters He fills out the rest of the name moving the cursor with the arrow keys and cycling to the desired letter u...

Page 7: ...Name House3south Address 002 Type Boom Status Inactive Network Unit 1 Name House3south Address 002 Type Boom Status Inactive Network Unit 1 Name House3south Address 002 Type Boom Status Inactive When...

Page 8: ...Joe presses to save it Network Unit 1 Name House3south Address 002 Type Boom Status Active Joe presses to add another Network Unit Network Unit 2 Name Unit 02 Address 003 Type Boom Status Inactive re...

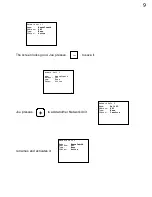
Page 9: ...ork Unit 3 Name House2south Address 004 Type Boom Status Active Network Unit 4 Name House2north Address 005 Type Boom Status Active He presses to see how the network menu looks now No Network Units 1...

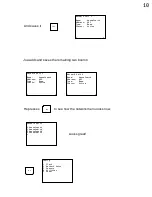
Page 10: ...2 LT 3 RH 1 AT Sensor Unit Fahrenheit Type Temp GTI Calibrate 00 Status Active AT Sensor Unit Fahrenheit Type Temp GTI Calibrate 00 Status Inactive Joe notices that it only needs to be active He pres...

Page 11: ...RH sensor He presses 3 d e f then RH Sensor Type RH GTI Calibrate 00 Status Inactive RH Sensor Type RH GTI Calibrate 00 Status Active RH Sensor Type RH GTI Calibrate 00 Status Active RH Sensor Type R...

Page 12: ...us Inactive RH Sensor Type RH GTI Calibrate 07 Status Inactive RH Sensor Type RH GTI Calibrate 07 Status Inactive RH Sensor Type RH GTI Calibrate 07 Status Inactive Change RH Sensor Type RH GTI Calibr...

Page 13: ...d picks Boom 1 from the list of booms Boom Boom 1 House3South 2 House3North 3 House2South 4 House2North 1 to see the Boom Screen Crop Menu Then picks a crop Boom1 B1R 01 Crop01 02 Crop02 03 Crop03 04...

Page 14: ...ation alarm or is busy running crops ahead of this one in the queue crop being currently run to be indicated by a 2 digit number status i e 02 for I m busy running crop 02 then you might reasonably ex...

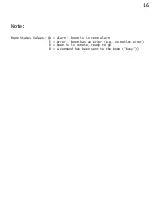
Page 15: ...Boom Status Values A alarm boom is in comm alarm E error boom has an error e g no motion error R boom is in remote ready to go B a command has been sent to the boom busy Note 16...

Page 16: ...ere are 4 values manual timed target model Joe presses once to cycle to timed Change Crop Status 10 42 B1 House3South B1R C01 Crop01 timed 00 00 A field appears for time Joe presses to move the cursor...

Page 17: ...Yes Crop Status 10 42 B1 House3South B1R C01 Poinse 10 15 timed 08 00 He presses to save Boom 1 is now scheduled to water Crop 01 every day at 8am 18...

Page 18: ...del Joe presses twice to cycle to target Change Crop Status 10 42 B1 House3South B1R C01 Crop01 Idle target 00000 01000 vpd A number and an editable field appear The number 00000 is the presently accu...

Page 19: ...vpd Joe s done He presses Run B1 House3South C01 Crop01 Reset AVPD Run Yes No then Yes Crop Status 10 42 B1 House3South B1B C01 Crop01 target 00001 00385 Boom is busy If however He would like to run...

Page 20: ...ee times to cycle to model Change Crop Status 10 42 B1 House3South B1R C01 Crop01 model 00000 00080 M01 GeraniumProp 01 D01 GeraniumEnab 01 When Joe switches to model the screen immediately selects Mo...

Page 21: ...hia 04 E01 GeraniumEnab 01 Again for this parameter there are 4 values manual timed target model Immediately the days screen for the model appears The Go Mini is assuming that if you had to pick a mod...

Page 22: ...l 00000 00970 M03 Fuschia 04 D03 FuschiaEnab 01 Change Enables 01 GeraniumEnab 02 TuberBegonia 03 FuschiaEnab 04 PoinsettiaEn 05 OrnaPepperEn 03 Config 0 3 d e f And picks the day Surveys the results...

Page 23: ...atus 10 42 B1 House3South B1R C01 Crop01 model 00000 00970 M03 Fuschia 04 E03 FuschiaEnab 02 Crop Status 10 42 B1 House3South B1R C01 Crop01 model 00000 00970 M03 Fuschia 04 E01 GeraniumEnab 01 Config...

Page 24: ...th B1R C01 Crop01 model 00000 00970 M03 Fuschia 04 E03 FuschiaEnab 01 Name Crop 01 The cursor doesn t start on the crop name even though it s at the top of the screen The cursor starts on the water ty...

Page 25: ...ia 11 26 model 00000 00970 M03 Fuschia 04 D03 FuschiaEnab 01 Crop Status 10 42 B1 House3South B1R C01 Fuschia 11 26 model 00000 00970 M03 Fuschia 04 E03 FuschiaEnab 01 After a few key presses he has c...

Page 26: ...del when the only Model in the Go Mini was the Dummy Model The Model01 factory installed on the Go Mini Joe presses to see the Model list Model Models 01 DummyModel Then to create a brand new model Th...

Page 27: ...en moves to the data points M02 GeraniumProp 30 Days 01 01000 10 01000 Yes Create M02 GeraniumProp 30 Days 01 01000 10 01000 Yes Create The Model is drawn using a connect the dots strategy with target...

Page 28: ...01 00080 22 00920 30 01000 Yes Create Now his second data point a 920 vpd target on Day 22 2 a b c 2 a b c Config 0 Config 0 9 w x y z 2 a b c Config 0 Joe specifically wants 3 data points he wants a...

Page 29: ...02 GeraniumProp 30 Days 06 00280 07 00320 08 00360 09 00400 10 00440 M02 GeraniumProp 30 Days 11 00480 12 00520 13 00560 14 00600 15 00640 M02 GeraniumProp 30 Days 16 00680 17 00720 18 00760 19 00800...

Page 30: ...M02 GeraniumProp 30 Days 01 00080 02 00120 03 00160 04 00200 05 00240 Joe presses He wants to change the first vpd target to 100 so he presses Config 0 Config 0 1 Config 0 Config 0 M02 GeraniumProp 3...

Page 31: ...ge When Joe added the two days the Mini Go populated them with data from the model s last day then day 30 This is why the target is 01000 for these days Joe wants to change this Config 0 1 Config 0 5...

Page 32: ...ss is very similar From the home screen Enable 01 Enable01 E02 EnableName Off x5 00 10 Days 01 20 00 08 00 10 20 00 08 00 Change Name EnableName He fills out a new name Name GeraniumEnab And presses t...

Page 33: ...5 10 Days 01 20 00 05 00 10 20 00 05 00 E02 GeraniumEnab Off x8 25 30 Days 01 20 00 05 00 10 20 00 05 00 3 d e f to set the length of the Enable to 30 days Next he sets the data points using the arrow...

Page 34: ...5 30 Days 11 18 38 07 44 12 18 36 06 48 13 18 34 06 52 14 18 32 06 56 15 18 30 07 00 E02 GeraniumEnab Off x8 25 30 Days 16 18 28 07 04 17 18 26 07 08 18 18 24 07 12 19 18 22 07 16 20 18 20 07 20 E02 G...

Page 35: ...at s because the day values are something that Joe might want to tweak more than the number of days or multiplier which might be more stable E02 GeraniumEnab Off x8 25 30 Days 01 18 58 06 00 02 18 56...

Page 36: ...02 GeraniumEnab Off x8 25 32 Days 31 17 58 08 00 32 18 00 08 00 E02 GeraniumEnab Off x8 25 32 Days 31 17 58 08 04 32 18 00 08 00 E02 GeraniumEnab Off x8 25 32 Days 31 17 58 08 04 32 18 00 08 00 E02 Ge...

Page 37: ...E02 GeraniumEnab Off x8 25 32 Days 31 17 58 08 04 32 17 56 08 08 Config 0 8 t u v Config 0 8 t u v Yes E02 GeraniumEnab Off x8 25 32 Days 31 17 58 08 04 32 17 56 08 08 38...

Page 38: ...arting at the Home Screen Sensors Sensors Wed 10 40 AT 74 7 deg F LT 88 4 deg F RH 93 2 RH VPD 0 42 10s This is just a view screen to show Joe his sensor values 39 Sensors Wed 10 40 AT 23 7 deg C LT 3...

Page 39: ...0 38 c 03 B3 C01 Wed 10 37 c 04 B1 C15 Wed 10 29 c 05 B3 C11 Tue 17 28 c Network Log 06 B1 C08 Wed 10 18 c 07 B4 C01 Wed 10 10 c 08 B1 C15 Wed 10 02 e 09 B4 C07 Wed 10 00 i 10 B3 C01 Wed 10 00 c up to...

Page 40: ...B Log Status Indicators 41 right column c complete i incomplete ongoing e error...

Page 41: ...00 Booms B1C B2R B3C B4 76 99 32 99 There are several pieces of information here mostly for diagnostic purposes 1 Board Temperature Sensor Temperature degF 2 Air Temperature Sensor Increments out of 1...

Reviews: