16
rev 06.13.12
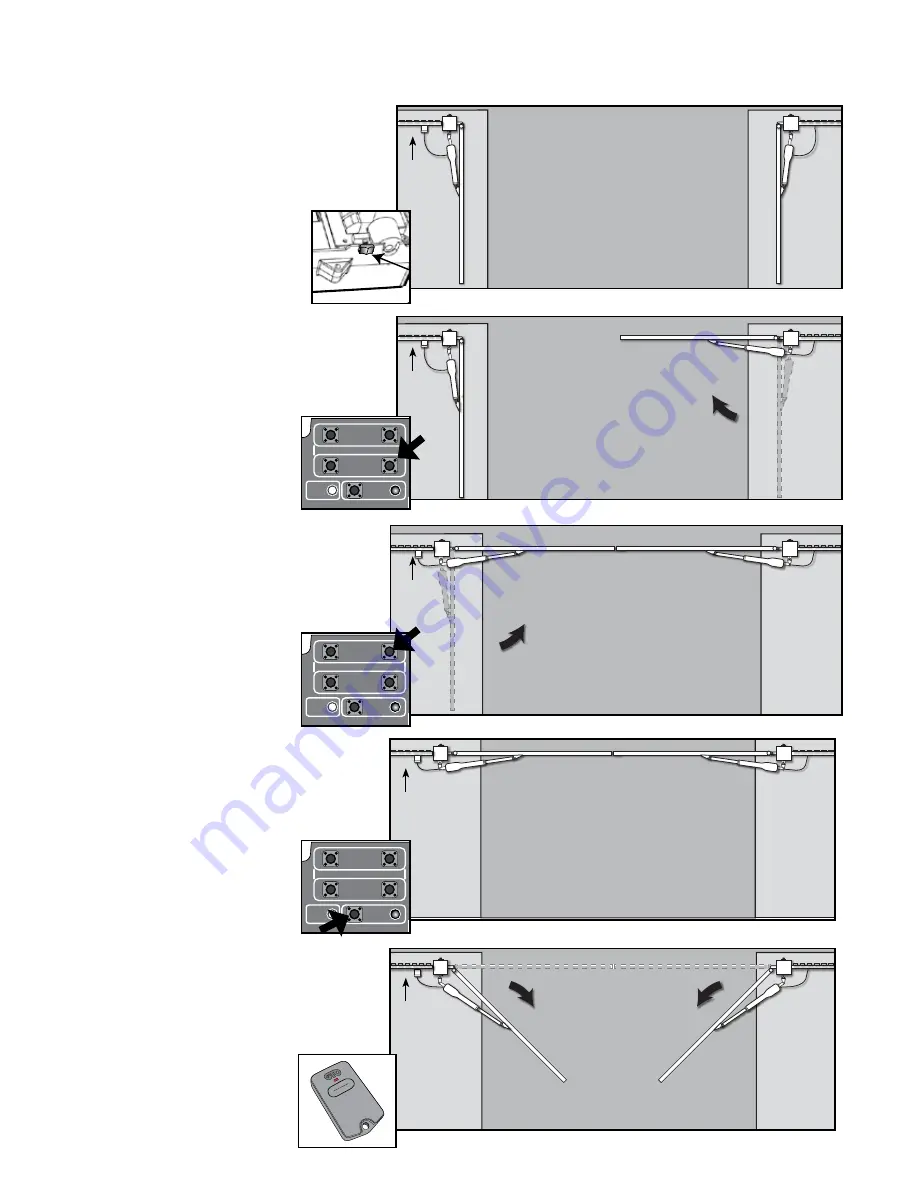
Step 1
Power switch is on, gates are in the
OPEN position, opener arms fully
retracted.
NOTE: The opener arms must be
extended more than 7 inches to
set limits.
Gates in
OPEN
Postion
Control
Box
ON/OFF
Switch
ON/OFF
1st
Gate
Opener
2nd Gate
Opener
Step 2
Press and
HOLD 2nd Gate Opener JOG
OPEN and CLOSE button. The gate will
begin to
CLOSE. Release the button
when the gate reaches desired
closed position. Use the
JOG
OPEN and CLOSE buttons to
"fine tune" the gate position if
necessary
.
2nd Gate
Closing
Control
Box
1st
Gate
Opener
2nd
Gate
Opener
Step 3
Press and
HOLD 1st Gate Opener JOG
OPEN and CLOSE button. The gate will
begin to close. Release the button when
the gate reaches desired
closed position. Use the
JOG
OPEN and CLOSE buttons to
"fine tune" the gate position if
necessary.
Control
Box
Step 4
With both gates in the
CLOSED position
press and hold the
SET LIMIT button
until the alarm and the red light come on.
Release the
SET LIMIT
button.
Step 5
Press the remote button once (within 5
feet of control box) and allow the gates to
fully open. The alarm will sound once both
gates reach the
OPEN LIMIT.
Both arms are now
programmed.
Gates in
CLOSED
Position
Gates
Opening
Control
Box
Control
Box
Set Closed Position Limit
(for Pull-To-Open Applications)
1st Gate
Closing
MIN
MAX OFF
REMOVE JUMPER FOR
PUSH TO OPEN OPTION
120
SEC.
STALL FORCE
OPEN < JOG > CLOSE
PWR.
SET
LIMIT
1st OPR.
2nd OPR.
STATUS
AUTO CLOSE
MIN
MAX OFF
REMOVE JUMPER FOR
PUSH TO OPEN OPTION
120
SEC.
STALL FORCE
OPEN < JOG > CLOSE
PWR.
SET
LIMIT
1st OPR.
2nd OPR.
STATUS
AUTO CLOSE
MIN
MAX OFF
REMOVE JUMPER FOR
PUSH TO OPEN OPTION
120
SEC.
STALL FORCE
OPEN < JOG > CLOSE
PWR.
SET
LIMIT
1st OPR.
2nd OPR.
STATUS
AUTO CLOSE
1st
Gate
Opener
2nd
Gate
Opener
1st
Gate
Opener
2nd
Gate
Opener
1st
Gate
Opener
2nd
Gate
Opener


