background image

38

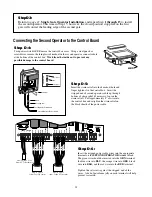
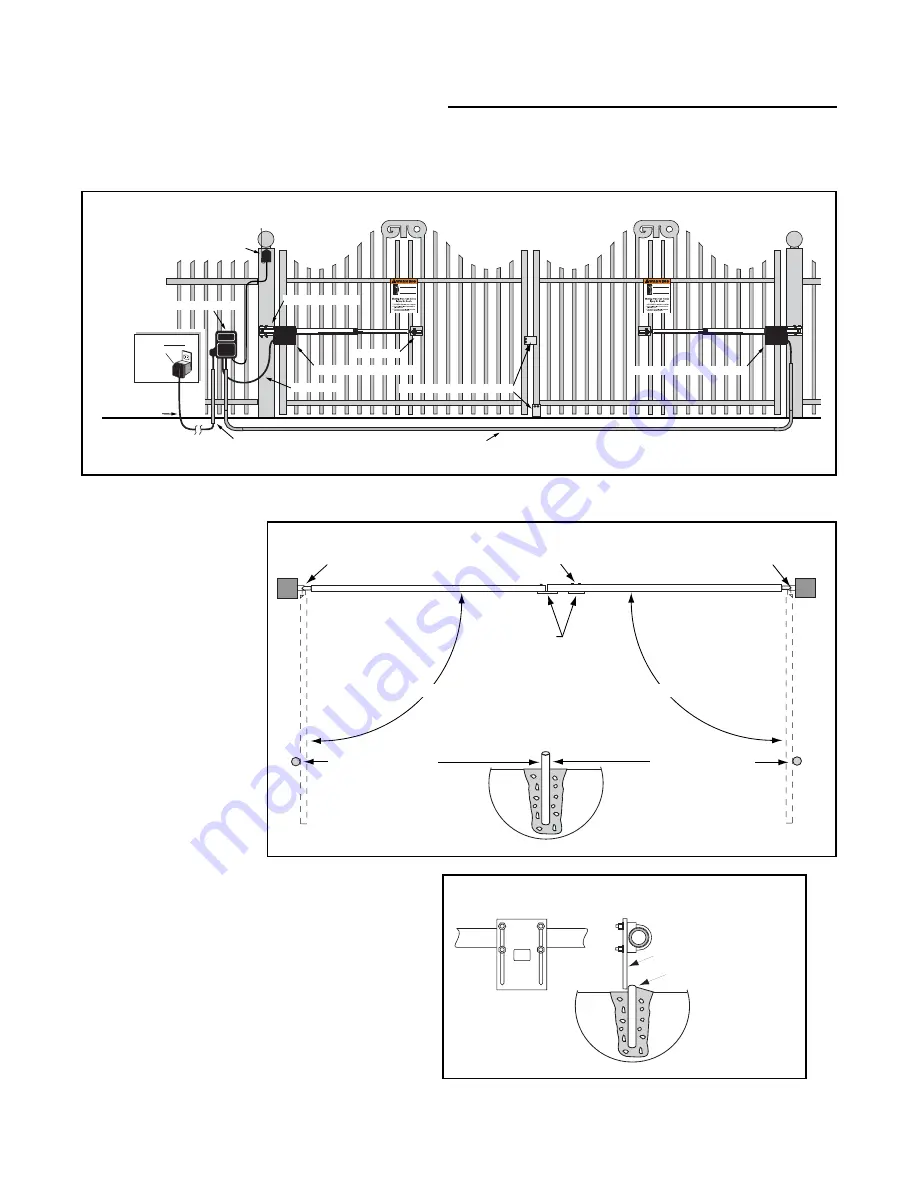
Step D1:

Attach the closed position
stop plate vertically to the
inside bottom of the gate
that will receive the
second operator (for push-
to-open, install plate on
outside of gate). In this
illustration this is the gate
that will close first.

Installing The Second Unit

Step D2:

Install a closed position ground stop in driveway securely
into ground directly below the gate. The positive stop
plate installed in Step D1 should rest against the ground
stop in the closed position. For added security, install a
GTO Automatic Gate Lock (see Accessory Catalog).

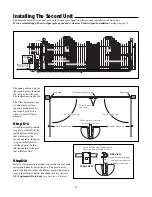
The diagram below shows a dual gate, pull-to-open (gate opens into the property) installation on iron gates.
If you are installing a Push-to-Open (gate opens out) system see Push-to-Open Installation starting on page 31.

The open position stop for
the second gate is installed
the same as the first gate.
See instructions on page 16.

The Closed position stops
on a dual gate system
require a ground stop for
the second gate (first to
close) to be installed as
follows:


Receiver

Run up to 1000' of low
voltage wire to control
box from transformer.
(wire not included)

120 Volt Indoor
Transformer

(Surge Protector,

not supplied)

PVC conduit (not included) to protect wire from lawnmowers and weedeaters.

Control Box with  Battery 

Power Cable

Closed Position Positive Stop Plate

Gate Bracket

Post Bracket Assembly

GTO/PRO 2000 – First Operator

GTO/PRO 2200 – Second Operator

Closed Position 
Stop Plates

Closed Position Stop Plate mounted 
on second gate (first gate to close).

Open Position Stop

Wood, metal, or concrete 

post set in concrete.

Gate Hinge

Gate Hinge

Open Position Stop

Not to exceed 110

°

Not to exceed 110

°

Closed position stop plate

Low profile ground stop
in middle of driveway

FRONT VIEW

SIDE VIEW

Ground Stop (under gate)

Summary of Contents for SW-2000

Page 1: ...rator safety as established and made effective March 1 2000 by Underwriters Laboratories Inc SERIES LI S T E D 75 Receiver Run 1000 max of low voltage wire to control box from transformer wire not included 120 Volt Indoor Transformer surge protector not supplied PVC conduit not included to protect wire from lawn mowers and weed eaters Control Box with Battery Power Cable Closed Position Positive S...

Page 2: ...he general public Restricted Access Vehicular Gate Operator Class IV A vehicular gate operator or system intended for use in a guarded industrial location or building such as an airport security area or other restricted access locations not servicing the general public in which unauthorized access is prevented via supervision by security personnel Converting Metric Units to English Equivalents Whe...

Page 3: ...ition Stops page 16 Mounting the Control Box page 17 Powering the System page 19 Solar Zones and Gate Activity page 20 Control Boards Settings page 22 Setting the Personal Transmitter Code page 24 Mounting the Receiver page 25 Setting the Closed Position Limit Switch page 26 Connecting Additional Safety Devices page 28 Compatible Safety Devices page 29 Connecting Accessories page 30 Push To Open I...

Page 4: ...CAREFULLY READ AND FOLLOW ALL SAFETY PRECAUTIONS WARNINGS AND INSTALLA TION INSTRUCTIONS TO ENSURE THE SAFE SYSTEM DESIGN INSTALLATION AND USE OF THIS PRODUCT The precautions and warnings in this manual are identified with this warning symbol The symbol identifies condi tions that can result in damage to the operator or its components serious injury or death Because GTO automatic gate operators ar...

Page 5: ... to become familiar with its safety features Understand how to manually open and close the gate by disconnecting the operator see page 1 5 This gate operator is intended for vehicular gates ONLY A separate entrance or gate must be installed for pedes trian use see page 6 NO ONE SHOULD CROSS THE PATH OF A MOVING GATE II During Installation 1 Install the gate operator on the inside of the property a...

Page 6: ... including disconnecting the operator for manual operation of the gate 2 Attach the warning signs included to each side of the gate to alert public of automatic gate operation Take a photo of warning signs installed on gate Record the date of the photo for your reference 3 SAVE THESE INSTRUCTIONS Leave a copy of the IMPORTANT SAFETY INSTRUCTIONS section of this manual with the consumer end user ...

Page 7: ... bottom edge and post mounted both inside and outside of a vehicular swing gate system B A hard wired contact sensor shall be located and its wiring arranged so that the communication between the sensor and the gate operator is not subjected to mechanical damage C A wireless contact sensor such as one that transmits radio frequency RF signals to the gate operator for entrapment protection function...

Page 8: ... it and can determine that its area of travel is clear of people pets or other obstructions 8 It is your responsibility to make sure that the installer posted warning signs on both sides of your gate If any of these signs or warning decals become damaged illegible or missing replace them immediately Contact your installer or GTO for replacements 9 If electric safety edge sensors or photoelectric s...

Page 9: ...mmended not included Warning Sign Warning signs alert people of automatic gate operation and are required when installing the GTO PRO 2000 series gate operator Furthermore a walk through gate must be installed if pedestrian traffic is expected near the vehicle gate We recommend the GTO Bulldog Pedestrian Gate Lock see Accessory Catalog for controlled access GTO s internal obstruction settings even...

Page 10: ...49 7 W Class I II and III Vehicular Swing Gate Operator Serial Number 2000 xxxxxxx 9901178 Conforms to UL 325 STANDARDS TO MANUALLY OPEN AND CLOSE THE GATE 1 Turn control box power switch OFF 2 Remove hairpin clip and clevis pin from front mount 3 Pull front mount away from gate bracket Disconnect operator ONLY when the control box power switch is OFF and the gate is NOT moving Series GTO Inc Tall...

Page 11: ...ircuit on the control board regulates charging Sleep draw is 40 mA active draw is 2 to 5 A Auto memorization of digital transmitter code GTO remote mounted RF receiver tuned to 318 MHz adjustable auto close timer OFF to 120 s inertia and obstruction sensitivity using three 3 potentiometers Power terminal bock accommodates a transformer and solar panels DIP switches simplify setup of gate operator ...

Page 12: ... Bolt 2 1 2 x 10 Carriage Bolt 2 8 Nylon Cable Tie 14 1 2 Washer 6 1 2 Lock Nut 7 3 8 Lock Nut 1 2 Receiver Mounting Screw 1 Installation of First Single Gate Operator Single Gate Operator Parts List Closed Position Stop Plate Gate Operator with 6 ft Power Cable Post Bracket Post Pivot Brackets 2 Gate Bracket Rear Mount Hardware not to scale Parts ...

Page 13: ...se at least one GTO Solar Panel to trickle charge the battery See the Accessory Catalog The diameter of the fence post should be at least 8 round or 6 square in order to mount the postbracket see page12 Anoptional 4 bracketcanbeusedwith4 post andmountingbracket adapters must be used with 4 and 6 round posts See Accessory Catalog Depending upon the diameter of the fence post you may need longer car...

Page 14: ...ket can be secured For the operator to perform properly Steps 1 2 must be complete before you go any further with the installa tion Pull to Open Single Gate gate opens into the property The diagram below is an example of a single leaf pull to open installation on an ornamental iron gate If you are installing a Push to Open gate opens out from the property system see page 31 Or if you are mounting ...

Page 15: ...plied On wood posts use a metal plate not provided between the nuts and post to prevent the operator from pulling the bolts and washers through the wood NOTE If you have round metal gate posts that are 4 or 6 in diameter optional mounting bracket adapters are available see Accessory Catalog The use of optional mounting brackets adapters may require you to drill a few additional holes in the standa...

Page 16: ... nut Step 5 Drill holes in fence post as marked using a 1 2 drill bit Install the post bracket using the 1 2 x 10 carriage bolts 1 2 washers and lock nuts provided Step 4 Position the post bracket on the fence post with the mounting holes centered over the scribe line The post bracket should be flush with the edge of the fence post closest to the gate see illustration Mark the position of post bra...

Page 17: ...lt and 1 2 nut Note when tightening the rear mount bolt leave it loose enough for the operator to pivot freely Step 9 Attach the gate bracket to the front mount using the clevis pin and hairpin clip Step 7 Tap the rear mount onto the back of the operator Align the 3 8 hole in the rear mount with 3 8 hole in the back of the operator and insert the 3 8 bolt through the holes and secure it with the l...

Page 18: ... holes in post bracket post pivot brackets and spacer When tightening the 1 2 nut leave it loose enough so that you can make adjustments later Installing the Gate Bracket Spacer Step 12 With the gate bracket clamped in the open position no more than 110o from the closed position Detach the operator from the gate bracket The mounting holes should be centered over the scribe line Drill the 1 2 holes...

Page 19: ...llustration below for positioning You will install an open position stop post at this point The open position stop post can be made of wood metal or concrete Closed Position Stop Open Position Stop Hairpin Clip Clevis Pin Gate Bracket Front Mount Push Pull Tube The positive stops hold the gate firmly in the open and closed positions The positive stops also form the boundaries of the gate operating...

Page 20: ...h the operator to the gate bracket Mounting the Control Box Step 16 Mount the control box using the nylon cable ties provided or another secure mounting method The control box must be mounted at least 3 feet above the ground to protect it from rain splash snow etc and at least 3 feet from an ac power source to prevent electrical interference Closed Position Stop Plate Closed Position Stop Plate mo...

Page 21: ...NEGATIVE terminal RED BLACK Operator Power Cable RED BLK ORG BLU GRN CLS EDG OPN EDG RED GRN ORG BLU WHT BLK ORG BLU GRN CLS EDG OPN EDG LEARN AUTO CLOSE INERTIA STATUS STATUS BATT OBSTR SENS RCVR R G B ALAR M SECO ND OPER ATOR FIRST OPER ATOR POWER IN 18VAC SOLAR ACCE SSOR Y PWR SW PWR SW Strain Relief 12 V Battery Step 19 Insert the stripped power cable wires into the appropriate terminals on th...

Page 22: ...ssories on page 44 should provide ample power to handle any situation For more information call the GTO Service Department 2 If the gate is binding dragging in high winds or if ball bearing hinges are not used it will require more than 5 A to move it this will reduce the MNC Gates weighing less than 1000 lb may have a higher MNC 3 The above data is based on a line voltage of 120 Volts from an elec...

Page 23: ...8 13 PRO 2000 Single Gate two panels 8 16 26 PRO 2000 Dual Gate two panels 4 8 13 Zone 1 Zone 2 Zone 3 Zone 3 Zone 3 NOTE A maximum of two 10 watt solar panels can be connected to the GTO PRO 2000 series of operators RED BLK ORG BLU GRN CLS EDG OPN EDG RED GRN ORG BLU WHT BLK ORG BLU GRN CLS EDG OPN EDG LEARN AUTO CLOSE INERTIA STATUS STATUS BATT BATT OBSTR UCT SENS RCVR R G B ALAR M SECO ND OPER ...

Page 24: ...ntrol board Step 24 Strip 3 16 off the ends of the low voltage wire and twist each wire end tightly Attach these ends to the 18VAC terminals located on the POWER IN terminal block see illustration above Make sure the exposed wires DO NOT touch each other Insert one transformer wire in an 18VAC terminal Insert the other transformer wire into the remaining 18VAC terminal The transformer wires can be...

Page 25: ... gates that push to open see Push to Open Installation on pages 31 32 NOTE The direction a gate opens is determined by standing inside the property and facing toward the gate SNGL DUAL Set to SNGL for a single gate leaf factory setting DUAL for dual gate leaves SEQ1 Controls the opening order of dual gate leaves See Dual Gate System Installation on page 40 for more infor mation the factory setting...

Page 26: ... reverses The gate will exert minimum force before obstructing when set to MIN When set to MAX the opera tor will exert maximum gate force before obstructing i e the operator will require greater resistance before stopping and revers ing The factory setting is MIN READ WARNING BELOW NOTE Heavy gates and gates with high wind resistance may require the OBSTRUCT SENS potentiometer to be set closer to...

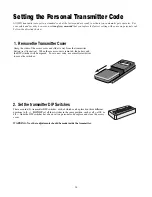
Page 27: ... Personal Transmitter Code 1 Remove the Transmitter Cover Grasp the sides of the access cover and slide it away from the transmitter button see illustration When the access cover is removed the battery and the DIP switches will be exposed To set a new code use a small screwdriver to move the switches Inc Inc Inc All GTO transmitters are set to a standard code at the factory and are ready to activa...

Page 28: ...vice complies with FCC rules Part 15 Operation is subject to the following conditions 1 This device may not cause harmful interference 2 This device must accept an interference that may cause undesired operation Transmitter distance may vary due to circumstances beyond our control NOTE The manufacturer is not responsible for any radio or TV interference caused by unauthorized modifications to this...

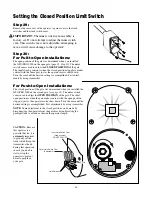
Page 29: ...o adjust the OPEN POSITION of the gate The ideal open position is when the gate makes contact with the open position stop post just as the operator motor shuts down Turn the cam until the desired setting is accomplished Test adjustments by using transmitter NOTE Some adjustment to the closed position can be made by disconnecting the operator from the gate bracket and rotating the push pull tube to...

Page 30: ...and washers on the post bracket and gate bracket assemblies Cut off the ends of the bolts extending beyond the tightened nuts Step 32 Install warning signs on both sides of the gate see page 7 using nylon cable ties provided or screws ...

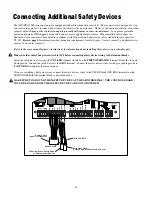
Page 31: ...ese devices on a vehicular gate Make sure the control box power switch is OFF before connecting safety device wiring to the terminal blocks Insert the safety device wires into the CLS EDG terminal located on the FIRST OPERATOR terminal block for the gate closing mode Ground the safety device at the GRN terminal Connect the safety device wires for the gate opening mode to the OPN EDG terminal in th...

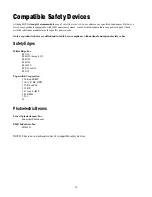
Page 32: ...otobeam EMX Industries Inc IRB 4X NOTE This is not an exhaustive list of compatible safety devices Although GTO strongly recommends the use of safety devices we do not endorse any specific brand names Below is a list of some products compatable with GTO operators systems some of which require their own power supply Check with the individual manufacturer for specific power needs Only use products t...

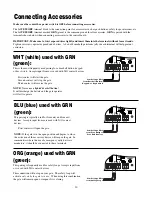
Page 33: ...BLU blue used with GRN green This pairing is typically used for free entry and free exit devices Accepts input from or is used with N O contact devices First contact will open the gate NOTE If the gate is in the open position and begins to close the activation of the accessory device will reopen the gate In communities where the use of a emergency entry device is mandatory it should be connected t...

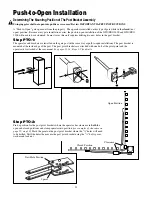
Page 34: ... post bracket The operator and brackets are installed on the gate post in the same way as pull to open installations The post bracket is mounted at the inside edge of the post The post pivot brackets are attached with one bolt at the pivot point and the operator s is attached at the rear mount See pages 11 14 Steps 1 9 for details Step PTO 2 Find a position for the post pivot brackets where the op...

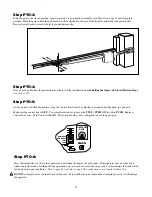
Page 35: ...n gate Make sure the control box is OFF Use a small screwdriver to move the PULL PUSH DIP switch to PUSH Replace control box cover Turn Power switch ON The control board is now configured to push the gate open Step PTO 6 Press the transmitter to activate the operator and determine the degree the gate opens If the operator does not shut down within one half second of striking the open position stop...

Page 36: ...imum of 1 0 Ω on the green wire and 0 Ω on the other wires Test each wire as you have above If all wires have the proper readings then the power cable is not the problem NOTE Inspect the cable for any signs of any punctures Wires inside the black sheath can be shorted and the cable will indicate the correct resistance ohms The control board This is a microprocessor board The power that runs the ga...

Page 37: ...attery is to perform a load test Place the voltmeter on dc put the red probe on the positive terminal and place the black probe on negative terminal Activate the unit and monitor the voltmeter The voltage drop should not be more than 1 0 V Note A loose battery terminal will cause the same symptoms that a bad battery will cause Terminals should be secure and corrosion free Remote control range Vari...

Page 38: ...the two 2 year warranty period the operator will be repaired or replaced at the manufacturer s option at no charge to the customer if returned freight prepaid to GTO Inc 3121 Hartsfield Road Tallahassee Florida USA 32303 IMPORTANT Call 850 575 4144 or Fax 850 575 8950 for a Return Goods Authorization RGA number before returning to factory Products received at the factory without an RGA number will...

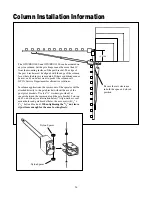
Page 39: ...Service Department for alternative solutions In column applications the rear mount of the operator will be attached directly to the gate bracket without the use of the post pivot brackets Use ten 1 2 washers provided as spacers between the rear mount and the gate bracket 5 on top and 5 on bottom see illustration below Align washers rear mount holes and gate bracket holes then secure with 1 2 x 33 ...

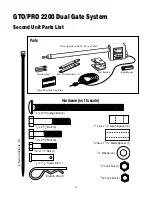
Page 40: ...ivot Brackets 2 Gate Bracket Rear Mount Hardware not to scale Parts Hairpin Clip 1 1 2 x 11 4 Clevis Pin 1 3 8 x 11 2 Bolt 1 1 2 dia x 17 16 Metal Spacer 1 11 4 dia x 1 2 Nylon Spacer 2 1 2 x 23 4 Bolt 3 1 2 x 33 4 Bolt 2 1 2 x 10 Carriage Bolt 2 8 Nylon Cable Tie 14 1 2 Washer 6 1 2 Lock Nut 7 3 8 Lock Nut 1 2 Receiver Mounting Screw 1 ...

Page 41: ...osition stop for the second gate is installed the same as the first gate See instructions on page 16 The Closed position stops on a dual gate system require a ground stop for the second gate first to close to be installed as follows Receiver Run up to 1000 of low voltage wire to control box from transformer wire not included 120 Volt Indoor Transformer Surge Protector not supplied PVC conduit not ...

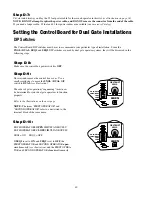
Page 42: ...ert the strain relief into the knockout hole and finger tighten it in the control box Insert the stripped end of second operator cable up through bottom of strain relief if necessary loosen the strain relief Pull approximately 4 of wire into the control box and retighten the strain relief on the black sheath of the power cable Connecting the Second Operator to the Control Board First Operator Powe...

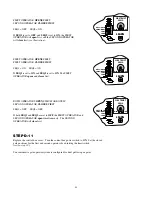
Page 43: ...control box power switch is OFF Step D 9 Unscrew and remove the control box cover Use a small screwdriver to move the SNGL DUAL DIP switch to DUAL see illustration The order of gate operation sequencing must now be determined for your dual gate operators to function properly Refer to the illustrations on the next page NOTE The terms FIRST OPERATOR and SECOND OPERATOR refer to a unit wired to the t...

Page 44: ...s and closes first BOTH OPERATORS OPEN SIMULTANEOUSLY SECOND OPERATOR CLOSES FIRST SEQ1 OFF SEQ2 OFF If both SEQ1 and SEQ2 are set to OFF the FIRST OPERATOR and SECOND OPERATOR open simultaneously The SECOND OPERATOR will close first STEP D 11 Replace the control box cover Turn the control box power switch to ON Set the closed gate positions for the first and second operators by adjusting the limi...

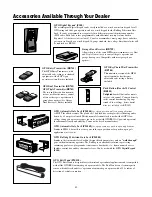
Page 45: ... in Requires 3 AA batteries not included Can also accommodate most garage doors and other gate openers If used as a wired keypad 16 gauge standard low voltage direct burial wire will be required see RB509 GTO Bulldog Pedestrian Gate Lock FM500 Similar to the Automatic Gate Lock but designed for horizontal use only on walk through gates without automatic operators The Bulldog is an affordable solut...

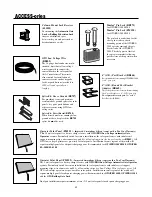
Page 46: ...This 10 watt solar panel is a battery charger for use with GTO PRO Low Voltage Automatic Gate Operator systems Particularly suited for remote installations the solar panel comes with tubular steel support mounting clips wire connectors and 8 ft of low voltage wire for longer lengths see RB509 All GTO low voltage operators are pre wired for solar panels Installation in some regions of the world wil...

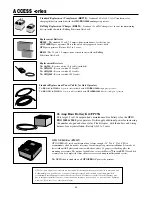
Page 47: ...ery included with the GTO PRO 2000 series gate operators Bulldog Replacement Charger RB421 Standard 12 volt DC charger not shown for maintaining battery included with the Bulldog Pedestrian Gate Lock Standard Replacement Power Cables for Gate Operators The PRO 6C AW209 6 ft power cable included with GTO PRO 2000 single gate operators The PRO 50C AW210 50 ft power cable included with GTO PRO 2200 d...

Page 48: ...talled as specified in the IMPORTANT SAFETY INSTRUCTIONS ____ The IMPORTANT SAFETY INSTRUCTIONS were reviewed with the customer ____ The Installation Manual was given to the customer ____ The customer was instructed to use silicone spray on the push pull tube front mount and rear mount to maintain the gate operator ____ Customer was instructed about disconnecting the operator for manual operation ...

Reviews: