6
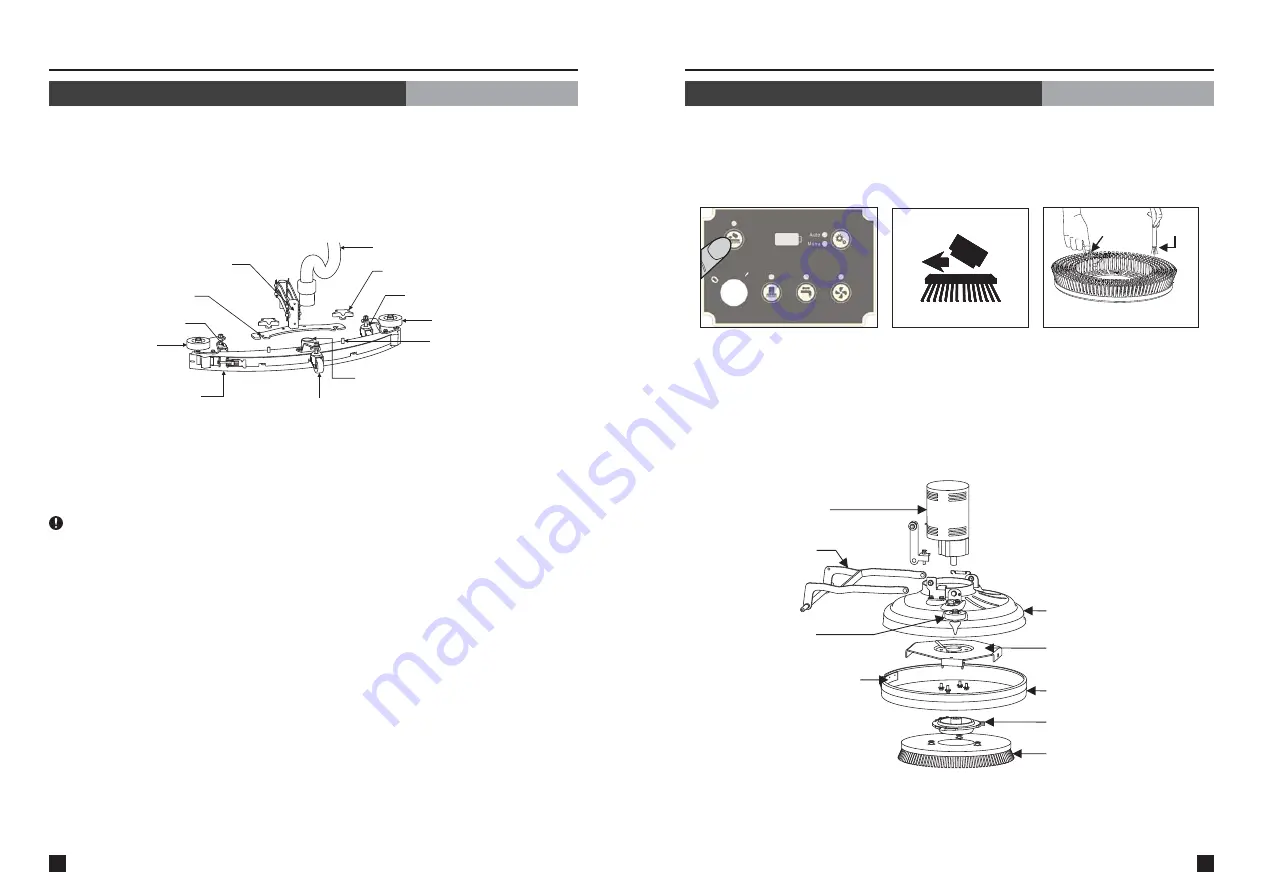
1.Squeegee assembling
15
●
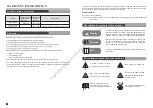
Brush assembly exploded diagram
●
②
Brush rack
⑤
Brush cover
③
Bumper wheel
①
Brush motor
⑦
Rubber band
④
Bounding frame
⑥
Brush plate
⑧
Brush holder
⑨
Brush
OPERATION INSTRUCTIONS
Assembling parts
Suction hose
Star nuts
Universal wheel
Bumper wheel
Bolt of the star screw
Suction inlet
Universal wheel
Squeegee assembly
Bumper wheel
Universal wheel
Slot
Squeegee lifting plate
fig.1
Turn the star nuts on the center of the squeegee frame anticlockwise to unfasten them.
Then slide the bolts of the star screws into the slots of the squeegee lifting plate and use the
star nuts to fasten the assembly by turning them clockwise. After that, connect the suction
hose with the suction inlet on the squeegee. Three universal wheels on the squeegee frame
are for adjusting the height and balancing of the squeegee(fig.1).
2.Battery assembling
Attention
(Battery is not included in standard configuration.)
1.The batteries can be dangerous if not connected or assembled correctly, so
let trained personnel help.
2.It is necessary to tilt open the tank to reach the batteries. Drain all the soiled water
and solution in the tank before turning it.
3.To prevent dangers, check the batteries and accessories before assembling them.
4.Make sure the machine is in switched off mode.
5.Stay away from fire.
6.Assemble the batteries in ventilated place.
7.Put the batteries in position with care, and connect them correctly with suitable cables.
Steps:
1.Unpack the batteries and check to confirm they are in good order.
2.Turn the tank to the floor as shown and put the batteries on top of the assembly plate(fig.2
fig.3).
3.Connect the batteries with suitable cable
: connect the cathode to the anode as shown.
And the left two cables connect to the battery socket.
4.Put the battery socket to the machine socket
.
&
(fig.4)
(fig.5)
MAINTENANCE GUIDE
Daily maintenance
4.Brush assembling
Pressing the removing button on the control panel(fig.15) to remove the brushes(fig.16)
(when the brushes are lifted up.) for cleaning. If the machine will stay idle for long time, the
brush should be removed, cleaned and air-dried.(fig.17), else, the prolonged loading to the
brush motors may cause failure or be unable to function properly.
fig.15 control panel
fig.16
fig.17
Brush
Rinse
Guangdong
Baiyun
Cleaning
Group
Co.,Ltd


