7
14
3.Maintain the squeegee assembly
The procedure to remove the squeegee:
3 Brush assembling
.
3 Brush assembling
.
●
Make sure the scrub pad is placed with the center of the pad driver and screw the pad
driver buckle. Afterwards, you can work as follows.
②
①
Pull the
clasp up
Attention Don’t dry the squeegee by exposing it to sunshine.
:
MAINTENANCE GUIDE
Daily maintenance
Bumper wheel
Triangle clasp
Front squeegee
Upper inner
pad(metal)
Lower inner
pad(plastic)
Rear squeegee
Retaining metal
strip assembly
Squeegee clasp
Star nuts
Triangle clasp
Remove, clean and air-dry the squeegee regularly to prolong its service life. The whole
squeegee assembly can be removed to be cleaned and air-dried.
1.Turn the two star nuts anticlockwise to remove the squeegee assembly.
2.Release the squeegee clasp to loosen the retaining metal strip assembly. Then pull the
two triangle clasps downwards to take out the retaining metal strip assembly.
3.After taking out the retaining metal strip assembly, the rear squeegee can be removed.
4.Loosen the upper and lower pads and then the front and rear squeegees can be removed.
Check to confirm the wearing condition of the squeegee and turn to an untouched side for
use. Each squeegee has 4 sides for switching use.
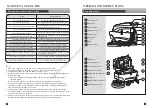
OPERATION INSTRUCTIONS
Assembling parts
fig.2
fig.3
fig.4
Battery assembly
Connect battery
cables
Battery
assembly
Open
the
tank
●
Do not operate any function button while hands are touching the brush, in case of injuries.
Attention
1.
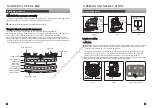
2.Step on the pedal rightly to lower the brush(fig.6). After that, switch on the key switch and
press the scrubbing/assembling button to assemble the brush
.
(fig.7)
Lift up the brush limit plate and push the brushes under the brush cover to keep proper
distance between them. Then, move on the brush to make the brush holder under the
center of brush cover. After that, put down the brush on the floor vertically(fig.5).
Brush
assembly
Brush
cover
Pedal
fig.5
fig.6
fig.7 Control panel
Guangdong
Baiyun
Cleaning
Group
Co.,Ltd


