G
ua
rd
ia
n
Fa
ll
Pr
ot
ec
tio
n
6
30
5
S.
2
31
st
S
t.
, K
en
t,
W
A
9
80
32
p
ho
ne
: (
80
0)
4
66
-6
38
5
f
ax
: (
80
0)
6
70
-7
89
2
w
w
w
.g
ua
rd
ia
nf
al
l.c
om
12
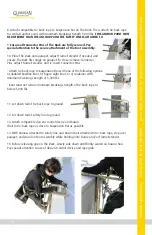
8. Attach compatible tie-back rope to Suspension Bar on The Rack. Then, attach tie-back rope
to certified anchor point with minimum breaking strength 5,000 lbs.
THIS ANCHOR POINT MUST
BE DIFFERENT THAN THE ANCHOR POINT THE SAFETY LINE IS ATTACHED TO.
9.
Ensure all Connector Pins of The Rack are fully secured. Pay
special attention to the secure attachment of the Foot Assembly.
10. Place The Rack onto parapet, adjust Frame Extender if needed, and
ensure The Rack fits snugly on parapet. To do so, remove Connector
Pins, adjust Frame Extender, and re-insert Connector Pins.
• Attach tie-back rope to Suspension Bar with one of the following options:
a) doubled bowline knot, b) figure-eight knot, or c) carabiner with
minimum breaking strength of 5,000 lbs.
• Knot must not reduce minimum breaking strength of tie-back rope to
below 5,000 lbs.
11. Let down tail of tie-back rope to ground.
12. Let down tail of safety line to ground.
13. Attach compatible descent control device and bosun
chair to tie-back rope as close to Suspension Bar as possible.
14. With harness attached to safety line and bosun chair attached to tie-back rope, step over
parapet, and stand on Foot Assembly while holding onto Frame and/or Frame Extender.
15. Before releasing grip on The Rack, slowly sink down until firmly seated on bosun chair.
Pay special attention to use of descent control device and rope grab.
Summary of Contents for 15169
Page 2: ......


