background image

-7-

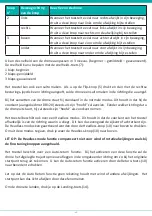
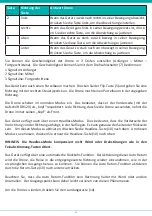
Button 

Switch direction

Drone Reaction

2

left

When the device has deviated too much to the right, press the 

button to the left to adjust the deviation

right

When the device has deviated too much to the left, press the 

button to the left to adjust the deviation

3

up

When the device has deviated too much to the back, press the 

button upwards to adjust the deviation

down

When the device has deviated too much to the front position, 

press the button downwards to adjust the deviation

You can adjust the speed of the drone in 3 levels (beginner – intermediate – advanced). The speed 

can be controlled with the speed-switch (7):

1 beep: beginner

2 beeps: intermediate

3 beeps: advanced

This device can also make loopings.  By pressing the Flip-button (5) and indicating a direction with 

the right joystick controller, the drone will make a looping in the direction you have indicated. 

When turning the drone on it is standard in the normal mode. This means that its head (indicated 

with DR120) will always be the front direction of the drone.  Any direction you command the 

drone to fly in, it will always keep the head as its front.

The device also has a Headless-mode. This means that the front of the device depends on the 

direction you’re flying in. This means that also the sides or the backside can be seen as the front.  

To activate this mode, press the Headless-button (10) up. To exit this mode, press the Headless-

button (10) again.

ATTENTION:  The  headless  mode  does  not  compensate  wind  or  rotation  deviations  such  as 

indicated by the fine-tuning buttons. 

The device has an Auto Return function.  When you activate this function, the drone will fly the 

flown trajectory again in the opposite direction to reach the original point of departure.  You can 

activate the Auto Return function by pressing the Return-button (10) down.

Please note that the Auto return function does not calculate deviations by wind or other sources.  

The original point of departure may vary because of these phenomena. 

To land the drone, press the Landing-button (14).

Summary of Contents for DR120

Page 1: ...1 USER S MANUAL GB NL D FR DR120 4 Propeller Drone with WIFI HD CAM...

Page 2: ...2 C B A D ILLUSTRATION 1 ILLUSTRATION 2 ILLUSTRATION 3 ILLUSTRATION 4 12 7 8 9 10 11 6 5 4 3 2 1 13 14...

Page 3: ...rt aux normes et sp cifications suivantes appliquant les versions valides en Septembre 2019 EN 60825 1 1994 A1 2002 A2 2001 EN 62115 2005 A11 2012 A12 2015 AC 2013 EN71 1 2011 A3 2014 EN71 Part 2 2011...

Page 4: ...ones such as industrial complexes nuclear installations prisons etc Flying a drone requires some experience We recommend you to practice sufficiently in a safe environment Check the drone before each...

Page 5: ...cable Then connect the USB charging cable with your computer or any USB charging device The LED light on the charger will light up red when the battery is fully charged To mount the battery into the d...

Page 6: ...To make the drone take off press the Take Off Alt Hold button 13 It will automatically rise to approximately 2 meters With the left Joystick controller you can make the drone Joystick Direction Drone...

Page 7: ...ndard in the normal mode This means that its head indicated with DR120 will always be the front direction of the drone Any direction you command the drone to fly in it will always keep the head as its...

Page 8: ...t with RQ ATTENTION Close by Wi Fi signals or too much distance between drone and smartphone can disturb the image Pictures and video s will automatically be saved in the memory of your smartphone unl...

Page 9: ...ximum toegelaten hoogte Overvlieg nooit personen of dieren Bewaar een veilige perimeter van 50m ten opzichte van personen en goederen Laat de drone niet vliegen in risicozones zoals industri le comple...

Page 10: ...batterij op te laden verbind je de stroomconnector met de bijgeleverde USB laadkabel Verbind vervolgens de USB laadkabel met je computer of een USB oplaadapparaat Wanneer de batterij volledig opgelad...

Page 11: ...2 meter Met de linkse besturings joystick 9 kan je de drone de volgende handelingen laten doen Richting van de joystick Reactie van de drone Onder hoogte De hoogte van de drone zal afnemen Boven hoog...

Page 12: ...staat hij standaard in de normale modus Dit houdt in dat hij de voorkant aangeduid met DR120 steeds als zijn hoofd zal aanzien Eender welke richting dat u de drone uitstuurt hij zal steeds zijn hoofd...

Page 13: ...Wi Fi signalen of te grote afstand tussen drone en smartphone kunnen het beeld soms verstoren Foto s en video s worden automatisch opgeslagen in het geheugen van je smartphone tenzij je een SD kaart v...

Page 14: ...m par rapport des personnes et des biens Ne faites pas voler le drone dans les zones de risque tels que les installations industrielles les installations nucl aires les prisons etc L op ration d un dr...

Page 15: ...u c ble de recharge USB fourni Ensuite connectez le c ble de charge USB votre ordinateur ou chargeur USB Lorsque la batterie est compl tement charg e le t moin LED rouge s allume sur le c ble de charg...

Page 16: ...commander le drone effectuer les op rations suivantes Direction de la manette de commande R action du drone Bas hauteur La hauteur du drone diminuera Haut hauteur La hauteur du drone augmentera Gauch...

Page 17: ...mal Cela signifie qu il est consid re la face avant DR120 comme sa t te N importe quelle direction que vous choisissez pour le drone il prendra toujours sa t te comme la face avant L appareil dispose...

Page 18: ...x Wi Fi voisins ou une grande distance entre le drone et le t l phone peuvent parfois d former l image Les photos et les vid os sont automatiquement stock es dans la m moire de votre smartphone sauf s...

Page 19: ...maximal zul ssige H he Fliegen Sie niemals ber Personen oder Tiere Halten Sie immer einen sicheren Umfang von 50m in Bezug auf Personen und Eigentum Fliegen Sie die Drone nicht in Risikogebieten wie I...

Page 20: ...den Akku voll aufzuladen vor dem ersten Gebrauch Um den Akku aufzuladen k nnen Sie den Stromanschluss mit dem mitgelieferten USB Ladekabel verbinden Dann schlie en Sie das USB Ladekabel an den Comput...

Page 21: ...einer ebener Fl che in einer sicheren Umgebung Um die Drone abzunehmen dr cken Sie die Take Off H hen Halt Taste 13 Die Drone wird automatisch auf ca 2 Meter steigen Mit dem linken Steuerjoystick kan...

Page 22: ...t im normalen Modus ein Das bedeutet dass er der Vorderseite mit der Aufschrift DR120 als Kopf respektiert Jede Richtung dass Sie die Drone aussenden nehmt die Drone immer seinen Kopf als Front Das Ge...

Page 23: ...Fi name der Drone beginnt mit RQ HINWEIS Benachbarte Wi Fi Signale oder der Abstand zwischen Done und Smartphone k nnen manchmal das Bild verzerren Fotos und Videos werden automatisch in dem Speicher...

Page 24: ...24...

Page 25: ...25...

Reviews: