17
Turning off
To turn the stove off, press the respective button for 3 seconds.
The fans keep running until the stove reaches safe temperature
for being turned off. The current supply must not be stopped for
that time!
Current failure
The stove is automatically turned off in case of current failure. The
stove is not automatically turned on until voltage is restored.
If this is the case, wait until the stove has completely cooled down,
clean the furnace grate and turn the stove on again.
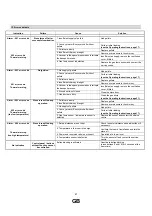
If the warning indicator is on, an operating function is not
working and the stove is turned off (see the troubleshooting
table in the Cleaning plan).
Putting the stove into operation for the first time
After the pellet stove is installed and accepted by a respective district
sweep master, the stove can be connected to the mains (230V).
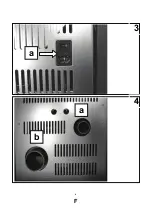
Then set the main switch (see picture 3a) to “I“ (ON).
The electronic control now indicates the operational readiness by a
beep.
Display background will light up.
The articles below explain the steps for putting the GP 8005 D pellet
stove into operation for the first time.
1. Check of the combustion chamber and the furnace
burner grate
-
Remove the transport protection in the combustion
chamber.
-
Check the inserts of the back wall and side walls if
fitted properly.
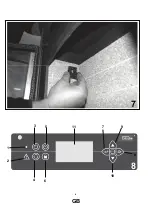
Check the retaining clamps (see page 5, pic. 7) if
seated firmly.
-
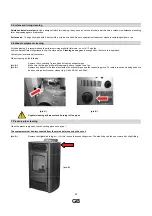
Make sure the furnace heater grate (see page 4, pic.
5) is fitted properly.
2. Time in hours / date
-
Press button 7 for 3 seconds to get to the menu
-
Control your selection using button 7.
-
Press button 7 again to set the hours by buttons 9
and 10.
-
Confirm your selection using button 7 after successful
setting.
-
Repeat your entry until year selection.
-
Use button 8 to return to the menu after successful
selection.
3. Operating
mode
-
Use button 4 to select the required operating mode
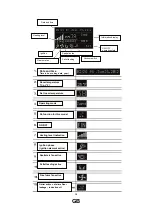
(see page 14, control panel specification)
To prevent damage, first heating should not reach more than
the third level for 1 hour; select the manual mode for that
purpose.
4. Filling the container with pellets
-
Fill the pellet container with pellets specified
according to DIN.
-
The protective grid in the container must not be
removed.
(see page 7, pic. 11).
Do not forget to close the lid after filling the container.
5. Initial
loading
Caution: The conveyer worm to transport pellets is not
filled when putting the product into operation for the
first time, so initial loading is necessary.
-
Press button 7 for 3 seconds to get to the menu.
-
Use button 10 to select section
6 "Actuating unit
test".
-
Confirm your selection using button 7.
- Press button 10 repeatedly to select section
"Feeding"
.
-
Confirm your selection using button 7.
-
Use button 10 to activate the initial loading.
Now the conveyer engine rotates permanently to fill the
shaft of the conveyer. This process may take a few
minutes.
-
Use button 10 to deactivate the initial loading as soon
as pellets are conveyed to the burner grate.
-
Press button 8 repeatedly to get back to the operating
mode.
Caution: The furnace burner grate must be emptied
after successful initial loading. Then make sure the
grate is seated properly and the stove door closed
well.
The pellet stove is now ready for operation
6. Turning
on
-
Turn the stove on using button 3 or the “ON” button
on the remote control.
The cold starting programme is initiated automatically
after the stove is turned on.
Caution: No setting is allowed in the ignition phase.
As soon as pellet ignition is allowed (visible flames) and
the temperature of flue gases reaches 52°C, individual
servicing is possible
(see page 14, Control panel).
Note:
Low smoke during first burning in the stove is no malfunction;
it is only a matter of time before everything is all right. Please make
sure sufficient ventilation of the room of installation is provided. The
paint does not include any toxic gas.
GB
Summary of Contents for 68032
Page 3: ...3 2 1 D ...
Page 4: ...4 3 4 a b a D ...
Page 5: ...5 5 6 D ...
Page 6: ...6 7 8 1 2 4 6 10 8 9 7 11 5 3 D ...
Page 7: ...7 9 10 D ...
Page 8: ...8 11 12 12 D ...
Page 9: ...9 13 D ...
Page 15: ...15 D ...
Page 29: ...3 2 1 GB ...
Page 30: ...4 3 4 a b a GB ...
Page 31: ...5 5 6 GB ...
Page 32: ...6 7 8 1 2 4 6 10 8 9 7 11 5 3 GB ...
Page 34: ...8 12 11 GB ...
Page 42: ...16 On Off Temperature mode Down Keep mode deactivation Manual mode Up Keep button GB ...
Page 55: ...3 2 1 F ...
Page 56: ...4 3 4 a b a F ...
Page 57: ...5 5 6 F ...
Page 58: ...6 7 8 1 2 4 6 10 8 9 7 11 5 3 F ...
Page 59: ...7 9 10 F ...
Page 60: ...8 11 12 12 F ...
Page 67: ...15 F ...
Page 81: ...3 2 1 I ...
Page 82: ...4 3 4 a b a I ...
Page 83: ...5 5 6 I ...
Page 84: ...6 7 8 1 2 4 6 10 8 9 7 11 5 3 I ...
Page 86: ...8 12 11 I ...
Page 107: ...3 2 1 CZ ...
Page 108: ...4 3 4 a b a CZ ...
Page 109: ...5 5 6 CZ ...
Page 110: ...6 7 8 1 2 4 6 10 8 9 7 11 5 3 CZ ...
Page 112: ...8 11 12 CZ ...
Page 133: ...3 2 1 SK ...
Page 134: ...4 3 4 a b a SK ...
Page 135: ...5 5 6 SK ...
Page 136: ...6 7 8 1 2 4 6 10 8 9 7 11 5 3 SK ...
Page 138: ...8 12 11 SK ...
Page 159: ...3 2 1 H ...
Page 160: ...4 3 4 a b a H ...
Page 161: ...5 5 6 H ...
Page 162: ...6 7 8 1 2 4 6 10 8 9 7 11 5 3 H ...
Page 164: ...8 11 12 H ...
Page 185: ...3 2 1 P ...
Page 186: ...4 3 4 a b a P ...
Page 187: ...5 5 6 P ...
Page 188: ...6 7 8 1 2 4 6 10 8 9 7 11 5 3 P ...
Page 190: ...8 12 11 P ...


