9.7
Feedback on the instructions
Your feedback helps us to keep improving these instructions. Thank you!
mailto: docufeedback@ch.gudel.com
Please provide the following information with your feedback:
• Identification number of the instructions
• Product, type
• Project number, order number
• Material number / serial number
• Year of manufacture
• Location of the product (country, ambient conditions, etc.)
• Photos, comments, feedback with clear reference to the section in the in-
structions
• Your contact data for clarifications if necessary
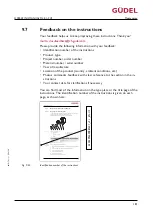
You can find most of the information on the type plate or the title page of the
instructions. The identification number of the instructions is given on each
page, as shown here:
9.3.7
Maintenance tasks after 6,750 hours
9.3.7.1
Replacing the lubricating pinion
A pinion soaked in lubricant runs along next to the drive pinion. It ensures a
continuous lubrication of the rack and the drive pinions.
Replace the lubricating pinion to ensure uniform lubrication.
A
B
C
D
E
F
G
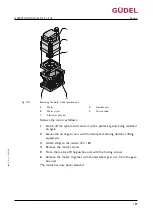
Fig. 9-7
Replacing the lubricating pinion
A
Lubrication point
E
Fastening screw
B
Screw
F
Lubricating pinion
C
Hexagonal socket wrench
G
Carriage
D
Covering
Lubrication ex
works
Specification
Lubrication quantity
Ü
Chapter 9.2.2.1,
2
116
Ü
Chapter 9.2.2.1,
2
116
Table 9-12
Lubricants: Guideways, racks, and pinions
Removing the lu-
bricating pinion
Remove the lubricating pinion as follows:
1
Switch off the plant and padlock it to secure it against being switched on
again
2
Remove the line of the automatic lubrication if necessary
3
Remove screws and covering
4
Remove the fastening screw
5
Remove lubricating pinion
The lubricating pinion has been removed.
Maintenance
OPERATING MANUAL ZP 1-5
45035996409887627_v3.1_
EN-US
129
Fig. 9-43
Identification number of the instructions
Maintenance
OPERATING MANUAL MLB 1-3 V2
881017611_v1.0_
EN-US
181
Summary of Contents for MLB 1-3 V2
Page 4: ...Revision history OPERATING MANUAL MLB 1 3 V2 881017611_v1 0_EN US 4 ...
Page 14: ...Table of contents OPERATING MANUAL MLB 1 3 V2 881017611_v1 0_EN US 14 ...
Page 86: ...Operation OPERATING MANUAL MLB 1 3 V2 881017611_v1 0_EN US 86 ...
Page 159: ...9 4 Maintenance schedules Maintenance OPERATING MANUAL MLB 1 3 V2 881017611_v1 0_EN US 159 ...
Page 160: ...Maintenance OPERATING MANUAL MLB 1 3 V2 881017611_v1 0_EN US 160 ...
Page 162: ...Maintenance OPERATING MANUAL MLB 1 3 V2 881017611_v1 0_EN US 162 ...
Page 164: ...Maintenance OPERATING MANUAL MLB 1 3 V2 881017611_v1 0_EN US 164 ...
Page 166: ...Maintenance OPERATING MANUAL MLB 1 3 V2 881017611_v1 0_EN US 166 ...
Page 170: ...Maintenance OPERATING MANUAL MLB 1 3 V2 881017611_v1 0_EN US 170 ...
Page 172: ...Maintenance OPERATING MANUAL MLB 1 3 V2 881017611_v1 0_EN US 172 ...
Page 174: ...Maintenance OPERATING MANUAL MLB 1 3 V2 881017611_v1 0_EN US 174 ...
Page 176: ...Maintenance OPERATING MANUAL MLB 1 3 V2 881017611_v1 0_EN US 176 ...
Page 178: ...Maintenance OPERATING MANUAL MLB 1 3 V2 881017611_v1 0_EN US 178 ...
Page 180: ...Maintenance OPERATING MANUAL MLB 1 3 V2 881017611_v1 0_EN US 180 ...
Page 206: ...Repairs OPERATING MANUAL MLB 1 3 V2 881017611_v1 0_EN US 206 ...
Page 212: ...Decommissioning storage OPERATING MANUAL MLB 1 3 V2 881017611_v1 0_EN US 212 ...
Page 217: ...13 Spare parts supply Spare parts supply OPERATING MANUAL MLB 1 3 V2 881017611_v1 0_EN US 217 ...
Page 218: ...Spare parts supply OPERATING MANUAL MLB 1 3 V2 881017611_v1 0_EN US 218 ...
Page 224: ...Spare parts supply OPERATING MANUAL MLB 1 3 V2 881017611_v1 0_EN US 224 ...
Page 234: ...List of illustrations OPERATING MANUAL MLB 1 3 V2 881017611_v1 0_EN US 234 ...
Page 238: ...List of tables OPERATING MANUAL MLB 1 3 V2 881017611_v1 0_EN US 238 ...
Page 246: ...Index OPERATING MANUAL MLB 1 3 V2 881017611_v1 0_EN US 246 ...
Page 248: ...Appendix OPERATING MANUAL MLB 1 3 V2 881017611_v1 0_EN US ...
Page 249: ...Hazard analysis Risk analysis Appendix OPERATING MANUAL MLB 1 3 V2 881017611_v1 0_EN US ...
Page 250: ...Appendix OPERATING MANUAL MLB 1 3 V2 881017611_v1 0_EN US ...
Page 255: ...Appendix OPERATING MANUAL MLB 1 3 V2 881017611_v1 0_EN US ...
Page 258: ...Technical data Appendix OPERATING MANUAL MLB 1 3 V2 881017611_v1 0_EN US ...
Page 259: ...Appendix OPERATING MANUAL MLB 1 3 V2 881017611_v1 0_EN US ...
Page 260: ...Layout Appendix OPERATING MANUAL MLB 1 3 V2 881017611_v1 0_EN US ...
Page 261: ...Appendix OPERATING MANUAL MLB 1 3 V2 881017611_v1 0_EN US ...
Page 262: ...Spare parts lists Appendix OPERATING MANUAL MLB 1 3 V2 881017611_v1 0_EN US ...
Page 263: ...Appendix OPERATING MANUAL MLB 1 3 V2 881017611_v1 0_EN US ...
Page 264: ...Options Appendix OPERATING MANUAL MLB 1 3 V2 881017611_v1 0_EN US ...
Page 265: ...Appendix OPERATING MANUAL MLB 1 3 V2 881017611_v1 0_EN US ...
Page 266: ...Third party documentation Appendix OPERATING MANUAL MLB 1 3 V2 881017611_v1 0_EN US ...
Page 267: ...Appendix OPERATING MANUAL MLB 1 3 V2 881017611_v1 0_EN US ...

