background image

Customer Helpline

 0333 3201989

10

a

Operating Instructions

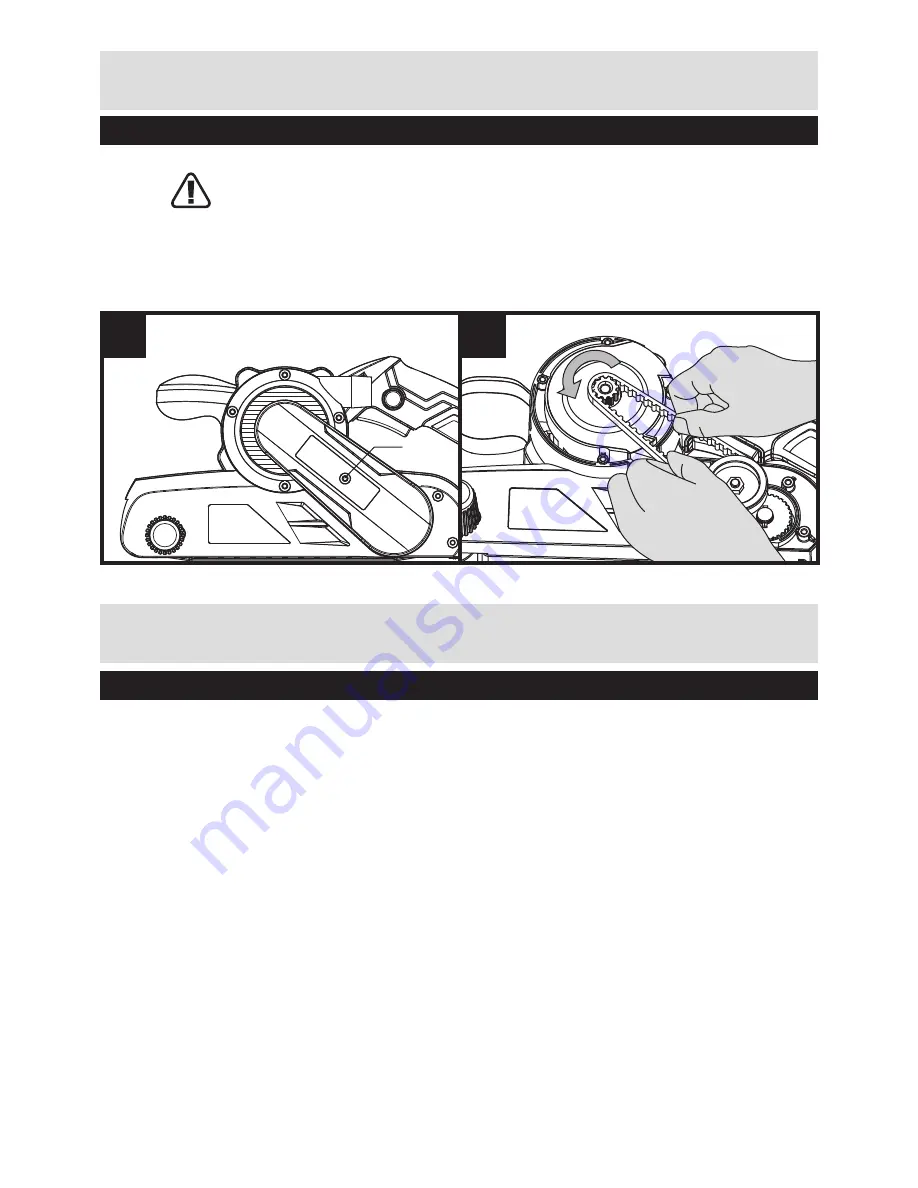
8. DRIVE BELT REPLACEMENT (SEE FIG H, I)

WARNING! Remove the main plug from the socket before carrying out a drive 
belt replacement. 

Remove the screw (a) and the belt cover as shown. Carefully 

cut the drive belt if not already broken and remove from your belt sander. Fit your 
new drive belt around the large pulley. Then install onto the small pulley by rotating 
clockwise and pushing the drive belt shown around the small pulley at the same time. 
The drive belt will be a tight fit. Fit the belt cover and three  screws. 

If your power tool becomes too hot, especially when used at low speed, set the speed to 
maximum and run with no load for 2-3 minutes to cool the motor. Avoid prolonged usage at very 
low speed. Always use a sanding belt suited to the material you wish to sand. Always ensure the 
work-piece is firmly held or clamped to prevent movement. Support large panels close to the 
sanding area. Any movement of the material may affect the quality of the sanding finish. Start 
your sander before sanding and turn off only after stopping sanding. For best results sand wood 
in the direction of the grain. Do not start sanding without the sanding belt fitted. Empty the dust 
bag every 5 minutes or sooner to ensure efficient dust collection.

Working Hints For Your Belt Sander

H

I

Summary of Contents for PBS850G

Page 1: ...ld belt sander These instructions contain important information that will help you get the best from your Guild belt sander ensuring it remains safe to operate If you need help or have damaged or missing parts call the Customer Helpline on 0333 3201989 After Sales Support PBS850G UK Ireland 0333 3201989 Help guildpowertools co uk ...

Page 2: ...ety Information 3 In The Box 6 Accessories 6 Operating Instructions 7 Working Hints For Your Belt Sander 10 Maintenance 11 Technical Data 11 Environmental Protection 12 Guarantee 13 Declaration of Conformity 13 Plug Replacement Uk Ireland Only 14 ...

Page 3: ...cate the appropriate safety measures you should take when assembling and operating the belt sander To reduce the risk of injury Please read the instruction manual Warning Wear ear protection Wear eye protection Wear dust mask Double insulation Waste electrical products must not be disposed of with household waste Please recycle where facilities exist Check with your local authorities or retailer f...

Page 4: ...c shock d Do not abuse the cord Never use the cord for carrying pulling or unplugging the power tool Keep cord away from heat oil sharp edges or moving parts Damaged or entangled cords increase the risk of electric shock e When operating a power tool outdoors use an extension cord suitable for outdoor use Use of a cord suitable for outdoor use reduces the risk of electric shock f If operating a po...

Page 5: ...sk of starting the power tool accidentally d Store idle power tools out of the reach of children and do not allow persons unfamiliar with the power tool or these instructions to operate the power tool Power tools are dangerous in the hands of untrained users e Maintain power tools Check for misalignment or binding of moving parts breakage of parts and any other condition that may affect the power ...

Page 6: ... Handle Variable Speed Control Dial Lock On Button Hand Grip Areas Dust Extraction Outlet Belt Cover Belt Centering Control Knob On Off Switch Sanding Belt Lever Sanding Belt SEE FIG E Sanding Plate SEE FIG F Dust Bag SEE FIG G Accessories Dust Bag 1pc Sanding Belt 1pc 7 4 1 2 3 6 5 9 8 ...

Page 7: ...emoval capacity of wood plastic metal filler as well as varnished surfaces 1 ON OFF SWITCH SEE FIG A Press to start and release to stop your tool 2 SWITCH LOCK ON BUTTON SEE FIG B Press on off switch 8 then lock on button 3 Your tool is now locked on for continuous use To switch off your tool just depress and release the on off switch Operating Instructions A B ...

Page 8: ...possible during no load operation See the table below for general guidance on speed selection Avoid prolonged use at very low speed as this may damage your sander s motor Material Speed selection Belt Grit Solid Wood 5 6 80 Veneer 2 4 150 Chipboard 1 5 60 80 Plastics 2 5 100 Steel 5 6 80 Paint Removal 6 40 60 Balsa Wood 1 3 100 Acrylic 1 2 100 4 HAND GRIP AREAS SEE FIG D Always hold your belt sand...

Page 9: ...old it firmly with one hand start the motor and release the switch immediately after observing tracking of sanding belt If abrasive belt runs outward turn tracking adjustment knob counter clockwise and clockwise if belt runs inward SEE FIG F Adjust the belt until the outer edge of the belt is even with the outer edge of the base plate 11 Belt life will be greatly increased by keeping the tracking ...

Page 10: ...screws If your power tool becomes too hot especially when used at low speed set the speed to maximum and run with no load for 2 3 minutes to cool the motor Avoid prolonged usage at very low speed Always use a sanding belt suited to the material you wish to sand Always ensure the work piece is firmly held or clamped to prevent movement Support large panels close to the sanding area Any movement of ...

Page 11: ...lly you may see sparks through the ventilation slots This is normal If the supply cord is damaged it must be replaced by the manufacturer its service agent or similarly qualified persons in order to avoid a hazard Technical Data Voltage 230 240V 50Hz Power input 850W No load speed 120 380m min Belt size 76 533mm Sanding size 76 140mm Protection class II Machine weight 3 51kg Technical Data Table A...

Page 12: ...yndrome if its use is not adequately managed WARNING To be accurate an estimation of exposure level in the actual conditions of use should also take account of all parts of the operating cycle such as the times when the tool is switched off and when it is running idle but not actually doing the job This may significantly reduce the exposure level over the total working period Helping to minimise y...

Page 13: ...o have an inherent defect present at the time of sale the store will provide you with a replacement Your statutory rights remain unaffected Issue1 08 2015 Declaration of Conformity This Guild 850W Belt Sander model number PBS850G fully complies with the Machinery Directive 2006 42 EC Electromagnetic Compatibility Directive 2004 108 EC before 2016 04 20 and 2014 30 EC since 2016 04 20 RoHS Directiv...

Page 14: ...loured blue must be connected to the terminal which is marked with N The wire which is coloured brown must be connected to the terminal which is marked with L WARNING Never connect live or neutral wires to the earth terminal of the plug Only fit an approved BS1363 A plug and the correct rated fuse Note If a moulded plug is fitted and has to be removed take great care in disposing of the plug and s...

Page 15: ......

Page 16: ......

Reviews: