background image

23

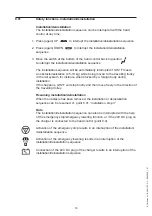
3 .  Remove cover/screen 

4 .  Checking the electrical state of the hoist 

•  Check batteries for: 

  •  Input/voltage 

  •  Output/voltage 

•  Check electrical functions and signals 

•  Check the wiring circuits for faults or defects 

•  Check the cable lead-ins 

•  Check the power supply, plugs, etc. 

5 .  Checking the mechanical state of the hoist 

•  Clean to remove dirt and other impurities 

•  Inspect and evaluate the condition of vital parts 

•  Replace defective and worn parts

•  Check and tighten all moving parts

•  Lubricate the product

•  Apply silicone oil to the surface of the product if necessary 

6 .  Replace cover/screen 

7 .  Go through the checkpoints under item 2 again to make sure that  

everything functions 

8 .  Have new problems arisen or been found under item 7? 

•  If new problems have arisen, return to item 3 

•  If there are no new problems, the inspection has been completed 

9 .  When a service inspection including service work or exchange of com-

ponents has taken place, the final check should comprise a weight test 

with the product’s nominal load .

13 .03 

Service inspection, travelling trolley for GH2 F

Deinstall GH2 F and put it on the transport trolley before service inspections 

of the Travelling trolley for GH2 F are carried out.

1 .  Visual control of the hoist 

•  Check for wear, irregularities, or other types of damage to the hoist

2 .  Remove cover/screen 

•  Clean the hoist to remove dirt and other impurities

•  Inspect and evaluate vital parts

  Every second year or after 2000 installations:

•  Dismantle the complete locking and winding mechanism

•  Install new, complete Quick lock (spare part)

3 .  Replace cover/screen 

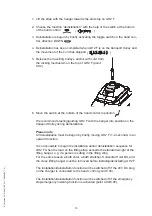
4 .  Adjust the length of the cord in relation to the height of the rail

©

 G

ul

dm

an

U

S

-8

82

/1

2/

20

11

 •

 #

 900690_1.01

©

 G

ul

dm

an

U

S

-8

82

/1

2/

20

11

 •

 #

 900690_1.01

©

 G

ul

dm

an

U

S

-8

82

/1

2/

20

11

 •

 #

 900690_1.01
©

 G

ul

dm

an

U

S

-8

82

/1

2/

20

11

 •

 #

 900690_1.01

Summary of Contents for GH2 F

Page 1: ...US GH2 F Ceiling Hoists Vers 1 01 ...

Page 2: ...pply 8 5 00 Description of functions 9 5 01 Pictograms 9 5 02 Example of a serial number label 10 5 03 Audio signals 10 5 04 Indicator lamps 10 6 00 Operation 11 6 01 Installation 12 6 02 Deinstallation 12 6 03 Lock Travelling trolley for GH2 F 14 6 04 Lifting and lowering 14 7 00 Transport running in the rail system 14 8 00 Safety functions 15 8 01 Safety functions installation deinstallation 16 ...

Page 3: ...inspection GH2 F 22 13 03 Service inspection travelling trolley for GH2 F 23 13 04 Trouble shooting 24 13 05 FAQ s 24 14 00 Technical specifications 25 15 00 EC declaration of conformity 27 USA and countries outside the EU 28 A Users guide 28 B Warranty 28 Guldmann US 882 12 2011 900690_1 01 Guldmann US 882 12 2011 900690_1 01 ...

Page 4: ...ived training The instruction offered by Guldmann to all customer groups in connection with the purchase of a ceiling mounted hoist has been received The carer pays close attention to the well being of the person being lifted The hoist is used in rail systems approved and tested in accordance with Guldmann s stipulations Installation and testing of rail systems should only be performed by Guldmann...

Page 5: ...ting hanger the lifting sling or other equipment determines the maximum load limit of the entire system The maximum load limit must not be exceeded Please note that the load limit may change when different components are used on a daily basis e g lifting hangers lifting slings 2 00 Unpacking and preparation Visual check of GH2 F If it appears that GH2 F has been damaged when you unpack it it must ...

Page 6: ...GH2 F with a snap hook The snap hook is sewn onto the strap and cannot be removed Please note Bath chairs bath stretchers and horizontal stretchers must be attached to the snap hook Strap attachment Use lifting hanger type 21X70 or Horizontal Lifter Type BS when using GH2 F with strap attachment Mount the lifting hanger as illustrated Loosen the pointed screws 2 Release the axle journal 3 Mount th...

Page 7: ... lifting sling Attach the hooks that face the user to the upper set of straps from the back Attach the lowermost set of straps from the legs to the hooks that face away from the user Lifting to and from sitting position When lifting a user from e g a wheelchair move GH2 F towards the person to be lifted The lifting hanger should be at the height of the user s chest and should not be moved further ...

Page 8: ...asures regarding ESD safety are valid in this connection See point 4 01 Emergency stop device The emergency stop device must be reset to zero in order to connect power to the product To do this push the contact arm to which the red emergency stop band is fastened towards the product until it clicks 4 01 Power supply GH2 F is equipped with batteries that require regular recharging The charger suppl...

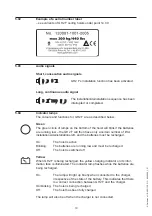
Page 9: ... indicator Emergency Emergency stop lowering Installation Lift Lower Direction UP Direction DOWN Deinstallation See point 6 00 See point 6 00 See point 6 00 See point 6 00 Type B in accordance with EN 60601 1 Read instructions before use Guldmann US 882 12 2011 900690_1 01 Guldmann US 882 12 2011 900690_1 01 ...

Page 10: ...lations deinstallations left and the batteries must be recharged On The hoist is active Blinking The batteries are running low and must be recharged Off The hoist is switched off Yellow When GH2 F is being recharged the yellow charging indicator on its infor mation face is illuminated The indicator lamp flashes while the batteries are being recharged On The lamp will light up briefly when connecte...

Page 11: ...ntrol the following functions 1 Installing and deinstalling the lifting module 2 Lifting and lowering a person 3 GH2 F is charged with the help of the DC connection on the hand control point 9 0 24V DC Guldmann US 882 12 2011 900690_1 01 Guldmann US 882 12 2011 900690_1 01 ...

Page 12: ... direction UP 4 Installation has been completed when GH2 F is automatically locked in the travelling trolley 5 Move the switch at the bottom of the hand control to position to complete installation We recommend steering guiding GH2 F with the hanger so that it is free from the transport trolley during installation The GH2 F lifting module must not be allowed to swing from side to side during insta...

Page 13: ...during deinstallation Please note All deinstallation must be begun by briefly moving GH2 F 1 2 seconds in an upward direction It is not possible to begin the installation and or deinstallation sequence for GH2 F when the load on the lifting strap exceeds the standard weight of the lifting hanger e g if a person is sitting in the lifting sling For the same reason a bath chair a bath stretcher Horiz...

Page 14: ...he GH2 F hoist The GH2 F hoist will automatically switch off after approximately ten minutes when not in use Note There must be a load on GH2 F corresponding to the weight of a Guldmann lifting hanger before the lowering function will work The lifting lowering function will be switched off if the 24V DC plug of the charger is connected to the hand control point 9 00 The lifting lowering function w...

Page 15: ... If GH2 F fails to stop respond to the hand control when it is in use pull the red strap lightly to deactivate all functions except the emergency lowering function GH2 F will not function when the emergency stop has been activated The emergency stop s contact arm must be pushed in manually before GH2 F is ready for use again After deactivation of the emergency stop press the UP or DOWN toggle swit...

Page 16: ...this happens GH2 F will stop briefly and then move freely in the direction of the travelling trolley Resuming installation deinstallation When the obstacle has been removed the installation or deinstallation sequence can be resumed cf point 6 01 installation step 3 Note The installation deinstallation sequence can also be interrupted with the help of the emergency stop emergency lowering function ...

Page 17: ...ck Push in the button 1 Attach the anchor with the cord from the travelling trolley Release the button and check that it returns fully to its original position Releasing the installation lock Wait for deinstallation to end and until GH2 F has been placed on a firm surface such as the transport trolley for GH2 F Push in the button 1 Release the anchor with cord from GH2 F Place the anchor with cord...

Page 18: ...ong a lifetime as possible A pre installed male plug on the connection side appropriate for the mains system in the country in question will protect the charger against incorrect use Connect the spiral wire to the hand control in the place indicated by the 24V DC label 1 The colour and function of the charger are as described below Green On Ready standby Orange On Recharging Storing the charger Th...

Page 19: ...rap lifting hanger towards the end stop on GH2 F before placing it on the transport trolley This will protect the lifting strap against unnecessary wear during transport and while stored on the transport trolley 10 02 Lifting accessories rail components and infra red remote control Guldmann ABC lifting sling and lifting hangers Order a special brochure from the distributor manufacturer or at www g...

Page 20: ...rack rail system is linked up to a room covering rail system or when tow room covering rail systems need linking The combi lock ensures that the two systems are locked together in situations such as transfer from a single track rail system in a bedroom to a room covering system in a bathroom The combi lock is available in manual or electrical models and activated either by pressing the switch or b...

Page 21: ...rding ESD safety are valid in this connection See point 4 01 How to prevent and avoid corrosion If GH2 F is mainly to be used in corrosive surroundings such as swimming pools it should be ordered with special corrosion preventive surface treat ment It is an advantage to remove GH2 F from the travelling trolley and rail system when not in use and if possible to remove it from the corrosive surround...

Page 22: ...the GH2 F must be performed at least one a year GH2 F and the Travelling trolley for GH2 F must be inspected by a qualified service fitter or by the Guldmann Service Team Guldmann offers a service agreement for GH2 F in connection with these inspections The service inspection includes a written report specifying what has been inspected and replaced Worn or defective components must be replaced by ...

Page 23: ...eturn to item 3 If there are no new problems the inspection has been completed 9 When a service inspection including service work or exchange of com ponents has taken place the final check should comprise a weight test with the product s nominal load 13 03 Service inspection travelling trolley for GH2 F Deinstall GH2 F and put it on the transport trolley before service inspections of the Travellin...

Page 24: ...the product installed in the travelling trolley rail system If NO Contact the Guldmann Service Team The hand control may be defective If YES Contact the Guldmann Service Team GH2 F may have been incorrectly installed The green lamp on GH2 F blinks after it has been connected to the charger 1 Check that the yellow charging indicator lights up when GH2 F is connected to the charger 2 Check that the ...

Page 25: ...s Max number of lifts in a series 72 at 85 kg 1000 mm 72 at 187 lbs 39 28 at 250 kg 1000 mm 28 at 550 lbs 39 Lifting speed 85 kg 187 lbs load 1680 mm min 66 min 250 kg 550 lbs load 1020 mm min 40 min max 5 kg 11 lbs load 3300 mm min 130 min Dual speed GH2 F GH2 F HD Weight Lifting module 9 8 kg 21 5 lbs Lifting module including travelling trolley 11 kg 24 lbs Lifting hanger min 2 0 kg 4 5 lbs Soun...

Page 26: ...w 17 V Periodic load lifting motor operation pause Dynamic supervision 15 85 Travelling trolley for GH2 F GH2 F HD A 98 mm 3 5 B 166 mm 6 5 C max 2800 mm 110 D min 650 mm 25 5 D max 750 mm 29 5 Depth of travelling trolley 84 mm 3 Cord length C adapted to height of rail during installation Max load 250 kg 550 lbs Weight Travelling trolley with the exclusion of lifting modules GH2 F GH2 F HD 1 2 kg ...

Page 27: ... product in the production year ZZZZ Production year was manufactured in conformity with the provisions in EN 10535 Hoists for the transfer of disabled persons requirements and test methods EN 60601 1 1990 Medical electrical equipment A1 1993 Part 1 1 General requirements for safety A2 1995 A12 1993 EN 60601 1 2 Medical electrical equipment Part 1 General requirements for safety 2 Collateral stand...

Page 28: ...by a Guldmann designated technician will be guaranteed for the remainder of the Warranty Period The warranty does not cover any part of the equipment which has been sub ject to damage or abuse by the user or others The warranty does not cover any part of the equipment which has been altered or changed in any way by the user or others Guldmann does not warrant that the lifting device functions will...

Page 29: ...r Return Authorization Number a brief description of the problem and your return address and phone number Guldmann does not assume the risk of loss or damage while in transit so it is recommended you insure the package Guldmann US 882 12 2011 900690_1 01 Guldmann US 882 12 2011 900690_1 01 ...

Page 30: ...30 Guldmann US 882 12 2011 900690_1 01 Guldmann US 882 12 2011 900690_1 01 ...

Page 31: ...31 Guldmann US 882 12 2011 900690_1 01 Guldmann US 882 12 2011 900690_1 01 ...

Page 32: ...K 8200 Aarhus N Tlf 45 8741 3100 Fax 45 8741 3131 info guldmann com www guldmann dk Guldmann Inc 5525 Johns Road Suite 905 Tampa FL 33634 Tel 800 664 8834 Tel 813 880 0619 Fax 813 880 9558 info guldmann net www guldmann net Guldmann US 882 12 2011 900690_1 01 ...

Reviews: