background image

9

1.11 

GH2+2 ceiling hoist with built-in drive motor

GH2+2 ceiling hoist with a built-in drive motor operates fully automatically on 
the rail system.
When using a GH2+2, please note that the motor uses approx. 1 second to
accelerate and stop the hoist, respectively. Thus, when stopping the unit from 
max. speed, the motor must be cut off 10-15 cm before the desired position.
When the hand control is activated for a shorter period of time, it is possible
to position the hoist with a high level of accuracy.
GH2+2 must run on its own power and should not be pulled through the rail 
system.

1.12 

GH2+2R ceiling hoist with built-in drive motor and infrared remote  control

GH2+2R has a built-in drive motor and IR receiver which is controlled by the 
IR sender.
With this sender, it is possible to control all the functions of the hoist.
Furthermore, the IR sender can be used to control e.g. switch tracks,
combi-locks and turntables mounted with IR receivers.

The cable-mounted hand control must remain fitted to the hoist. This will

ensure that the hoist can always be operated if the IR sender is mislaid
or if its batteries run dry.

In certain cases, an unladen hoist with a drive motor can, due to its low 

unloaded weight, have difficulty in driving through, for example, switch 


tracks, if the switch is not open in the direction in which the hoist is passing. 
To provide extra security for unassisted users that the hoist runs smoothly 
through the track system, it is possible to mount a friction enhancer in  
connection with the hoist’s drive wheels. Friction enhancers cannot be  
used in connection with a drive-through charging station.

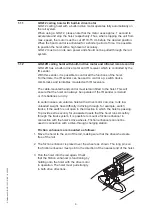
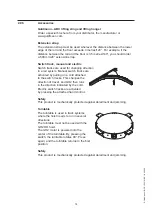
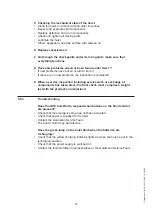
Friction enhancers are mounted as follows:

1.  Move the hoist to the end of the rail, making sure that the drive wheels are 

free of the rail.

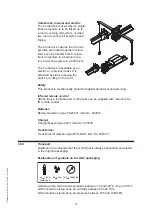
2.  The friction enhancer is placed over the wheels as shown. The long pins on 

the friction enhancer must point in the direction of the nearest end of the hoist.

3.  Run the hoist into the rail again. Check 

that the friction enhancer is functioning by 
holding onto the hoist with the drive motor 
in operation. The hoist must pull strongly 
in both drive directions.

© 

Guldmann 

G

B

/U

S

-12

63/0

1

/0

8

 •

 #

 90069

© 

Guldmann 

G

B

/U

S

-12

63/0

1

/0

8

 •

 #

 90069

Summary of Contents for GH2

Page 1: ...1 GB US GH2 Ceiling Hoists ...

Page 2: ... motor 9 1 12 GH2 2R ceiling hoist with built in drive motor and infrared remote control 9 2 00 Description of functions 10 2 01 Pictograms 10 2 02 Indicator lamps 11 2 03 Operation 11 2 04 Safety functions 12 2 05 Recharging 13 2 06 Accessories 14 3 00 Transport 15 4 00 Maintenance and storage 16 4 01 Cleaning 16 4 02 Storage 16 4 03 How to prevent and avoid corrosion 16 4 04 Daily maintenance 16...

Page 3: ...th a Guldmann lifting hanger or with another suitable lifting hanger point 1 06 the hoist is used with a Guldmann lifting sling or other suitable slings point 1 07 1 03 Important precautions Read the instructions carefully before using the GH2 hoist GH2 s maximum load of 200 kg 440 lbs and 250 kg 550 lbs respectively must never be exceeded GH2 may only be used to lift people The red emergency stop...

Page 4: ... load may change when different components are used such as lifting hangers lifting slings etc 1 05 Unpacking and preparation Visual check of the GH2 If it appears that the GH2 hoist has been damaged when you unpack it it must not be used until it has been checked by a qualified person or by the Guldmann Service Team Contents of the box 1 GH2 hoist 2 Hand control 3 Transformer charger 4 Manual 5 L...

Page 5: ...ing GH2 with a snap hook GH2 with a snap hook can also be used for Swing The snap hook is sewn onto the strap and cannot be removed Please note Bath chairs bath stretchers and horizontal stretchers must be attached to the snap hook Strap attachment Use lifting hanger type 21X70 or Horizontal Lifter Type BS when using GH2 with strap attachment Mount the lifting hanger as illustrated Loosen the poin...

Page 6: ...ach the lowermost set of straps from the legs to the hooks that face away from the user Lifting to and from sitting position When lifting a user from e g a wheelchair move the GH2 towards the person to be lifted The lifting hanger should be at the same height as the person s chest and should not be moved further in over the user than to approximately mid thigh position Place the lifting hanger par...

Page 7: ...y GH2 is equipped with batteries that require regular recharging The power supply for charging and the battery charging point must be connected by a qualified engineer or by the Guldmann Service Team The transformer recharger supplied must always be used AC power supply When the power is supplied via the rails Midi rails an AC transformer Guldmann type DTS 2420 item No 937000 must be used For conn...

Page 8: ...s close to each other as possible The lifting hanger is attached to the hook on hoist B 2 Pull out the free strap and hook from hoist A and attach it to the eye 3 Pull out the lifting strap on hoist B a little further and retract the lifting strap on hoist A When the transfer swing has been completed there is no longer any load on the lifting strap on hoist B 4 Release the hook and strap from hois...

Page 9: ...trol must remain fitted to the hoist This will ensure that the hoist can always be operated if the IR sender is mislaid or if its batteries run dry In certain cases an unladen hoist with a drive motor can due to its low unloaded weight have difficulty in driving through for example switch tracks if the switch is not open in the direction in which the hoist is passing To provide extra security for ...

Page 10: ...rial number label see variants of GH2 ceiling hoists under point 6 00 No 120001 1001 2005 max 200 kg 440 lbs V Guldmann A S Graham Bells Vej 21 23A DK 8200 Århus N Tel 45 8741 3100 www guldmann com 24V AC DC FUSE 15AF 240VA ED15 IP20 No 120001 1001 2005 max 250 kg 550 lbs V Guldmann A S Graham Bells Vej 21 23A DK 8200 Århus N Tel 45 8741 3100 www guldmann com 24V AC DC FUSE 5AF 75VA ED15 IP20 Guld...

Page 11: ...ng Off The hoist is switched off Yellow On Charging indicator indicates that connection is established between the hoist and the recharger transformer 2 03 Operation Hand control Pressing a button on the hand control automatically switches on the GH2 hoist The GH2 will automatically switch off after approximately ten minutes when not in use 1 Lift 2 Lower 1 Lift 2 Lower 3 Move hoist towards the op...

Page 12: ...ice should be used only in an emergency If contrary to expectations it becomes necessary to use the safety functions the fault must be located and remedied before using the GH2 hoist again Please contact your supplier Re EMC If electromagnetic or other influences occur between this product and other products these products must not be used together The function of the emergency strap Pulling the r...

Page 13: ...isted the strap safety device will be activated and the GH2 hoist will be deactivated If the yellow mark on the strap is visible it is not allowed to lift with maximum load 2 05 Recharging When the GH2 hoist is not in use it should be parked in the recharging unit This will maintain the batteries and ensure them a long lifetime When GH2 is being recharged the yellow charging indicator on GH2 s inf...

Page 14: ... activated by pulling on a cord attached to the switch tracks This changes the direction of travel and GH2 then runs in the direction indicated by the cord Electric switch tracks are activated by pressing the attached hand control Safety This product is mechanically protected against derailment and jamming Turntable The turntable is used in track systems where the hoist needs to run in several dir...

Page 15: ... protected against derailment and jamming Infrared remote control Switch tracks turntable and combi locks can be supplied with receivers for IR remote control Batteries Battery Guldmann type FG20401 item No 933015 Charger Charger Mascot type 2240 item No 937030 Transformer Transformer Guldmann type DTS 2420 item No 937000 3 00 Transport Guldmann recommends that the GH2 hoist is always transported ...

Page 16: ...surroundings such as swimming pools it must be ordered with a special corrosion preventive surface treatment Do not expose GH2 to sudden cold heat as an example do not move a cold GH2 into a hot bathroom 4 04 Daily maintenance Check the lifting sling for wear and damage before using the hoist Never use a damaged or defective lifting sling Never use the GH2 hoist if the lifting strap is damaged or ...

Page 17: ...components from Guldmann Spare parts drawings and documentation can be ordered from the manufac turer or the distributor 1 Visual inspection of the hoist Check for wear irregularities or other types of damage to the hoist 2 Testing the hoist as though in normal use Check all functions of the product with and without load as described in section 2 Check that the emergency stop functions Check that ...

Page 18: ...9 When a service inspection including service work or exchange of components has taken place the final check must comprise a weight test with the product s nominal load 5 03 Troubleshooting Does the GH2 hoist fail to respond when buttons on the hand control are pressed Check that the emergency stop has not been activated Check that power is supplied to the hoist Contact the Guldmann Service Team T...

Page 19: ...s 40 32 with 200 kg 1000 mm 32 with 440 lbs 40 Lifting speed with 85 kg load 187 lbs 1680 mm min 66 min with 200 kg load 440 lbs 1200 mm min 47 min with max 5 kg load max 11 lbs 3300 mm min 130 min Dual speed GH2 2 and GH2 2R Speed on straight rail at full load 15 cm sec 6 sec Soft start stop GH2 HD Max load 250 kg 550 lbs Max number of lifts in series AC 92 with 85 kg 1000 mm 92 with 187 lbs 40 3...

Page 20: ...V AC Power supply 24V DC Output transformer 40VA Outpout recharger 32VA Supply voltage transformer or recharger 100 240V Current consumption GH2 8 5A at max load Current consumption GH2 2 drive motor 2 5A at max load Max power consumption GH2 240VA Charging time max 8 hours Lead batteries sealed and maintenance free 2 x 12V Rechargeable batteries order no 933015 Safety Measures Safety cut off for ...

Page 21: ...ct YYYY Serial No of the product in the production year ZZZZ Production year was manufactured in conformity with the provisions in EN 10535 Hoists for the transfer of disabled persons requirements and test methods EN 60601 1 1990 Medical electrical equipment A1 1993 Part 1 1 General requirements for safety A2 1995 A12 1993 EN 60601 1 2 Medical electrical equipment Part 1 General requirements for s...

Page 22: ...e specifications set forth in the documentation provided with the equipment The above express warranties are made for a period of 365 days from the date the lifting equipment is delivered to you as the first user Your distributor will replace any lifting equipment which proves defective in materials or workmanship without additional charge on an exchange basis Your distributor will either replace ...

Page 23: ...item being returned because Guldmann does not assume the risk of loss or damage while in transit Do not return items or warranty service to Guldmann The warranties set forth above are in lieu of all other express and implied warranties whether oral written or implied and the remedies set forth above are your sole and exclusive remedies Only an authorized officer of Guldmann may make modifications ...

Page 24: ...ce Graham Bells Vej 21 23A DK 8200 Århus N Tel 45 8741 3100 Fax 45 8741 3131 E mail info guldmann com www guldmann com Guldmann Inc 5525 Johns Road Suite 905 Tampa FL 33634 Tel 800 664 8834 Tel 813 880 0619 Fax 813 880 9558 E mail info guldmann net www guldmann net ...

Reviews: