background image

Gulfstream Inc. highly recommends the following cleaning regimen. You should always contact your local governing 

agency for their specific cleaning and disinfecting requirements and regulations for pedicure spas. For your clients 

safety, always use the regulations as a minimum standard for cleaning and disinfecting.  Combining your states 

standards with the regimen listed below will provide your clients with a safe and healthy pedicure spa environment 

experience.

Routine maintenance:

Powdered cleansers or abrasives are 

NOT RECOMMENDED

. A clean towel or sponge, are all that are usually 

needed. A soft bristled brush may be used when excessive residue is present. Use a mild soap and water solution to 

clean the upholstery, but do not over wet. Wipe dry with a clean towel. No internal maintenance of the spa 

components is necessary. Remove clean jet caps and spray with disinfectant after each use. For extra protection, our 

recommendation is that the system be flushed daily or weekly depending on use. To flush the clean jet system fill spa 

with hot water to just above the jets. Add disinfectant. Run whirlpool for 15 minutes, drain and then wipe dry with 

clean soft cloth. 

NOTE:

  
Cleaning or sanitizing is NOT disinfecting. According to the Centers for Disease Control and Prevention (CDC), and 

the US Environmental Protection Agency (EPA), disinfecting occurs only when there is a reduction of pathogenic 

microbes at 99.999%. Sanitizing is only a reduction of 99.9%. Cleaning of whirlpool pedicure spas requires surfactant 

and chelating detergents that are low-foaming and have the ability to remove body oils, organic oil additives, mineral 

oil, skin cells, nail clippings etc that can accumulate both in the basin and the jets which may become a fertile area for 

micro organisms to grow.

The use of oil based products can build up in the whirlpool system causing clogging in the jets. Adherence to the 

above cleaning will minimize build up. Gulfstream not recommend the use of mineral oil based products.

TESTING/FLUSHING FOOT SPA

After foot spa has been installed, fill tub with water just above the jets. Carefully check for leaks at drain and over 

flow.  After checking underside for leaks turn on system by pushing whirlpool button and watch for leaks as water 

circulates.  Let tub run full cycle. Open drain plug for water discharge.

CLEANING & MAINTENANCE

8

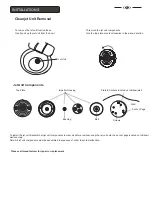
Please refer the diagrams  to remove jet covers for cleaning

Summary of Contents for Mini Lavender

Page 1: ...cations are subject to change without notice 2011 All rights reserved PLEASE SAVE THIS MANUAL FOR FUTURE REFERENCE OWNER MANUAL Cleanjet Gulfstream Inc Gulfstream Inc are trademarks of Mini Lavender Patent D610697 D600950 ...

Page 2: ...Table of Contents Safety and Precautions INSTALLATIONS Jet Assembly Plumbing Connections 1 2 Identifying Parts 3 4 5 6 Warranty Service 10 Owner Manual Operations and Use Cleaning Maintenance 7 8 9 ...

Page 3: ...ay cause severe damage to the unit as well as possible serious injury to the person BASIC PRECAUTIONS SHOULD ALWAYS BE OBSERVED INCLUDING THE FOLLOWING 1 Read and follow all instructions 2 DANGER To reduce the risk of injury do not permit children to use this unit unless they are supervised at all times 3 Use this unit only for its intended use as described in this manual Do not use attachments th...

Page 4: ...ir a damaged cord OPERATION AND USE INSTRUCTIONS READ AND FOLLOW ALL INSTRUCTIONS 1 IMPORTANT At the end of the day ALWAYS turn the main power OFF 2 DANGER To reduce the risk of injury do not permit children to use this unit unless they are closely supervised at all times 3 CAUTION This unit should not be used by persons with open wounds cuts or sores on their feet or legs or by persons with poor ...

Page 5: ...table Footrest Wheel Lock Jet Control Laminated Wood Grain Base La Mini Lavender Mini Lavender Dimension Length 22 56 cm Width 19 1 4 49 cm Height 21 43 cm Footrest Up 26 66 cm Pedi Bowl Dimension Wide 19 5 49 5 cm Height 18 1 4 46 5 cm Front Jet Unit ...

Page 6: ... Plate Anchors located on tub bowl wall Impeller Housing Top Plate Wall Ball Bushing Anchor Pegs Jet Unit Components To install the jet unit Assemble all jet unit components in order as before removal snap the jet unit onto the anchor pegs located on tub bowl wall securely Note All jet unit components must be assembled in sequence of order to avoid malfunction Screws Please call manufacturer for r...

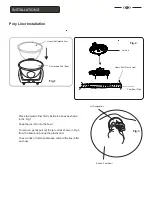
Page 7: ... gently pull out the jet unit as shown in Fig 3 from the bowl and pull up the plastic liner To avoid risk of infection disease discard the liner after each use Heavy Soft plastic liner Fig 1 Removable Pedi Bowl Fig 3 Poly Liner Installation Fig 2 Jet Unit Heavy Soft Plastic Liner Pedi Bowl Wall Bottom Pedi Bowl Jet Designation ...

Page 8: ...d to supply power to the unit The roller back massage chair uses a 115V A C supply 3 Spa unit should stand securely on level floor with the wheel lock on when in use There is no drain connection with the spa Simply lift up the pedi bowl and discharge When using soft liner simply pull FAILURE TO ANCHOR THE BASE MAY RESULT IN PERSONAL INJURY OR DAMAGE TO THE UNIT DAMAGE AS A RESULT WILL VOID THE WAR...

Page 9: ...l up the liner and discard the water Control Panel OPERATIONS USE 7 BASIC PRECAUTIONS SHOULD ALWAYS BE OBSERVED INCLUDING THE FOLLOWING 1 Read and follow all instructions 2 DANGER To reduce the risk of injury do not permit children to use this unit unless they are supervised at all times 3 Use this unit only for its intended use as described in this manual Do not use attachments that are not recom...

Page 10: ...hirlpool for 15 minutes drain and then wipe dry with clean soft cloth NOTE Cleaning or sanitizing is NOT disinfecting According to the Centers for Disease Control and Prevention CDC and the US Environmental Protection Agency EPA disinfecting occurs only when there is a reduction of pathogenic microbes at 99 999 Sanitizing is only a reduction of 99 9 Cleaning of whirlpool pedicure spas requires sur...

Page 11: ...on top of the Magnet and the Back Plate so that the tab is slightly left from the top Turn the Top Plate clockwise until you hear a click sound Note there are 3 pegs on the back of the Back Plate the pegs which has small holes 1 18 of an inch should be aligned with the Top Plates tab after the click sound 6 Remount the Magnet Jet onto the pedicure bowl by aligning the pegs so that the tab is at th...

Page 12: ...of plastic surfaces due to exposure and or the use of harmful cleaning agents or chemicals 3 Staining fading or discoloration caused by improper or poor water additives not related to the maintenance of proper water are not covered by this warranty 4 Staining fading or discoloration of the seat armrests or footrests 5 Freight damage misuse neglect accident natural disaster and abuse 6 Unauthorized...

Page 13: ...ns are subject to change without notice 2011 All rights reserved Manufacturer of Acrylic Bath Whirlpool Pedicure Foot Spas Gulfstream Inc Cambridge Ontario Canada N1R 5X5 Tel 519 622 0950 Fax 519 622 6926 www gulfstreaminc com ...

Reviews: