27
.............................
CCEC/ OM Manual RotaSec Titan 1.5 EN
08.2009
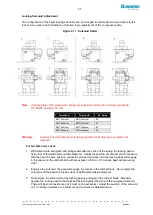
Locking Solenoid Adjustment
The configuration of the head locking solenoids can be changed from fail safe on power failure to fail
lock or vice-versa in both directions of rotation, by re-adjustment of the component parts,
Figure 4.11 - Solenoid Detail
Note -
If the fail state of the solenoid is changed by physically turning it around then parameter
0.0. MUST be altered to suit.
Direction A
Direction B
0.0. Value
BMT (fail lock)
BMT (fail lock)
00
SMT (fail safe)
BMT (fail lock)
01
BMT (fail lock)
SMT (fail safe)
02
SMT (fail safe)
SMT (fail safe)
03
Warning -
Fail lock solenoids become hot during operation since they are energised until
released.
For fail safe units check
:
1. With solenoid de-energised and plunger extended by action of the spring the locking pawl is
held clear of the baffle plate outside diameter. Adjust the position of solenoid coil if necessary,
with the head in home position, retract the plunger manually, and the locking pawl will engage
in the recess on the ratchet block without excessive friction. On release pawl will also swing
clear.
2. Energise the solenoid, the pawl will engage the recess in the ratchet block. De-energise the
solenoid and the pawl will release clear of baffle plate outside diameter.
3. Re-energise the solenoid and the locking pawl is engaged in the ratchet block. Manually
operate the locking pawl to the Release Position against the force of the energised solenoid.
There will be some resistance but it must not be excessive. Adjust the position of the solenoid
coil to reduce resistance to a minimum and re-check as detailed above.
Summary of Contents for RotaSec B120D
Page 2: ...CCEC OM Manuals RotaSec Titan 1 5 08 2009...
Page 11: ...11 CCEC OM Manual RotaSec Titan 1 5 EN 08 2009 Typical Units Model B90S Model F90S...
Page 12: ...12 CCEC OM Manual RotaSec Titan 1 5 EN 08 2009 Model R120S Model R120DI...
Page 61: ...61 CCEC OM Manual RotaSec Titan 1 5 EN 08 2009...
Page 63: ...63 CCEC OM Manual RotaSec Titan 1 5 EN 08 2009 Model S90S Model R90S...
Page 64: ...64 CCEC OM Manual RotaSec Titan 1 5 EN 08 2009 Model R120S Model S120S...
Page 65: ...65 CCEC OM Manual RotaSec Titan 1 5 EN 08 2009 Model F90D...
Page 66: ...66 CCEC OM Manual RotaSec Titan 1 5 EN 08 2009 Model F120D...
Page 67: ...67 CCEC OM Manual RotaSec Titan 1 5 EN 08 2009 Model R90D...
Page 68: ...68 CCEC OM Manual RotaSec Titan 1 5 EN 08 2009 Model R120D...
Page 69: ...69 CCEC OM Manual RotaSec Titan 1 5 EN 08 2009 Model S90D...
Page 70: ...70 CCEC OM Manual RotaSec Titan 1 5 EN 08 2009 Model S120D...
Page 71: ...71 CCEC OM Manual RotaSec Titan 1 5 EN 08 2009 Model F90DI...
Page 72: ...72 CCEC OM Manual RotaSec Titan 1 5 EN 08 2009 Model F120DI...
Page 73: ...73 CCEC OM Manual RotaSec Titan 1 5 EN 08 2009 Model R90DI...
Page 74: ...74 CCEC OM Manual RotaSec Titan 1 5 EN 08 2009 Model R120D...
Page 75: ...75 CCEC OM Manual RotaSec Titan 1 5 EN 08 2009 Model S90DI...
Page 76: ...76 CCEC OM Manual RotaSec Titan 1 5 EN 08 2009 Model S120DI...
Page 84: ...84 CCEC OM Manual RotaSec Titan 1 5 EN 08 2009 Fig 5 31 Optional Pushbuttons...
Page 98: ...98 CCEC Product Data CCEC O M Manuals ClearSec 1 3 09 2008 Notes...
Page 99: ...99 CCEC OM Manual RotaSec Titan 1 5 EN 08 2009 Notes...


