58
.............................
CCEC/ OM Manual RotaSec Titan 1.5 EN
08.2009
General Details
1. Check level of the base, check the head room, corridor width, base and all critical
dimensions. Refer to the installation figures.
Tool Kit
(If installation to be carried out by client)
A tool kit, Pt No. 80061724, is required to assist with the installation of routines.
The kit contains:
Insert (M10 RX)
1
M5 Pin Hex Insert
1
General purpose Grease
50grms
Sealant
100grms
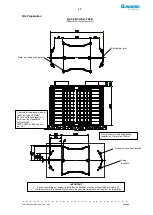
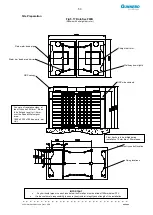
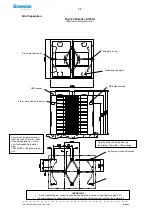
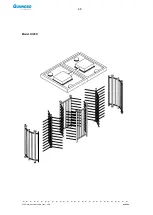
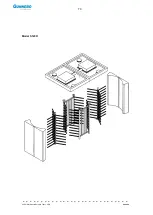
Basic Principles of Setting To Work (Fig 5.21 and 5.22)
With reference to the Diagrams carry out the following routines:
1. Assemble Items 1,2 and 3 using four M10 x 30 RX screws and M10 Shakeproof Washer.
2. Assemble Items 4 (two off) and 5 securing with Screws RX Head M10 x 30 and M10 shake
proof washers.
3. Run the cables required through the upright support columns . Fit the plastic Cable Protector
Caps.
4. Assemble Items 6 and 7 (ensuring that Item 6 is packed with grease and that the Bearing is
Inserted in to the Bearing Cup)
5. Fit and bolt together the items assembled in Step 1 and 2 using screws RX Head M10 x 30
over the required fixing location.
6. Position the Roof Frame on top of the main framework and secure in place using twelve M10 x
30 RX Head screws and shake proof washers.
NOTE
: Ensure that the Electrical Cables are pulled through the framework.
7. Connect all electrical cables as detailed in Figure 5.26.
8. Fit the Head Mechanism (9) and the Electrical Plate.
9. Connect the cables.
NOTE
: Ensure that the Cabling Conduit (part of the Head Assembly) is long enough to allow
Head Cover removal.
10. On completion, fit the Head Cover (M5 x 16 PinHex Screws ) ensuring that the Sealing Strip is
applied to the edges.
11.
Bolt the Assembly to the floor using the „Spit Bolts‟ supplied.
12. Prior to tightening the fixing bolts make sure that the complete Assembly is LEVEL. Use the
shims supplied as necessary.
13. Fit the Service Panels
Summary of Contents for RotaSec B120D
Page 2: ...CCEC OM Manuals RotaSec Titan 1 5 08 2009...
Page 11: ...11 CCEC OM Manual RotaSec Titan 1 5 EN 08 2009 Typical Units Model B90S Model F90S...
Page 12: ...12 CCEC OM Manual RotaSec Titan 1 5 EN 08 2009 Model R120S Model R120DI...
Page 61: ...61 CCEC OM Manual RotaSec Titan 1 5 EN 08 2009...
Page 63: ...63 CCEC OM Manual RotaSec Titan 1 5 EN 08 2009 Model S90S Model R90S...
Page 64: ...64 CCEC OM Manual RotaSec Titan 1 5 EN 08 2009 Model R120S Model S120S...
Page 65: ...65 CCEC OM Manual RotaSec Titan 1 5 EN 08 2009 Model F90D...
Page 66: ...66 CCEC OM Manual RotaSec Titan 1 5 EN 08 2009 Model F120D...
Page 67: ...67 CCEC OM Manual RotaSec Titan 1 5 EN 08 2009 Model R90D...
Page 68: ...68 CCEC OM Manual RotaSec Titan 1 5 EN 08 2009 Model R120D...
Page 69: ...69 CCEC OM Manual RotaSec Titan 1 5 EN 08 2009 Model S90D...
Page 70: ...70 CCEC OM Manual RotaSec Titan 1 5 EN 08 2009 Model S120D...
Page 71: ...71 CCEC OM Manual RotaSec Titan 1 5 EN 08 2009 Model F90DI...
Page 72: ...72 CCEC OM Manual RotaSec Titan 1 5 EN 08 2009 Model F120DI...
Page 73: ...73 CCEC OM Manual RotaSec Titan 1 5 EN 08 2009 Model R90DI...
Page 74: ...74 CCEC OM Manual RotaSec Titan 1 5 EN 08 2009 Model R120D...
Page 75: ...75 CCEC OM Manual RotaSec Titan 1 5 EN 08 2009 Model S90DI...
Page 76: ...76 CCEC OM Manual RotaSec Titan 1 5 EN 08 2009 Model S120DI...
Page 84: ...84 CCEC OM Manual RotaSec Titan 1 5 EN 08 2009 Fig 5 31 Optional Pushbuttons...
Page 98: ...98 CCEC Product Data CCEC O M Manuals ClearSec 1 3 09 2008 Notes...
Page 99: ...99 CCEC OM Manual RotaSec Titan 1 5 EN 08 2009 Notes...


