background image

11 


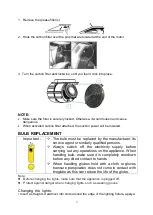
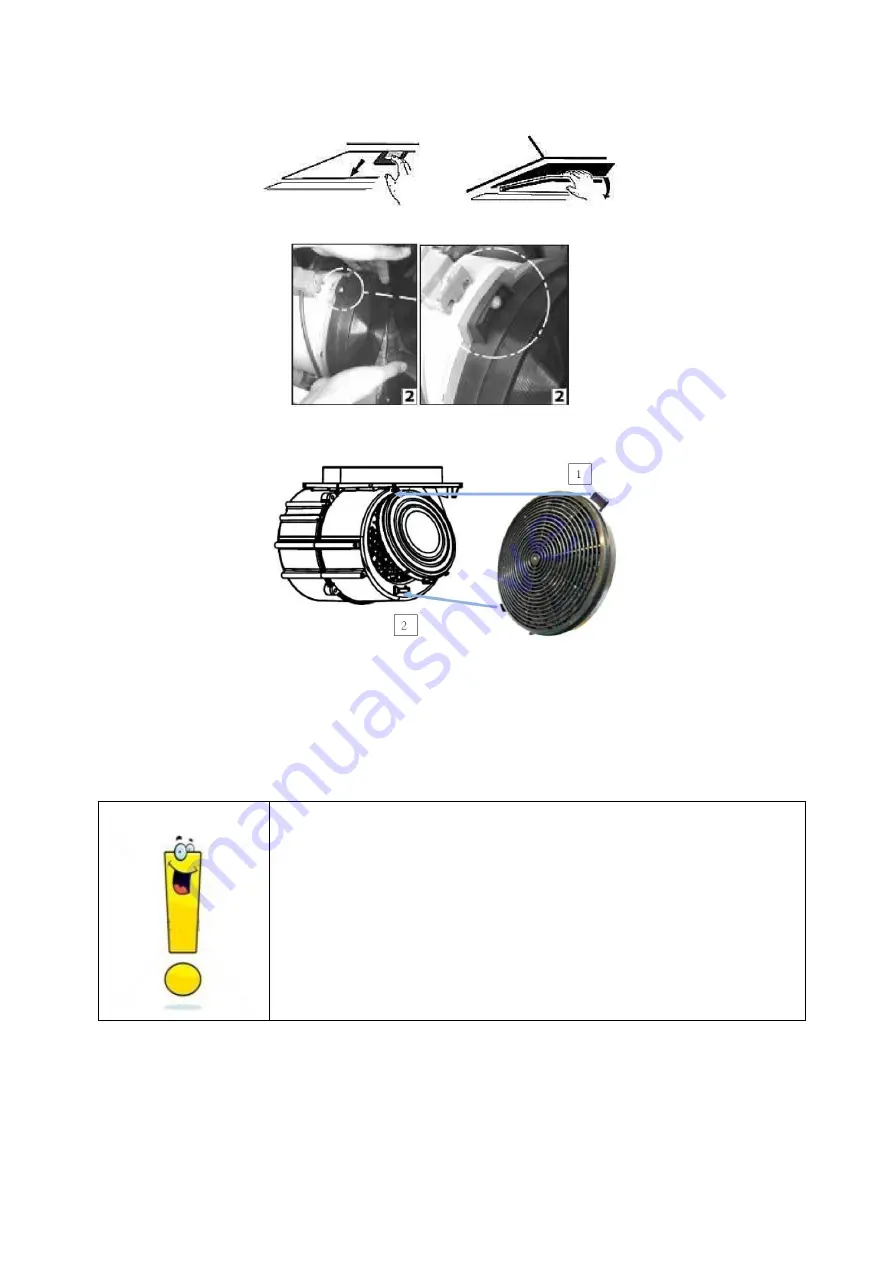
1.  Remove the grease filter(s). 


2.  Hook the carbon filter over the pins that are located at the end of the motor. 


3.  Turn the carbon filter anticlockwise, until you feel it click into place. 


NOTE:  

  Make sure the filter is securely locked. Otherwise, it would loosen and cause 

dangerous.  

  When activated carbon filter attached, the suction power will be lowered.  


BULB REPLACEMENT 

Important : 


  The bulb  must be replaced by the manufacturer, its 

service agent or similarly qualified persons. 

  Always switch off the electricity supply before 

carrying out any operations on the appliance. When 
handling bulb, make sure it is completely cooldown 
before any direct contact to hands. 

  When handling globes hold with a cloth or gloves 

toensure perspiration does not come in contact with 
theglobe as this can reduce the life of the globe. 

Note: 

  Before changing the lights, make sure that the appliance is plugged off. 

  Protect against danger when changing lights, such as wearing gloves. 


Changing  the  lights: 

• 

Insert a straight screwdriver into slots around the edge of the lighting fixture, apply a 

Summary of Contents for MARGARETTE

Page 1: ...Gunter Hauer Instruction Manual Cooker Hood MARGARETTE...

Page 2: ...Content Safety information 2 Installation 4 Start using your cooker hood 7 Troubleshooting 9 Maintenance and cleaning 9 Environmental note 12...

Page 3: ...er hood is located above a gas appliance this distance shall be at least 65 cm The air must not be discharged into a flue that is used for exhausting fumes from appliances burning gas or other fuels A...

Page 4: ...Children younger than 8 years old should stay away unless they are under permanent supervision There shall be adequate ventilation of the room when the cooker hood is used at the same time as applian...

Page 5: ...e body 6 a pin 3 should be top oriented the axis 4 should be inserted in the holes 5 on body repeat all the operations for the 2nd half part INSTALLATION If you have an outlet to the outside your cook...

Page 6: ...crews M4 nut and washer the overlap between angle iron should more than 100mm See pic 3 6 Using 6 pcs M4X10 screws to fix the angle iron on the cooker hood housing and install the expansion pipe See p...

Page 7: ...extraction Keep expansion pipe short and straight Do not reduce the size or restrict expansion pipe When using expansion pipe always install the pipe pulled taut to minimize pressure loss Failure to...

Page 8: ...initial point and should be led to an outer wall After the installation make sure that the cooker hood is level to avoid grease collection at on end Ensure the expansion pipe selected for installatio...

Page 9: ...ress lamp button again to turn off the lights Indicator light of lamp button and power button will be off And recycle like this 4 Press the High button once motor runs on high speed the indicator ligh...

Page 10: ...he correct distance The Cooker hood inclines The fixing screw not tight enough Tighten the hanging screw and make it horizontal NOTE Any electrical repairs to this appliance must conform to your local...

Page 11: ...rtwork on the control panel and will voidmanufactures warrantee GREASE MESH FILTERS The mesh filters can be cleaned by hand Soak them for about 3 minute in water with a grease loosening detergent then...

Page 12: ...rvice agent or similarly qualified persons Always switch off the electricity supply before carrying out any operations on the appliance When handling bulb make sure it is completely cooldown before an...

Page 13: ...us for the environment and human health due to the presence of hazardous substances For more information please contact your local or regional authorities NOTE The following shows how to reduce total...

Page 14: ...M hlenstrasse 8a Berlin 14167 Germany www gunter hauer eu e mail info gunter hauer de...

Reviews: