background image

Günter & Hauer 


3. If the power cord is damaged, it must be replaced by the manufacturer, its service 
agent or a qualified person in order to avoid an accident. 

4. Do not use a plug and extension cord other than those originally supplied with the 
hood. 

5. Grounding of this hood is mandatory. Do not remove the grounding contact from the 
plug. 

6. For the purpose of additional protection of the hood against voltage drops in a network 
it is recommended to connect it through the additional automatic switch 6A. 

3. Before installation of decorative boxes of an air duct, deduce a wire for connection 
of the hood to the power supply network. 

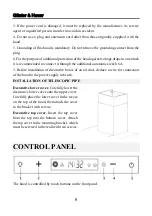
INSTALLATION OF TELESCOPIC PIPE 

Decorative lower cover.

 Carefully lower the 

decorative lower cover onto the upper cover. 
Carefully place the lower cover in the recess 
on the top of the hood, then attach the cover 
to the bracket with screws.  

Decorative  top  cover.

  Insert  the  top  cover 

from  the  top  into  the  bottom  cover.  Attach 
the top cover to the mounting bracket, which 
must be screwed to the wall with two screws.


CONTROL PANEL 

The hood is controlled by touch buttons on the front panel. 


Summary of Contents for MARTA 60

Page 1: ...G nter Hauer INSTRUCTION MANUAL COOKER HOOD MARTA 60...

Page 2: ...G nter Hauer CONTENT PRECAUTIONS 2 SIZE APPEARANCE 4 INSTALLATION CONNECTION 6 CONTROL PANEL 9 MAINTENANCE 10 TROUBLESHOOTING 12 SPECIFICATIONS 13...

Page 3: ...protective film from the stainless steel hood until you are sure about the technical serviceability of the hood by connecting it to the mains and checking all its functions We recommend that all work...

Page 4: ...ce to the exhaust air and increase noise and vibration as well as overheating of the engine The hood must be installed above the electric hobs at a height of at least 65 cm and above the gas burners a...

Page 5: ...rials used for packaging are environmentally safe and 100 recyclable as indicated by the appropriate symbol WARNING Packaging materials plastic bags pieces of foam etc should be inaccessible to childr...

Page 6: ...installation of the hood For a description of how to remove them see the relevant sections Check that there are no objects inside the hood placed during its transportation e g bags with screws instru...

Page 7: ...rap is positioned horizontally to avoid the accumulation of fat on one side INSTALLATION CONNECTION 1 Draw a vertical line on the wall to the ceiling or to the required height marking the centre of th...

Page 8: ...il it is securely fastened to the bracket INSTALLATION OF AIR DUCT Caution To reduce the risk of fire use only a metal air duct 1 Install the duct adapter on the hood 2 Put the air duct of the require...

Page 9: ...on the duct adapter 5 Install the ceiling wall cover Connect the air duct to it Use adhesive tape to connect the duct parts together Air recirculation mode Caution Do not use plastic or rigid air duct...

Page 10: ...it through the additional automatic switch 6A 3 Before installation of decorative boxes of an air duct deduce a wire for connection of the hood to the power supply network INSTALLATION OF TELESCOPIC P...

Page 11: ...aken within the next 3 seconds FILTER CONTAMINATION INDICATOR After a while using the hood the indicator will appear on the display This means that the hood filter is dirty and needs cleaning After cl...

Page 12: ...tructions below You can remove two panels from the hood Press the bottom panel inwards until you hear the lock clicking Lift and pull out the glass Similarly click on the middle panel until it clicks...

Page 13: ...electrical connection Check the fan setting Low hood efficiency The fan speed is not high enough Check the condition of the grease filter wash once every 1 5 2 months charcoal carbon filter may need...

Page 14: ...be disposed of separately from household waste in accordance with local regulations You will help to avoid negative consequences for the environment and human health which can be caused by improper re...

Reviews: