EN
30
5. REMOTE CONTROL
( Mirror
-
and stainless steel
-
variant only )
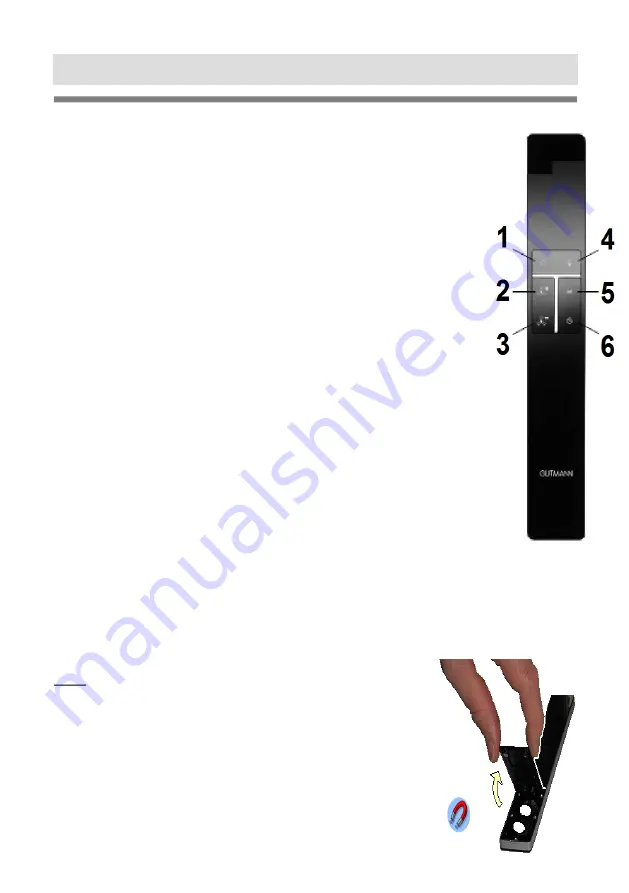
ON / OFF (1)
To switch on, press the field with the
ON / OFF
symbol. Fan runs in 1
stage. The first two LEDs light up Press the
ON / OFF
symbol again to
switch off.
The
filter saturation indicator
is also reset by pressing the key
(1)
(~10 sec.) until the red LED goes out.
Increase fan capacity
(2)
Press the Increase fan power icon. The fan power increases by one
power level each time the button is pressed.
Reduce fan power
(3)
Press the Reduce fan power icon. The fan power decreases by one
power level up to power level 1 with each press.
Illumination
(4)
Press the button with the light icon to turn on the light. Press the button
again to turn off the backlight. If the lighting symbol is held down for a
longer time, the lighting is dimmed.
Colour temperature setting
The colour temperature of the LED lighting can be infinitely adjusted
between 2700K and 6500K.
Press and hold the delay button (
6)
to adjust, the LEDs start to change
the colour temperature. When the desired setting is reached, release
the button, the colour setting is saved.
Intensive level
(5)
The maximum fan output is reached by pressing the Intensive level button. The fan
power switches back by one power level after 5 minutes.
Automatic follow
-
up time
(6)
Touching the field with the follow
-
up time symbol (2nd symbol from left) activates the
automatic follow
-
up time, the follow
-
up time symbol flashes. The cooker hood switches
back from level 3 to level 1 and continues to run there for ~15 minutes before switching
off.
Note: If the remote control functions are limited or not
avaiable please check battery capacity first.
Battery change:
The battery cover is located on the back of the remote control.
Lift it with thumb and index finger until the magnetic contact
holding the battery cover is released. Now remove the empty
batteries and replace them with the same type. Replace the
battery cover.
Attention: Please dispose of empty batteries properly.
OPERATING INSTRUCTIONS
Summary of Contents for CARTA 7500 W
Page 9: ...DE 9 11a 11b 15 PRODUKTBESCHREIBUNG...
Page 27: ...EN 27 11a 11b 15 PRODUCT DESCRIPTION...
Page 45: ...FR 45 11a 11b 15 DESCRIPTION DU PRODUIT...
Page 63: ...IT 63 11a 11b 15 DESCRIZIONE DEL PRODOTTO...
Page 81: ...ES 81 11a 11b 15 DESCRIPCI N DEL PRODUCTO...
Page 99: ...NL 99 11a 11b 15 PRODUCTOMSCHRIJVING...
Page 110: ......
Page 111: ......

