EN
43
8. MACHINING
-
WORKTOP
-
BASE CABINET
1
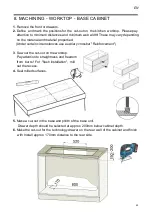
. Remove the front or drawers.
2.
Define and mark the positions for the cut
-
out on the kitchen worktop. Please pay
attention to minimum distances and minimum web width! These may vary depending
on the material and material properties!
(Under certain circumstances use auxiliary crossbar "Reinforcement").
3
. Saw out the cut
-
out on the worktop.
Pay attention to straightness and freedom
from burrs ! For "flush installation", mill
out the recess.
4.
Seal milled surfaces.
5.
Make a cut
-
out in the base and plinth of the base unit.
Drawer depth should be selected at approx. 200mm below cabinet depth.
6.
Make the cut
-
out for the technology drawer on the rear wall of the cabinet and finish
with Install approx. 170mm distance to the rear side.
Summary of Contents for NIVEL 8000 ML Series
Page 11: ...DE 11 Draufsicht Vorderansicht 5 ABMESSUNGEN ...
Page 12: ...DE 12 5 ABMESSUNGEN LÜFTEREINHEIT ...
Page 18: ...DE 18 8 BEARBEITUNG ARBEITSPLATTE ...
Page 35: ...EN 35 top view front view 5 DIMENSIONS ...
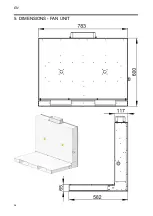
Page 36: ...EN 36 5 DIMENSIONS FAN UNIT ...
Page 59: ...FR 59 Vue du dessus Vue de face 5 DESSINS TECHNIQUES EN DIMENSIONS ...
Page 60: ...FR 60 5 DIMENSIONS UNITÉ DE VENTILATION ...
Page 83: ...IT 83 Vista dall alto Vista frontale 5 DIMENSIONI DISEGNI TECNICI ...
Page 84: ...IT 84 5 DIMENSIONI UNITÀ VENTILATORE ...
Page 107: ...ES 107 Vista en planta Vista frontal 5 DIMENSIONES ...
Page 108: ...ES 108 5 DIMENSIONES UNIDAD DE VENTILADOR ...
Page 131: ...NL 131 Bovenaanzicht Vooraanzicht 5 AFMETINGEN ...


