


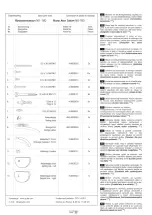


7
5
8
1
6
10
11
12
9
13
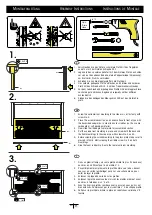
SILIKON
24 h
SILIKON
7. Richten Sie das komplette Vordach an der Hauswand aus und zeich
nen die Befestigungslöcher an der Hauswand an. Nehmen Sie das
Vordach wieder ab.
8. Mit einem ø12mm Steinbohrer Dübellöcher bohren und Dübel Nr.6
einsetzen. Achtung: Bohren Sie die Löcher so tief, wie die Schrauben
lang sind. Die Befestigungsmittel des Haustürvordaches sind der
jeweiligen Beschaffenheit der Hauswand anzupassen. Eine ausrei
chend sichere Befestigung ist zu gewährleisten.
9. Montieren Sie jetzt Ihr Vordach mit Schrauben Nr. 5 (17mm Schlüssel)
und den Scheiben Nr.7. Anschließend die Abdeckkappen Nr.8 auf
drücken.
10. Befestigen Sie die beiliegenden Wasserabläufe Nr.10 und Halterungen
Nr.11 mit den Schrauben Nr.1 an den Tragarmen. Dazu die Halterung
Nr. 11 in die Öffnung des Tragarmes von oben einsetzen. Den
Wasserablauf von unten gegenhalten und mit Schraube Nr.1 ver
schrauben .
11. Kleben Sie die Abdeckkappen Nr.12 mit dem beigefügten Silikon auf
die Tragarme. Dazu spritzen Sie Silikon in die Nut der Abdeckkappe
und drücken sie fest auf den Tragarm.
12. Die Wasserabläufe sind regelmäßig zu reinigen.
13. Bei erhöhter Schnee- und Eislast ist das Haustürvordach abzuräumen.
Achtung Unfallgefahr! Das Vordach ist nicht begehbar.
7. Line up the assembled canopy roof section against the outside wall
and mark the mounting holes needed to fasten it. Remove the roof
again.
8. With a 12mm masonry bit, drill plug holes and insert the hole plugs
No. 6. Please note it is important to dril holes as deep as the screws
are long. The way the canopy roof is fastened should depend on the
condition of your wall. You must ensure that the attachment is
adequate.
9. Now fasten your canopy roof with bolts No. 5 together with washers
No. 7 (using a 17mm spanner) and then press on the covering caps
No. 8.
10. Fasten the supplied water drain No. 10 and fastener No
11 with screw No. 1 to the side arm. Make sure that you insert the
fastener No. 11 from above into the opening in the side arm. Hold the
water drain from underneath up against the side arm and fasten it with
screw No. 1.
11. Glue the end cap No. 12 onto the side arm with the silicone provided,
by squeezing silicone into the groove of the end cap and pressing it
firmly onto the side arm.
12. The water outlets must be cleaned regularly.
13. In extreme snow or ice conditions, the canopy roof should be swept
clear. Beware of Accidents: Under no cumstances walk on the canopy.
7. Ajustez l’auvent complet contre le mur de la maison à l’emplacement
souhaité et marquez l’emplacement des trous de fixation sur le mur.
Retirez l’auvent.
8. Percez les trous avec un foret à béton de 12 mm de diamètre et
mettez les chevilles n° 6 en place. Attention : la profondeur des trous
doit être égale à la longueur des vis. Il faut choisir la fixation de
l’auvent en fonction du type de mur et assurer une fixation
suffisamment résistante.
9. Montez maintenant l’auvent avec les vis n° 5 (clé de 17 mm) et les
rondelles n° 7. Enfoncez ensuite les caches n° 8.
10. Fixez les gouttières n° 10 jointes et les supports n° 11 aux bras avec
les vis n° 1. Enfoncez le support n° 11 par le haut dans l’ouverture
du bras. Soutenez la gouttière par dessous et fixez-la avec la vis n° 1.
11. Collez les caches n° 12 sur les bras avec le mastic silicone fourni.
Injectez le mastic silicone dans la rainure du cache et enfoncez
celui-ci fermement sur le bras.
12. Il faut nettoyer régulièrement les gouttières.
13. Éviter l’accumulation de quantités importantes de neige ou de glace
sur l’auvent.
Attention ! Risque d’accident ! Ne jamais monter sur l’auvent :
il n’est pas prévu pour cela.
D
GB
F
M
ONTAGEANLEITUNG
A
SSEMBLY
I
NSTRUCTIONS
I
NSTRUCTIONS DE
M
ONTAGE
10
Seite


