


M
ONTAGEANLEITUNG
A
SSEMBLY
I
NSTRUCTIONS
I
NSTRUCTIONS DE
M
ONTAGE
9
Seite
1.
2.
3.
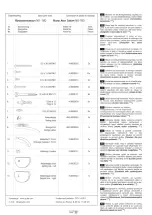
3,5x13
2
4
3,5x25
3,5x13
2
3
3,5x9,5
a.
a.
a.
a.
a.
a.
b.
b.
b.
a.
3
3,5x9,5
ø 12
Stein
Pierre
Stone
17
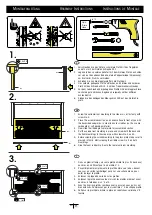
1. Verschrauben SIe das hintere, schmalere Profil mit den Tragarmen
zuerst nur mit der hinteren Schraube Nr.3
2. Legen SIe das so vormontierte Teil mit dem hinteren Profil nach unten
vor sich auf den ebenen Boden auf eine Pappunterlage (Verpackung),
um Kratzer im Profil zu vermeiden.
3. Schieben Sie nun die Stegglasplatte in die Profile ein .
4. Das vordere, gebogene Profil aufstecken, und hinteres und vorderes
Profil mit den Schrauben Nr.3, 4 mit den Tragarmen verschrauben.
5. Vor dem Verschrauben der gebogenen Profile mit dem Stegglas diese
nochmals gut andrücken. Beginnen Sie jeweils mit der mittleren
Schraube Nr.2.
6. Kleben Sie den beiliegenden Moosgummi Nr.9 auf das hintere Alu-
profil.
1. Screw the narrower rear moulding to the side arms, at first only with
screw No. 3.
2. Place this assembled section on an even surface in front of you with
the backside downwards. In order to avoid scratches put it on some
cardboard or soft packing material.
3. Now slide the ribbed glass plate into this assembled section.
4. Put the curved front moulding in place and screw both the back and
the front mouldings to the side arms with screws No. 3 and 4.
5. Before screwing the curved moulding to the glass plate make sure it is
pressed in firmly. Start screwing the middle screw No. 2 on both
mouldings.
6. Glue the foam rubber No. 9 onto the rear aluminium moulding.
1. Dans un premier temps, vissez le profilé arrière (le plus fin des deux)
aux bras en n’utilisant que la vis arrière n° 3.
2. Posez l’élément ainsi prémonté, le profilé arrière vers le bas, devant
vous sur un carton (emballage) posé sur une surface plane, pour
éviter de rayer le profilé.
3. Enfoncez la plaque de verre dans les profilés.
4. Enfoncez le profilé avant courbe et vissez les profilés arrière et avant
aux bras à l’aide des vis n° 3 et 4.
5. Avant de fixer les profilés courbes au verre, assurez-vous qu’ils sont
bien enfoncés. Commencez par la vis centrale n° 2 de chaque profilé.
6. Collez sur le profilé alu arrière la pièce en caoutchouc cellulaire n° 9
fournie.
D
GB
F


