8
9
Montage BS 160 / 200 | Montage BS 160 / 200 | Instructions BS 160 / 200
6.
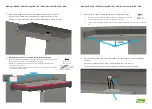
Montage Pfosten mit Entwässerung / Mounting post with drainage /
Poteau de montage avec drainage
B
A
A
Untere Befestigungspunkt für Befestigungswinkel mittels eines Pendels ausjustie-
ren. Anschließend Befestigungswinkel auf dem Boden verschrauben.
Adjust the lower fixing point for the mounting bracket using a pendulum. Then
screw the fixing bracket to the floor.
Régler le point de fixation inférieur de l‘étrier de fixation à l‘aide d‘un pendule. Ensui-
te, vissez l‘étrier de fixation au sol.
BS 160 1x
BS 200 1x
BS 160 je 1x
BS 200 je 1x
Pendel
Pendulum
Pendule
Setzten Sie den Pfosten mit dem Fallrohr, dem Pfosten Unterteil und dem Rohrbo-
gen zusammen.
Assemble the post with the downpipe, the lower part of the post and the pipe bend.
Assemblez le poteau avec le tuyau de descente, la partie inférieure du poteau et le
coude du tuyau.
B
Setzten Sie den eben zusammen gesteckten Pfosten auf den oberen Befestigungs-
winkel und verschrauben Sie diesen.
Place the post, which has just been assembled, on the upper mounting bracket and
screw it together.
Placez le poteau qui vient d‘être assemblé sur le support de montage supérieur et
vissez-le ensemble.
BS 160 8x
BS 200 8x
/ C
Montage BS 160 / 200 | Montage BS 160 / 200 | Instructions BS 160 / 200
C
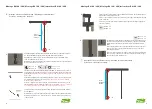
Setzten Sie den Rohrbogen auf den Winkel auf und schieben Sie das
Pfosten Unterteil nach unten. Verschrauben Sie den Pfosten mit dem
Winkel und das Pfosten Oberteil mit dem Pfosten Unterteil (kleines
Bild).
Place the pipe bend on the angle and slide the lower part of the post
down. Screw the post to the bracket and the post top to the post
bottom (small picture).
Placez le coude du tuyau sur l‘angle et faites glisser la partie inférieure
du poteau vers le bas. Vissez le poteau au support et le haut du pote-
au au bas du poteau (petite photo).
BS 160 8x
BS 200 8x
7.
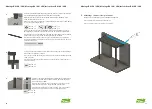
Montage Pfosten ohne Entwässerung / Mounting post without drainage /
Poteau de montage sans drainage
B
A
Pendel
Pendulum
Pendule
/ C
Stecken Sie das Fallrohr und den Rohrbogen zusammen. Setzten Sie dies auf den
unteren Befestigungspunkt. Die Differenz, welche über das Vordach steht muss ab-
gesägt werden.
Tipp: Rohr und Rohrbogen müssen stramm zwischen Vordach und
Halter sitzen.
Push the downpipe and the pipe bend together. Place this on the lower fixing point.
Cut off the difference above the canopy.
Tip: Pipe and pipe bend must sit tightly
between canopy and bracket.
Poussez le tuyau de descente et le tuyau plier ensemble. Placez-le sur le point de
fixation inférieur. Coupez la différence au-dessus de la verrière.
Conseil : Le tuyau et
le coude du tuyau doivent être bien serrés entre la verrière et le support.
8x80
M10


