28
Advanced Features
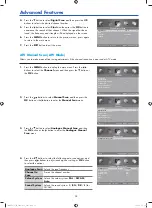
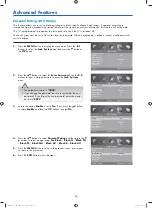
3.
Press the button to select
Analogue Manual Scan
and then
the
OK
button or the button to enter the
Analogue Manual
Scan
menu.
Manual Scan
Analogue Manual Scan
Move
MENU: Return EXIT: Exit
OK: Select
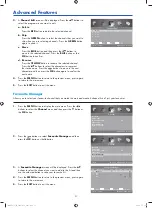
4.
Press the button to select
Digital Scan
and then press the
buttons to selects the desired channel number.
5.
Press the button to select
Start
and then press the
OK
button to
commence the search of that channel. When the signal has been
tuned, the frequency and strength will be displayed on the screen.
6.
Press the
MENU
button to return to the previous menu, press again
to return to the main menu.
7.
Press the
EXIT
button to exit the menu.
ATV Manual Scan (ATV Mode)
Allows you to make manual fine tuning adjustments if the channel reception is poor under ATV mode.
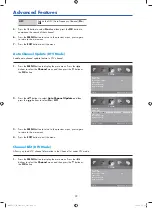
1.
Press the
MENU
button to display the main menu. Press the
buttons to select the
Channel
menu and then press the button or
the
OK
button.
Digital Manual Scan
Digital Scan
Start
Frequency
Strength
CH 8
191.50 MHz
0
MENU: Return
0~9: Input
EXIT: Exit
Move
Adjust
Channel
Auto Scan
Manual Scan
Auto Channel Update
Channel Edit
Favourite Manager
Signal Information
On
MENU: Return EXIT: Exit
Move
Channel
Auto Scan
Manual Scan
Auto Channel Update
Channel Edit
Favourite Manager
Signal Information
On
MENU: Return EXIT: Exit
Move
OK: Select
2.
Press the
buttons to select
Manual Scan
and then press the
OK
button or the button to enter the
Manual Scan
menu.
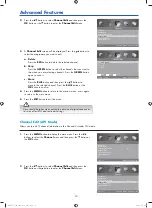
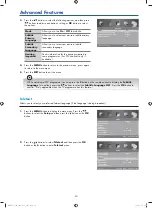
4.
Press the
buttons to select the following auto scan options, and
then press buttons to adjust each option’s setting or
OK
button
to select the options.
Analogue Scan
Selects the tune frequency.
Channel to
Save
Presets the channel number.
Colour System
Selects the colour system:
PAL
/
SECAM
/
Auto
.
Sound System
Selects the sound system:
I
/
BG
/
DK
/
L
(for
SECAM).
Analogue Manual Scan
Analogue Scan
Channel to Save
Colour System
Sound System
471.30 MHz
CH001
PAL
BG
MENU: Return
0~9: Input
EXIT: Exit
AFC
Off
Start
Move
Fine Tune
G24HTC16_IB_160630-V2_Annie.indd 28
30/6/16 下午6:06

