background image

7

Assembly Instructions

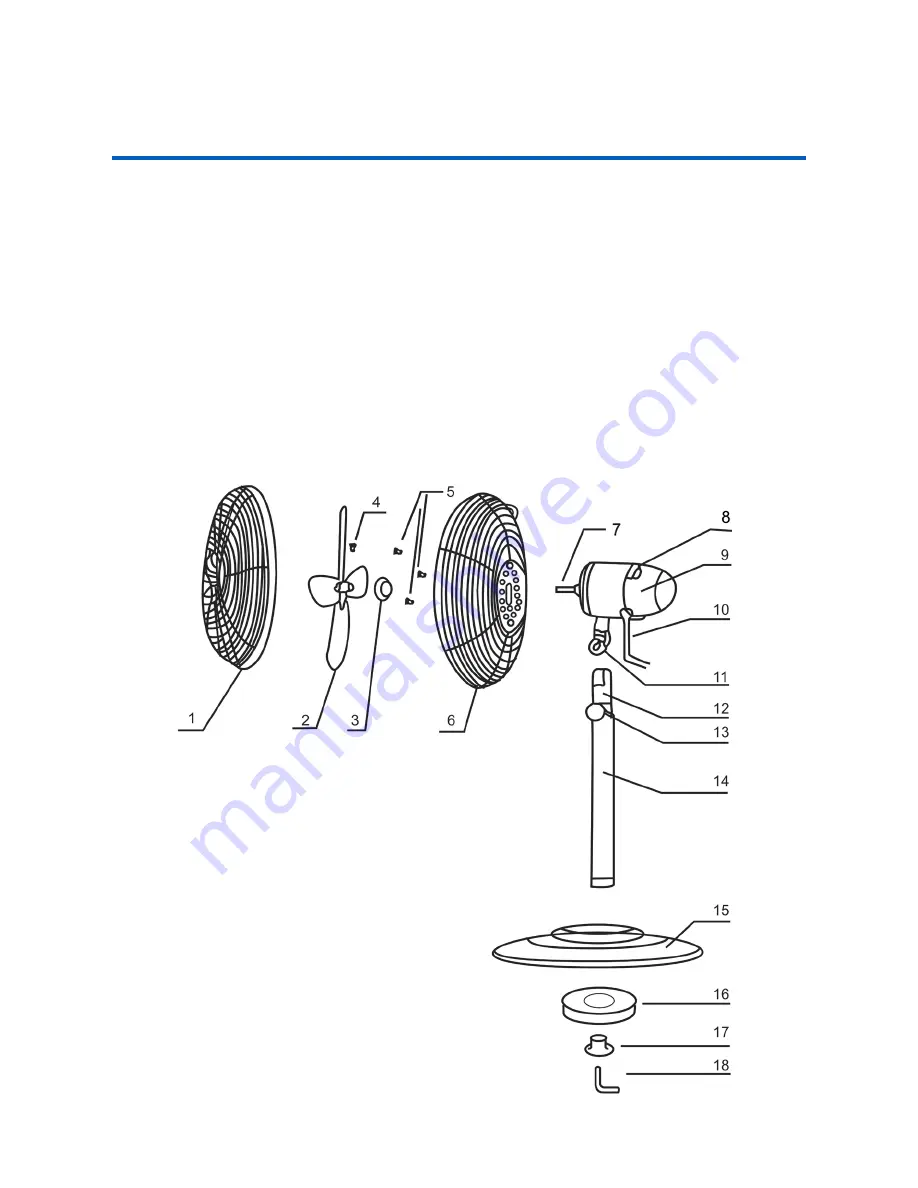
Assemble your Pedestal Fan

1.  Front grille
2.  Fan blade
3.  Locking nut
4.  Fan blade screw
5.  Fixation screws
6.  Rear grille
7.  Motor shaft
8.  Speed control
9.  Fan motor

10.  Mains lead
11.  Knob
12.  Inner pole
13.  Height adjustment screw
14.  Outer pole
15.  Round base
16.  Weight
17.  Fastener
18.  Locking screw

•  Connect the fan blade on to the fan 

motor, with the rear grille in between. 

Fasten the fan blade screw.

•  Fix the front grille with the rear grille, 

and tighten the fixation screws.

•  Connect the inner pole on to the fan 

motor at the knob.

•  Install the outer pole on to the base by 

tightening the locking screw.


Sleek & modern high-velocity fan provides more powerful wind than 

ordinary plastic fans. Draws air off the floor and circulate through the 

entire room keeping room cool and breezy. Put near the windows and 

it helps exhaust hot indoor stuffy air and pulls in fresh outdoor air. 


● Energy-saving, high velocity motor for maximum air circulation 

● Tilt-adjustment for flexible use 

● Triple speed selection 

● Precision fan blades for powerful wind but low-noise 

● Chrome-stand, solid construction with thermal-protection to prevent 

motor overheat. 


1.  Front Guard 

2.  Fan Blade 

3.  Locking Nut 

4.  Fan Blade Screw 

5.  Fixation Screw 

6.  Rear Guard 

7.  Motor Shaft 

8.  Speed Control 

9.  Fan Motor 

10. Mains Lead 

11. Knob 

12. Inner Tube 

13. Height Adjustment Screw 

14. Outer Tube 

15. Base 

16. Weight 

17. Fastener 

18. Locking Screw 


Summary of Contents for G45PFS15

Page 1: ...Instruction Manual G45PFS15 45CM METAL PEDESTAL FAN ...

Page 2: ...1 Contents Guide to the Appliance 2 Caring for the Environment 3 Safety Information and Warnings 4 Assembly Instructions 7 Operation Instructions 8 Care and Maintenance 9 Technical Specifications 10 ...

Page 3: ...ce 1 Fan blade 2 Safety grille 3 Adjustable height 4 Round base 1 2 3 4 NOTE Due to production improvements the appliance may differ slightly from the diagram shown Diagrams in this instruction manual are for reference only ...

Page 4: ... Responsible disposal of the appliance At the end of its working life do not throw this appliance out with your household rubbish An environmentally friendly method of disposal will ensure that valuable raw materials can be recovered and used again Electrical and electronic appliances contain materials and substances which if handled or disposed of incorrectly could be potentially hazardous on the...

Page 5: ...he power cord regularly for visible damage If the cord is damaged it must be replaced by the manufacturer its authorised service centres or appropriately qualified personnel in order to avoid any hazards WARNING Do not pick up or operate the appliance if the power supply cord plug or housing is damaged or after it malfunctions or has been dropped or damaged in any manner In case of damage contact ...

Page 6: ...r failure to follow these instructions Usage restriction This fan is not intended for use by persons including children with reduced physical sensory or mental capabilities or lack of experience and knowledge unless they have been given supervision or instruction concerning use of the appliance by a person responsible for their safety Children This fan is not a toy Supervise young children to ensu...

Page 7: ...th moving parts Never insert fingers pencils or any other objects through the grilles when fan is running Keep hair and loose clothing well away from the fan when it is in use Free airflow Make sure nothing is blocking the airflow outlet and air intake grilles ...

Page 8: ...n motor at the knob Install the outer pole on to the base by tightening the locking screw k modern high velocity fan provides more powerful wind than ary plastic fans Draws air off the floor and circulate through the e room keeping room cool and breezy Put near the windows and ps exhaust hot indoor stuffy air and pulls in fresh outdoor air ergy saving high velocity motor for maximum air circulatio...

Page 9: ...ep all objects at least 1 metre from the front sides and rear of the appliance Do not cover the appliance Do not leave the appliance operating unattended 1 Place the fan on a dry level and study surface 2 Plug the power cord into the wall power socket 3 Select your desired speed setting 1 for low speed 2 for medium speed and 3 for high speed 4 To turn off the Pedestal Fan turn the speed control to...

Page 10: ...ogrammer timer separate remote control system or any other device that switches the appliance on automatically When you have finished using the fan at the end of the season wipe off any dust to maintain it in good working order for the next season Disassemble the front grille and remove the fan blade Clean and store the fan in its original box in a safe dry location protected from dust The applian...

Page 11: ...10 Technical Specifications Specifications Model G45PFS15 Supply 230VAC 50Hz Wattage 50W Made in China Subject to technical change without notice ...

Page 12: ...036 1300 725 885 customercare gvaproducts com au gvaproducts com au While every effort has been made in the preparation of this instruction manual the publishers cannot be held responsible for the accuracy of the information contained herein or any consequences arising from it ...

Reviews: