background image

5

Before using the bar fridge

• 

Remove all packaging materials from around and inside the appliance and 

dispose of them responsibly. Plastic wrapping can be a suffocation hazard for 

babies and young children, so ensure all packaging materials are out of their 

reach.

• 

Check to ensure you have all of the following parts: 


1 x Drip tray 

1 x Chiller compartment 


1 x Ice tray 

2 x Glass shelves 


1 x Glass crisper cover  1 x Crisper drawer 


1 x Instruction manual  1 x Warranty card 


2 x Warranty stickers

• 

Before connecting the unit to the power source, let it stand upright for 

approximately two hours. This will reduce the possibility of a malfunction in the 

cooling system from handling during transportation.

• 

Clean the interior surface with lukewarm water using a soft cloth.

Installing the bar fridge

• 

This appliance is designed to be freestanding only and should not be recessed 

or built-in.

• 

Place the bar fridge on a floor that is strong enough to support it when it is fully 

loaded. To level the fridge, adjust the levelling feet at the bottom of the fridge.

• 

Leave a 10–15cm clearance between the back and sides of the fridge and 

any wall or other appliance, which allows proper air circulation to cool the 

compressor and condenser.

• 

Locate the unit away from direct sunlight and sources of heat (stove, heater, 

radiator, etc.). Direct sunlight may affect the acrylic coating and heat sources 

may increase power consumption. Extreme cold ambient temperatures may 

also affect fridge performance.

• 

Avoid locating the fridge in moist areas. 

• 

Plug the fridge into an exclusive, properly installed, grounded wall outlet. Do 

not under any circumstances cut or remove the third (ground) prong from 

the power cord. For advice concerning power connection and/or grounding, 

contact a certified electrician or the after sales support line.

• 

After plugging the appliance into a wall outlet, allow the unit to cool down for 

2–3 hours before placing food in the refrigerator compartment.

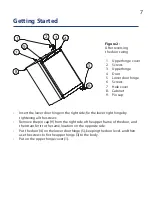
Getting Started

Summary of Contents for GVABF117

Page 1: ...Instruction Manual 117L Bar Fridge GVABF117...

Page 2: ...3 General Safety Instructions 1 Parts and features 4 Getting started 5 Operating Instructions 8 FAQ s 9 Other useful information 10 Contents...

Page 3: ...statement may result in severe personal injury or death Warning means that failure to heed this safety statement may result in extensive product damage serious personal injury or death Caution means t...

Page 4: ...r pull chain Do not kink pinch or damage the power cord Position the cord out of the way so no one steps on or places anything on the cord or against it Secure the cord behind the unit so it is not le...

Page 5: ...for your bar fridge the front of the unit must be completely unobstructed Keep any ventilation openings in the appliance enclosure or in the built in structure clear of obstructions Choose a well ven...

Page 6: ...afety Children should be supervised to ensure that they do not operate play with or crawl into the appliance Responsible disposal At the end of its working life observe any local regulations regarding...

Page 7: ...n Place the bar fridge on a floor that is strong enough to support it when it is fully loaded To level the fridge adjust the levelling feet at the bottom of the fridge Leave a 10 15cm clearance betwee...

Page 8: ...s below and on the following page to reverse the door swing the numbers in brackets refer to the parts in the illustrations NOTE Keep all the parts you remove for re installation of the door on the ot...

Page 9: ...oor and then transfer it to the same location on the opposite side Put the door 4 on the lower door hinge 5 keeping the door level and then use the screws to fix the upper hinge 3 to the body Put on t...

Page 10: ...ust the temperature control to the setting that best suits your needs The setting of 3 should be appropriate To turn the appliance off turn the temperature control to Off this stops the cooling cycle...

Page 11: ...r compartment This compartment is designed for the production of ice cubes and short term storage 3 4 days at most of some commercially frozen foods The temperature in this compartment does not get co...

Page 12: ...y The fridge does not have the correct clearances There are vibrations Check to assure that the fridge is level The fridge seems to make too much noise The rattling noise may come from the flow of the...

Page 13: ...t use boiling water because it may damage the plastic parts WARNING Never use a sharp or metal instrument to remove frost as it may damage the cooling system and will void the warranty We recommend us...

Page 14: ...12...

Reviews: