background image


GDM-541/533 User Manual   

8


GDM-541/533 Overview 

Overview    

The GDM-541/533 is a handheld true RMS digital multimeter with 

high reliability and security (GDM-533: 6000 counts; GDM-541: 

22000 counts). With large screen, high resolution analog pointer 

display, full scale overload protection, and unique appearance 

design, it becomes a new practical electrical measuring meter. The 

meter can measure AC/DC voltage/current, resistance, diode, 

transistor hFE (GDM-541), continuity, capacitance, frequency, duty 

ratio, temperature (GDM-533), etc. Featuring data transmission, 

data hold, relative value measurement, peak measurement, internal 

temperature alarm, low battery indication, backlight, auto power 

off, and NCV functions, the meter is an ideal measuring tool for 

many application fields. 

Accessories  

Before using the GDM unit, check the package contents to make 

sure all the accessories are included.  


Standard Accessories 

Description 


User manual*1 pc 


Test leads*1 pair 


Adapter socket*1 pc 


K-type thermocouple (GDM-533)*1 pc 


USB cable*1 pc 


1.5V AAA batteries*4 

Summary of Contents for GDM-533

Page 1: ...Handheld Digital Multimeter GDM 541 533 USER MANUAL ISO 9001 CERTIFIED MANUFACTURER...

Page 2: ...r language without prior written consent of Good Will company The information in this manual was correct at the time of printing However Good Will continues to improve products and reserves the rights...

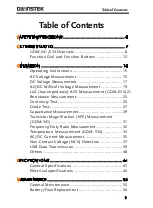
Page 3: ...dance ACV Measurement GDM 533 21 Resistance Measurement 23 Continuity Test 25 Diode Test 27 Capacitance Measurement 29 Transistor Magnification hFE Measurement GDM 541 31 Frequency Duty Ratio Measurem...

Page 4: ...ion Electrical Symbols These safety symbols may appear in this manual or on the instrument Warning or Caution Caution possibility of electric shock Both direct and alternating current Equipment protec...

Page 5: ...ter casing broken LCD etc is found please do not use the meter Do not use the meter if the rear cover or the battery cover is not completely covered up or it may pose a shock hazard Damaged test leads...

Page 6: ...current make sure the fuses are intact Do not use or store the meter in high temperature high humidity flammable explosive or strong magnetic field environments Do not change the internal circuit of t...

Page 7: ...DM 541 533 in a nutshell including its main features and front rear panel introduction GDM 541 GDM 533 GDM 541 533 Overview 8 Overview 8 Accessories 8 External Structure 9 LCD Display 10 Function Dial...

Page 8: ...tance diode transistor hFE GDM 541 continuity capacitance frequency duty ratio temperature GDM 533 etc Featuring data transmission data hold relative value measurement peak measurement internal temper...

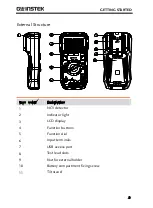
Page 9: ...Item Index Description 1 NCV detector 2 Indicator light 3 LCD display 4 Function buttons 5 Function dial 6 Input terminals 7 USB access port 8 Test lead slots 9 Nut for external holder 10 Battery com...

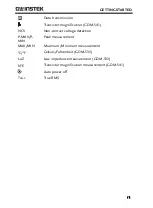
Page 10: ...C DC AC DC measurement Low battery indication Auto range Diode test Continuity test Relative value measurement k M Resistance units ohm kilohm megaohm mV V Voltage units millivolt volt A mA A Current...

Page 11: ...ion GDM 541 NCV Non contact voltage detection P MAX P MIN Peak measurement MAX MIN Maximum Minimum measurement C F Celsius Fahrenheit GDM 533 LoZ Low impedance measurement GDM 533 hFE Transistor magni...

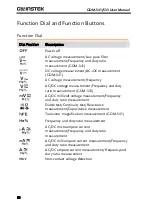
Page 12: ...quency and duty ratio measurement GDM 533 AC DC millivolt voltage measurement Frequency and duty ratio measurement Diode test Continuity test Resistance measurement Capacitance measurement Transistor...

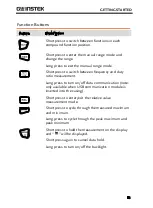
Page 13: ...ty ratio measurement Long press to turn on off data communication note only available when USB communication module is inserted into the casing Short press to enter exit the relative value measurement...

Page 14: ...ge Measurement 19 LoZ low impedance ACV Measurement GDM 533 21 Resistance Measurement 23 Continuity Test 25 Diode Test 27 Capacitance Measurement 29 Transistor Magnification hFE Measurement GDM 541 31...

Page 15: ...to the warning sign beside the input terminals which indicates that the measured voltage or current must not exceed the values marked on the meter AC Voltage Measurement Wire Connection Diagram Steps...

Page 16: ...el 5 Read the voltage value on the display if the voltage is 1000V the red indicator light will be on and the buzzer will sound an alarm 6 Short press the button to display the frequency duty ratio of...

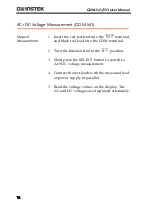
Page 17: ...e COM terminal 2 Turn the function dial to the or position 3 Short press the SELECT button to switch to DC voltage SELECT measurement if required 4 Connect the test leads with the measured load or pow...

Page 18: ...nal and black test lead into the COM terminal 2 Turn the function dial to the position 3 Short press the SELECT button to switch to AC DC voltage measurement 4 Connect the test leads with the measured...

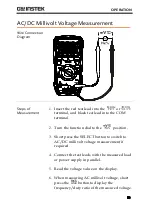
Page 19: ...rminal 2 Turn the function dial to the position 3 Short press the SELECT button to switch to AC DC millivolt voltage measurement if required 4 Connect the test leads with the measured load or power su...

Page 20: ...of the AC mV range is about 10M This load effect may cause measurement errors in high impedance circuits In most cases if the impedance of the circuit is below 10k the error can be ignored 0 1 The inp...

Page 21: ...test lead into the or terminal and black test lead into the COM terminal 2 Turn the function dial to the position 3 Connect the test leads with the measured load or power supply in parallel 4 Read th...

Page 22: ...ock when measuring high voltages After completing the measurement disconnect the test leads from the circuit under test Before each use verify meter operation by measuring a known voltage After using...

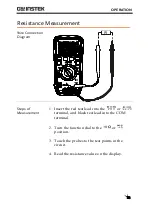
Page 23: ...gram Steps of Measurement 1 Insert the red test lead into the or terminal and black test lead into the COM terminal 2 Turn the function dial to the or position 3 Touch the probes to the test points in...

Page 24: ...the power supply of the circuit and fully discharge all capacitors When measuring low resistance the test leads will produce 0 1 0 3 measurement error To obtain accurate measurement short circuit the...

Page 25: ...lack test lead into the COM terminal 2 Turn the function dial to the or position 3 Short press the SELECT button to switch to continuity test 4 Touch the probes to the test points in the circuit 5 Mea...

Page 26: ...26 Caution Use caution when working with voltages above AC 30Vrms 42Vpeak or DC 60V Such voltages pose a shock hazard Before testing continuity switch off the power supply of the circuit and fully di...

Page 27: ...the or terminal and black test lead into the COM terminal 2 Turn the function dial to the or position 3 Short press the SELECT button to switch to diode test if required 4 Connect the red probe with...

Page 28: ...on for reference only 7 If the diode is open or its polarity is reversed the LCD will display OL For silicon PN junction the normal value is generally about 500 800 mV Caution Use caution when working...

Page 29: ...red test lead into the or terminal and black test lead into the COM terminal 2 Turn the function dial to the or position 3 Short press the SELECT button to switch to capacitance measurement 4 Touch th...

Page 30: ...capacitors to avoid damage to the meter and user If the measured capacitor is short circuited or the capacitance exceeds the maximum range the LCD will display OL When measuring high capacitance it i...

Page 31: ...agram Steps of Measurement 1 Turn the function dial to the hFE position 2 Insert the adapter socket into the input terminals 3 Insert the three pins of the transistor under test into the corresponding...

Page 32: ...terminal and black test lead into the COM terminal 2 Turn the function dial to the position 3 Short press the button to switch to frequency duty ratio measurement if required 4 Read the frequency dut...

Page 33: ...sert the K type thermocouple into the adapter socket and then insert the adapter socket into the input terminals 3 Bring the temperature sensing end of the thermocouple close to the object surface und...

Page 34: ...GDM 541 533 User Manual 34 Caution Only K type thermocouple is applicable The LCD displays OL when the meter is turned on The measured temperature should be less than 230 C 446 F F C 1 8 32...

Page 35: ...d into the COM terminal 2 Turn the function dial to the or position 3 Short press the SELECT button to switch to AC DC current measurement if required 4 Connect the test leads with the measured load o...

Page 36: ...rrent is unknown select the maximum range and then accordingly reduce There are fuses inside mA A and A input terminals Do not connect the test leads with any circuit in parallel When the measured cur...

Page 37: ...the meter close to the wire AC under test 3 If the voltage of the wire is 50Vrms frequency 50Hz 60Hz the red indicator light will be on and the buzzer will beep If no voltage is detected the LCD will...

Page 38: ...ries with the distance between the NCV detector and the wire under test The detected voltage level is for reference only not for specific measurement The frequency of the detected voltage should be 50...

Page 39: ...o the USB access port of the meter and the LCD will display Figure B 3 If USB data transmission is not needed during measurement long press the button or pull out the USB module to disable data transm...

Page 40: ...r will beep for warning Users can wake the meter up by pressing the SELECT button To disable the auto off function press and hold the SELECT button in the off state and then turn on the meter To recov...

Page 41: ...533 6 Refresh rate 2 3 times s 7 Range Auto Manual 8 Polarity display Auto 9 Over range Indication OL 10 Low battery indication is displayed 11 Operating temperature 0 C 40 C 32 F 104 F 12 Storage te...

Page 42: ...ould be within 18 C 28 C and the fluctuation range should be within 1 C When the temperature is 18 C or 28 C add temperature coefficient error 0 1 x specified accuracy C Technical Specifications Index...

Page 43: ...1mV 0 8 3 6 000V 0 001V 0 5 3 60 00V 0 01V 0 5 3 600 0V 0 1V 1000V 1V 1 0 3 Input impedance About 1G for mV range about 10M for other ranges Accuracy guarantee 1 100 of range short circuit allows lea...

Page 44: ...2 50 40Hz 100Hz LPF 1 8 50 220 00V 10mV 40Hz 1kHz 0 8 10 1kHz 10kHz 2 0 50 40Hz 100Hz LPF 2 0 50 1000 0V 0 1V 40Hz 1kHz 1 2 10 1kHz 10kHz 3 0 50 40Hz 100Hz LPF GDM 533 Range Resolution Frequency Respo...

Page 45: ...Add 5 when crest factor is 2 2 5 c Add 7 when crest factor is 2 5 3 The AC crest factor can be 2 0 at 10000 counts and can only be 1 at 22000 counts The additional error should be added according to...

Page 46: ...00V 0 1mV 40Hz 500Hz 1 8 70 22 000V 1mV 40Hz 500Hz 1 8 70 220 00V 10mV 40Hz 500Hz 1 8 70 1000 0V 0 1V 40Hz 500Hz 4 0 70 AC voltage display True RMS Input impedance About 10M Accuracy guarantee 10 100...

Page 47: ...00 0 8 10 22 000M 1k 1 5 10 220 00M 10k 3 0 50 GDM 533 Range Resolution Accuracy 600 0 0 1 1 2 2 6 000k 1 1 0 2 60 00k 10 600 0k 100 6 000M 1k 1 2 2 60 00M 10k 2 0 5 Measurement result displayed value...

Page 48: ...uzzer will beep once For short circuit the buzzer will beep for a long time Overload protection 1000V When the forward voltage drop is within 0 12V 2V the buzzer will beep once When the forward voltag...

Page 49: ...60 00 F 10nF 600 0 F 100nF 6 000mF 1 F 10 5 60 00mF 10 F Overload protection 1000V Measurement result displayed value capacitance of open circuit test leads For capacitance 1 F GDM 533 and 22nF GDM 54...

Page 50: ...F 2 F 1 0 6 F 32 572 F 1 0 4 F 572 1832 F 1 0 6 F The measured temperature should be less than 230 C 446 F DC Current GDM 541 Range Resolution Accuracy 220 00 A 0 01 A 0 5 10 2200 0 A 0 1 A 22 000mA...

Page 51: ...equency Response Accuracy 220 A 0 01 A 40Hz 1kHz 0 8 10 1kHz 10kHz 3 50 2200 A 0 1 A 40Hz 1kHz 0 8 10 1kHz 10kHz 3 50 22mA 1 A 40Hz 1kHz 1 2 10 1kHz 10kHz 3 50 220mA 10 A 40Hz 1kHz 1 2 10 1kHz 10kHz 3...

Page 52: ...est factor of a non sinusoidal wave as follows GDM 533 a Add 4 when crest factor is 1 2 b Add 5 when crest factor is 2 2 5 c Add 7 when crest factor is 2 5 3 The AC crest factor can be 2 0 at 10000 co...

Page 53: ...4 0 1 99 9 0 1 2 5 Frequency input amplitude 100kHz 200mVrms input amplitude 20Vrms 100kHz 1MHz 600mVrms input amplitude 20Vrms 1MHz GDM 533 1Vrms input amplitude 20Vrms 1MHz 40MHz GDM 541 1Vrms input...

Page 54: ...tinuity 70 On green Continuity 50 Diode Off 2V On red Breakdown 0 12V On green Conduction 0 12V 2V AC DC voltage Off 1000V On red 1000V Current Off 10A On red 10A Internal temperature during AC DC cur...

Page 55: ...ly and remove the test leads General Maintenance Clean the meter casing with a damp cloth and mild detergent Do not use abrasives or solvents If there is any malfunction stop using the meter and send...

Page 56: ...heck the built in 600mA and 11A fuses Operation Insert the red test lead into the or terminal Insert the red probe into the mA A input terminal to measure the resistance If the LCD displays OL the 600...

Reviews: