background image

2

GT4.0 TREADMILL

BEFORE YOU BEGIN

Thank you for choosing the Gymstick GT4.0 Treadmill. We take great pride in producing this quality 

product and hope it will provide many hours of effective exercise to make you feel better, look 


better and enjoy life to its fullest.

TABLE OF CONTENT

1. 

SAFETY INSTRUCTIONS  ................................................................................................ 3

2. 

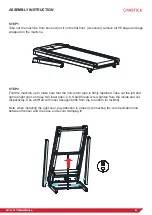
ASSEMBLY INSTRUCTION...............................................................................................  4

3. 

MOVING TREADMILL........................................................................................................  8

4. 

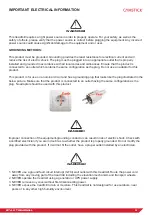
IMPORTANT ELECTRICAL INFORMATION  ..................................................................... 9

5. 

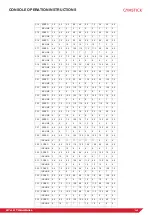
CONSOLE OPERATION INSTRUCTIONS  ....................................................................  10

6. 

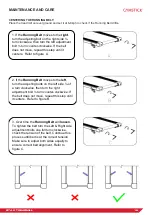
MAINTENANCE AND CARE  ............................................................................................. 15

7. 

LUBRICATING THE TREADMILL ...................................................................................... 17

8. 

TROUBLESHOOTING ....................................................................................................... 18

9. 

EXPLODED DRAWING ..................................................................................................... 20 

10.   PARTS LIST  ...................................................................................................................... 21 

11. 

IMPLIED WARRANTY  ......................................................................................................  24

READ AND FOLLOW THE SAFETY INSTRUCTIONS. FAILURE TO FOLLOW THESE INSTRUCTIONS 

CAN RESULT IN SERIOUS INJURY.

!

NOTIFICATION!

Summary of Contents for GT4.0

Page 1: ...ER MANUAL IMPORTANT Read all instructions carefully before using this product Retain this owner s manual for future reference The specifications of this product may vary from this photo subject to cha...

Page 2: ...oy life to its fullest TABLE OF CONTENT 1 SAFETY INSTRUCTIONS 3 2 ASSEMBLY INSTRUCTION 4 3 MOVING TREADMILL 8 4 IMPORTANT ELECTRICAL INFORMATION 9 5 CONSOLE OPERATION INSTRUCTIONS 10 6 MAINTENANCE AND...

Page 3: ...d be on the equipment while in use Please make sure all parts are not damaged and fixed well before use Never operate the unit if it is damaged if it is not working properly This equipment should be p...

Page 4: ...ells you what you will be doing Read and understand all instructions thoroughly before assembling the treadmill WARNING USE CAUTION WHEN ASSEMBLING THIS TREADMILL FAILURE MAY RESULT IN INJURY 0 0 0 0...

Page 5: ...fety key Upright post Motor cover Side rail Running belt Maximum load 120kg Dimension folded 1104 x 815 x 1450mm Dimension unfolded 1711 x 815 x 1389mm Running surface 1420 x 500mm Speed 1 0 18 0km h...

Page 6: ...sure that the non return pipe is firmly fastened Take out the left and right upright post and use two inner Allen C K S half thread screw tighten from the inside and out respectively Use a M8 20 with...

Page 7: ...expand the running table take out the console and assembly it as shown below After aligning the hole position from inside to outside use the M8 20 Allen C K S full thread screw to lock in STEP 4 Lift...

Page 8: ...8 GT4 0 TREADMILL ASSEMBLY INSTRUCTION STEP 5 Finally check the machine screw is locked After all the screws are fastened the machine installati on is completed MOVING THE TREADMILL...

Page 9: ...ding plug that looks like the plug illustrated in the below picture Make sure that the product is connected to an outlet having the same configuration as the plug No adapter should be used with this p...

Page 10: ...ascension data KEYBOARD OPERATION INSTRUCTION 1 PROG Program selection key stop state loop selection program P1 P36 U01 U02 U03 and FAT 2 MODE When selected to the initial state of is normal mode pre...

Page 11: ...Countdown Under selecting calories window flicker press or to modify the value The range is 20 9990CAL Default is 50CAL 8 Training mode 4 Distance Countdown Under selecting Distance window flicker pre...

Page 12: ...irm and enter the next set of settings press the speed key adjustment set the last parameter to start 3 Age setting range 15 80 years old default 25 years old 4 Default target heart rate THR 220 age x...

Page 13: ...RAM P1 P36 Stage program 1 2 3 4 5 6 7 8 9 10 P1 SPEED 1 0 3 0 5 0 5 0 5 0 7 0 7 0 5 0 3 0 2 0 INCLINE 2 2 8 6 6 4 4 6 2 2 P2 SPEED 2 0 3 0 5 0 8 0 5 0 5 0 6 0 8 0 4 0 3 0 INCLINE 3 3 2 2 8 8 4 4 4 4...

Page 14: ...5 0 7 0 11 0 11 0 11 0 8 0 8 0 11 0 7 0 6 0 INCLINE 4 9 10 6 6 9 9 5 5 5 P25 SPEED 3 0 5 0 7 0 7 0 7 0 9 0 9 0 7 0 5 0 4 0 INCLINE 4 4 10 8 8 6 6 8 4 4 P26 SPEED 4 0 5 0 7 0 10 0 7 0 7 0 8 0 10 0 6 0...

Page 15: ...at its lowest position and check its function if normal 2 Clip the safety key cord with your clothes 3 Ensure and check its function and stability before use Standing on the Running belt to get it sta...

Page 16: ...it centers Refer to figure B 3 Over time the Running Belt will loosen To tighten the belt turn the Left Right side adjustment bolts one full turn clockwise check the tension of the belt Continue this...

Page 17: ...ICATE 1 Raise the belt up on one side and apply lubricant to the running deck Use a rag to thoroughly wipe the lubricant over the running deck Repeat this process for the other side 2 The moving parts...

Page 18: ...hange the fuse The running belt does not run smoothly a no enough lubrication Use the Silicone oil b running belt too tight Adjust the tightness of running belt Running belt slips a running belt too l...

Page 19: ...maged or open replace the connecting wire or lift the motor After checking all press the learning key on the control to learn again E5 Over current protection under the running state the down control...

Page 20: ...20 GT4 0 TREADMILL EXPLODED DRAWING 1...

Page 21: ...screw M8 15 2 14 Full thread screw M8 20 4 15 Inner hexagon bolts M8 20 4 16 Allen socket full thread screw M6 15 2 17 Allen C K S half thread screw M8 50 20 5 18 Flat washer 12 2 19 Allen C K S half...

Page 22: ...on wire 1 39 Photoelectric sensor 1 40 Handle pulse speed 1 41 Handle pules incline 1 42 Handle pulse connection wire 1 43 Controller 1 44 Safety key 1 45 Power connection wire 1 46 Power connection w...

Page 23: ...67 Water cup 1 68 Side rail guider 6 69 Tube plug 1 70 Tube plug 2 71 Cylindrical cushion 6 72 Taper cushion conductive rubber 4 73 Wheel 4 74 Pipe strap 5 75 TAB bolt 1 76 spring 1 1 77 Magnetic rin...

Page 24: ...s to the following parts as far as included in the scope of delivery frame electronic devices wheels and running belt The guarantee does not cover Damage effected by outer force Intervention by unauth...

Reviews: