background image


SAFETY INFORMATION 


Before using the equipment, carefully read this manual and keep handy for future consultation. 
The owner is responsible for guaranteeing that all equipment users are adequately informed of the safety 
precautions. 


ELECTRICAL SAFETY 


To reduce the risk of burns, fire, electrical shocks or personal injury, see the following precautions: 


Remove the treadmill plug from the socket when not in use. 
Do not use the treadmill if the socket is wet, if the cable or plug are damaged or if the treadmill is not 

running properly. 


Never place the electrical cable under the carpet, or place any object on the cable. 
Only use the electrical cable supplied with this treadmill. 
If the supply cord is damaged, it must be replaced by your assistance technical. 


Always connect the appliance to a socket with a grounded circuit and no other appliances connected 

to it. Do not modify the plug provided with the appliance if it is not compatible with your socket, ask a 
qualified electrician to install a suitable socket. 


WARNING! 

Connect this unit to a properly grounded outlet only. Please using special circuit with special power 

supply, plug with power supply must be connected with earth. 


MECHANICAL SAFETY 


Before beginning exercising make sure that the treadmill is functioning properly. To maintain the safety 

level of your equipment, do not use if with defect. 


Replace any damaged elements immediately and/or and do not use equipment until it has been 

repaired. 


Always use original spare parts. 
Inspect the equipment before exercising to ensure that all screws and nut are well fastened. 
Never let any fall on or be inserted into any opening. 
Never activate speed when anyone is standing on the treadmill. 


Make sure that all the screws, bolts and nuts are correctly fitted and tightened. 

Use only attachments 

recommended by your assistance technical. Don’t use the product if is damaged or unserviceable. 


Always place the device on a smooth, clean and sturdy surface. 


1

Summary of Contents for RUN 10.0

Page 1: ...RUN 10 0 TREADMILL USER MANUAL Read all instructions carefully before using this product Retain this owner s manual for future reference...

Page 2: ...Consult your doctor before commencing any exercise program This is especially important for people over 35 years of age or those people with pre existing health problems The heartbeat sensor is not a...

Page 3: ...e plug provided with the appliance if it is not compatible with your socket ask a qualified electrician to install a suitable socket WARNING Connect this unit to a properly grounded outlet only Please...

Page 4: ...ren and pets especially during use thus avoiding any possible accidents Do not exercise 1 hour before or 2 hours after a meal Consult your doctor before commencing and during any exercise program Spec...

Page 5: ...EXPLODED VIEW 3...

Page 6: ...ad screw ST4X15 18 52 Control cable L 600 1 17 Philips S K S full thread screw M5X15 4 53 Upright post cable L 1200 1 18 Philips S K S self tapping screw ST4X16 36 54 Console cable L 1050 1 19 Allen C...

Page 7: ...rame Console Stand post left Stand post right Console connection strap left and right Safety key Silicon oil Screw kits manual T Allen wrench 1pcs Inner hex bolt M10x20 18pcs Cross allen wrench 1pcs I...

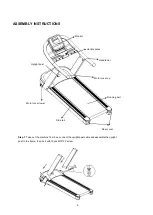
Page 8: ...e Handle bar Upright post Motor cover up Running belt Motor cover lower Side rail Rear cover Step 1 Take out the machine from box connect the upright post cable and assemble the upright post to the fr...

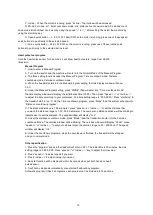
Page 9: ...nect the cable at the right side of the console to the upright post cable assemble the console onto the upright posts then fix with 8pcs M10 20 screw Step 4 Push the upright post cover upwards make su...

Page 10: ...he treadmill is located next to the power supply cord at the back of the motor cover Flip this switch to the ON position SAFETY SWITCH This key cuts the power supply if you fall immediately stopping t...

Page 11: ...ely and it will have warning sound You can hear the sound ring for half second per each 2 seconds until put on the safety key it shows for 2 seconds then all information will change into 0 5 Key instr...

Page 12: ...st the time according to your preference The time setting range is 5 00 99 00 Press start stop to the treadmill start to run C On the Time countdown program press Mode than the system will enter into...

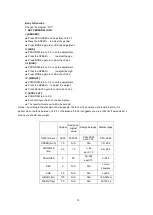
Page 13: ...ED 4 8 10 12 4 8 10 12 4 8 10 12 4 8 10 12 P12 INCLINE SPEED 13 4 12 12 10 4 8 12 13 4 12 12 10 8 13 12 4 12 4 12 10 4 8 12 13 4 12 12 10 4 8 12 P13 P14 INCLINE SPEED INCLINE 4 4 4 8 8 8 10 10 12 13 1...

Page 14: ...ent II AGE PROGRAM turn to F 2 to do the adjustment Press the SPEED to adjust the age Press MODE again to confirm the choice III HIGH PROGRAM turn to F 3 to do the adjustment Press the SPEED to adjust...

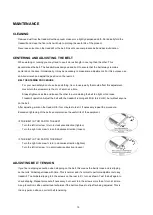
Page 15: ...ion Adjust the belt with the treadmill running at 4 Mi H 6 4 Km H but without anyone on the belt After adjusting walk on the treadmill for four minutes to test it If necessary repeat the procedure Exc...

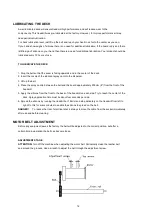
Page 16: ...belt 4 Place the spray nozzle between the belt and the board approximately 200mm 8 from the front of the treadmill 5 Apply the silicone from the front to the back of the treadmill on each side Try to...

Page 17: ...HELP This treadmill is designed with user safety as the number one priority In the event of electrical failure the treadmill will shut off automatically to prevent user injury and to prevent damage t...

Page 18: ...below PROBLEM The treadmill can not work SOLUTION 1 Verify that the power cord is plugged in properly to the outlet and the treadmill switch is turned on 2 put the safety key on the treadmill 3 The tr...

Page 19: ...ler of this product within the guarantee period The warranty applies to the following parts as far as included in the scope of delivery Frame cable electronic devices wheels and pedals The guarantee d...

Reviews: