background image

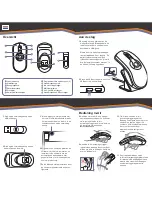
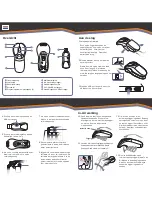
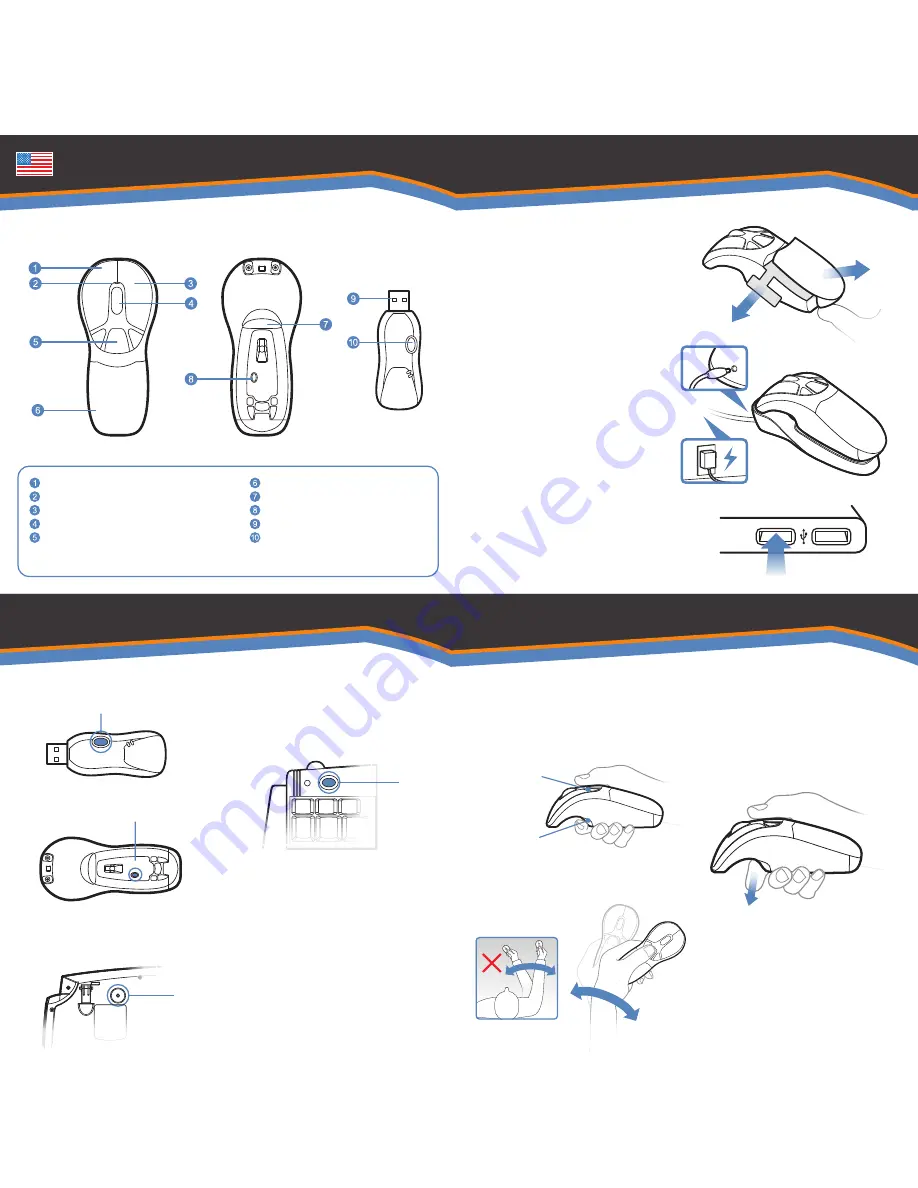
NiMH battery pack
In-Air Activation Trigger
Mouse Connect Button
2.4 GHz USB Receiver
USB Receiver Connect Button

Left Mouse Button
LED light
Right Mouse Button
Scroll Wheel
Programmable Mouse Buttons (3)

Getting Started

In-Air Operation

2


Connect the power adapter to the 
desktop charger and power outlet.  

1


Removing Insulator tab.

10


Hold the mouse using a comfortable 

handshake position. Use your index 

finger to access the in-air activation 

trigger and your thumb to access the 

top mouse buttons.

12


Click and hold the in-air activation 

trigger then move the cursor over a 

target and release the trigger before 

clicking. This parks the cursor over 

the target and allows you to click 

more accurately.

13


Double-clicking the in-air activation 

trigger puts the Air Mouse in motion 

mode so you can move the cursor 

without holding the trigger.

11


Press and hold the in-air activation trigger 
and move the cursor by flexing only your 
wrist while keeping your arm and body 
stationary.

Overview

Press the release button on the bottom 
of the mouse and remove battery pack.  
Remove and discard the plastic 
insulator tab.  Replace battery.

Place mouse on cradle charger and 
charger for 8 hours. The blue LED 
charger light will light solid blue and 
the mouse LED will pulsate slowly 
while charging.

4


Press the connect button on the USB 
receiver.

3


Insert the USB receiver into an 
available USB port on your computer.

5


Press the connect button on the 
bottom of the mouse

6


If your product includes the Full 
sized keyboard, turn the keyboard 
over and press the connect button

9


If you are using Windows, insert the 
software CD into the CD drive and 
install. The automatic web updater 
will also check for the latest updates 
for your product.

8


The computer will automatically 
detect and configure the Air Mouse.

7


If your product includes the Compact 
keyboard, press the connect button 
on the upper left hand corner

Top Buttons

Trigger

Summary of Contents for GYM100EU

Page 1: ...yration Air Mouse Choose your product Clickez sur votre produit Selecta su producto Warranty Garantie Garant a Air Mouse GO Plus GYM1100NA GYM1100EU Air Mouse Elite GYM5600NA GYM5600EU www gyration co...

Page 2: ...Gyration Air Mouse Elite User Guide Guide de l utilisateur Bedienungsanleitung Manual de usuario Manuale dell utente Gebruikershandleiding www gyration com...

Page 3: ...he top mouse buttons 10 Tip Click and hold the in air activation trigger then move the cursor over a target and release the trigger before clicking This parks the cursor over the target and allows you...

Page 4: ...ez sur le d clencheur d activation et maintenez le enfonc puis d placez le curseur sur une cible et rel chez le d clencheur avant de cliquer Le curseur stabilis vous gagnerez en pr cision lorsque vous...

Page 5: ...kt Bewegen Sie dann den Cursor ber ein Ziel und lassen Sie die Aktivierungstaste los bevor Sie klicken Auf diese Weise verharrt der Cursor ber dem Ziel und erm glicht Ihnen ein genaueres Anklicken 11...

Page 6: ...superiores del rat n con el pulgar 10 Sugerencia haga clic y mantenga pulsado el bot n de activaci n a rea mueva el cursor hasta su objetivo y suelte el bot n de activaci n antes de hacer clic El curs...

Page 7: ...nte di attivazione delle funzioni In aria quindi portare il cursore sul punto desiderato e rilasciare il pulsante di attivazione prima di fare clic In questo modo il cursore rimarr fermo nel punto des...

Page 8: ...ctiveringstrigger ingedrukt Beweeg vervolgens de cursor over een doel en laat de trigger los voordat u klikt Hierdoor parkeert u de cursor boven het doel waardoor u nauwkeuriger kunt klikken 11 Door t...

Page 9: ...Gyration Air Mouse GO Plus User Guide Guide de l utilisateur Bedienungsanleitung Manual de usuario Manuale dell utente Gebruikershandleiding www gyration com...

Page 10: ...the in air activation trigger and move the cursor by flexing only your wrist while keeping your arm and body stationary Overview Press the release button on the bottom of the mouse and remove battery...

Page 11: ...terie Retirez le plastique de protection Replacez la batterie Placez la souris sur le chargeur pendant 8 heures La LED bleue du chargeur s allumera et la LED bleue de la souris clignotera pendant le c...

Page 12: ...terseite und nehmen Sie den Akku heraus Entfernen Sie den Kunststoffisolierstreifen Setzen Sie den Akku wieder ein Stellen Sie die Maus in die Ladesta tion und laden Sie sie f r 8 Stunden auf Die LED...

Page 13: ...er el bot n pulsado 11 Mantenga pulsado el bot n de activaci n a rea y desplace el cursor flexionando nicamente la mu eca sin mover el brazo ni el cuerpo Presione el bot n de apertura en la parte infe...

Page 14: ...overe le batterie Rimuovere e gettare la linguetta isolante in plastica Rein serire le batterie Inserire il mouse nel supporto e lasciarlo in carica per 8 ore Durante la carica il LED blu del supporto...

Page 15: ...der het kunststof isolatielipje Plaats het batterijblok terug Plaats de muis op de cradle en laad deze 8 uur lang op Het blauwe led lampje blijft blauw branden en de muis led knippert langzaam tijdens...

Page 16: ...larly important in rural areas Caution Users should not attempt to make such connections themselves but should contact the appropriate electric inspection authority or electrician as appropriate Warra...

Page 17: ...deze kunnen per staat of provincie verschillen Movea www gyration com Informations r glementaires Avis aux utilisateurs Cet quipement a t test et sa conformit a t tablie par rapport aux limites applic...

Page 18: ...r Dieses Produkt verwendet bei Betrieb Hochfrequenz die Verwendung in Flugzeugen kann daher aufgrund m glicher St rungen eingeschr nkt sein FCC Erkl rung Dieses Ger t ist in bereinstimmung mit Teil 15...

Page 19: ...on la compatibilidad electromagn tica 89 336 EEC de acuerdo con la normativa EN 55022 Clase B Aviso sobre el equipo de Industry Canada La certificaci n de Industry Canada identifica el equipo certific...

Reviews: