background image

10

Operating manual

KOOLWELD 1

Translation of the original 

instructions

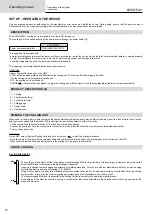
SET UP - OPERATING THE DEVICE

Only experienced personnel, authorised by the manufacturer, may set up and install the device. During setup, ensure that the power source is 

disconnected from the mains power supply. Serial or parallel power source connections are not allowed.

DESCRIPTION

The KOOLWELD 1 cooling unit is designed to cool liquid TIG torches (L). 

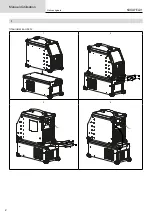
The cooling unit is controlled directly by the power source through the power cable (I-5).

KOOLWELD 1

Power source compatibility

TITANIUM 230 AC/DC FV

This equipment is equipped with:

- a water level safeguard to prevent the water level from becoming too low for the unit, as well as the torch’s water-cooling feature, to operate properly.

- a water flow safeguard to prevent clogs in the torch’s water supply system and damage to the torch.

- a thermal safeguard to protect the torch against abnormal heating.

This equipment is automatically detected by the power source.

TITANIUM:

Select «System/Cooling unit» on the HMI:

- AUTO: activates when welding and deactivates the cooling unit 10 minutes after the welding is finished.

- ON: the cooling unit is permanently switched on.

- OFF: the cooling unit is switched off.

- PURGE 

: a feature that is designed to purge the cooling unit or fill the water circuit; these safeguarding features are then deactivated.

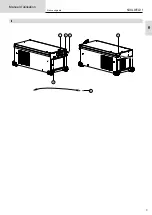
PRODUCT DESCRIPTION (II) 

1.) Fill plug
2.) Coolant outlet (blue)
3.) Coolant inlet (red)
4.) Filling gauge
5.)

Power cable

6.) Priming hose

PRIMING THE COOLING UNIT

When used for the first time or after emptying the tank completely, starting the pump may be difficult and may result in a lack of water flow. Use the 

priming hose supplied with the product (II-6) and follow the instructions below to prime it correctly:

- Fill the coolant tank to its maximum level. The tank has a three-litre capacity.

- Connect the priming hose to the coolant outlet connector (II-2) and place the other end in an empty container (ideally a bottle).

- Turn on the power source.

TITANIUM:

On the HMI, select «System/Cooling Unit» and click on the icon  

 to start the priming procedure.

- Once the pump is running (with the container filling with coolant), stop the cooling unit by pressing one of the buttons on the HMI.

- Disconnect the ignition hose and refill the fluid in the cooling unit: the pump is now primed.

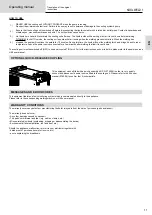
LIQUID COOLING

FILLING THE DEVICE

MAX

MIN

The cooling unit tank must be filled to the gauge’s recommended MAX level on the front of the cooling unit. However, it must never fall 

below the MIN level, otherwise a warning message will appear.

Use only a specific coolant designed specifically for welding machines; it must have with low electrical conductivity as well as being 

protected against corrosion and freezing (P.N.  062511).

Using other coolants, in particular a standard automotive coolant, may lead to an electrolytic build-up of solid deposits in the cooling 

system which, in turn, may lead to poor cooling performance and even blockages in the cooling circuit.

The recommended MAX level is essential for optimising the liquid-cooled torch’s operational performance.

Any damage to the machine caused by using a coolant other than those stipulated in these instructions will not be covered by the 

machine’s warranty.

Summary of Contents for 070820

Page 1: ... Groupe de refroissement Cooling Unit Kühleinheit Grupo de refrigeración Koelgroep Unità di raffreddamento Agregat chłodzący EN 1 3 8 11 36 40 DE 1 3 12 15 36 40 ES 1 3 16 19 36 40 RU 1 3 20 23 36 40 NL 1 3 24 27 36 40 IT 1 3 28 31 36 40 PL 1 3 32 35 36 40 73502 V1 30 08 2022 ...

Page 2: ...2 Manuel d utilisation KOOLWELD 1 Notice originale I TITANIUM 230 AC DC FV 1 2 3 4 ...

Page 3: ...FR 3 Manuel d utilisation KOOLWELD 1 Notice originale II 1 4 2 3 5 6 ...

Page 4: ...selon les applications Protéger les yeux lors des opérations de nettoyage Les lentilles de contact sont particulièrement proscrites Il est parfois nécessaire de délimiter les zones par des rideaux ignifugés pour protéger la zone de soudage des rayons de l arc des projections et des déchets incandescents Informer les personnes dans la zone de soudage de ne pas fixer les rayons de l arc ni les pièce...

Page 5: ...RANSIT DU MATERIEL Il est préférable de vidanger le groupe froid avant transport Ne pas faire transiter le matériel au dessus de personnes ou d objets INSTALLATION DU MATÉRIEL Mettre le matériel sur un sol dont l inclinaison maximum est de 10 Prévoir une zone suffisante pour aérer la source de courant de soudage et accéder aux commandes Ne pas utiliser dans un environnement comportant des poussièr...

Page 6: ... de la pompe peut s avérer difficile et générer un défaut de débit d eau Pour l amorcer correctement il est recommandé d utiliser le tuyau d amorçage fourni avec le produit II 6 et suivre les indications suivantes Remplir le réservoir de liquide de refroidissement jusqu à son niveau maximum Le réservoir a une capacité de 3 litres Brancher le tuyau d amorçage au connecteur de sortie du liquide de r...

Page 7: ... branché quelques minutes après soudage pour permettre son refroidissement Pour utiliser une torche TIG avec refroidissement air il est nécessaire de désactiver le groupe froid OFF Pour ce faire veuillez consulter la notice de l interface du générateur FIXATION RAPIDE EN OPTION Ce matériel peut être équipé d un kit d assemblage rapide ref 076006 afin de fixer et d enlever très rapidement un généra...

Page 8: ...welding hood with a sufficient level of protection variable depending on the application Protect your eyes during cleaning operations Wearing contact lenses is strictly forbidden It is sometimes necessary to enclose the welding area with fireproof curtains to protect it from arc radiation spatter and incandescent waste Inform people in the welding area not to look at the arc rays or the molten par...

Page 9: ...ansportation Do not carry the equipment over people or objects SETTING UP THE EQUIPMENT Place the equipment on a floor with a maximum slope of 10 Ensure the work area has sufficient ventillation for welding and that there is easy access to the control panel The machine must not be used in an area with conductive metal dusts The equipment must be protected from heavy rain and kept out of direct sun...

Page 10: ...d for the first time or after emptying the tank completely starting the pump may be difficult and may result in a lack of water flow Use the priming hose supplied with the product II 6 and follow the instructions below to prime it correctly Fill the coolant tank to its maximum level The tank has a three litre capacity Connect the priming hose to the coolant outlet connector II 2 and place the othe...

Page 11: ... it to cool down The cooling unit must be switched off OFF to use an air cooled TIG torch For further instructions on how to do this please refer to the power source s HMI user manual OPTIONAL QUICK RELEASE COUPLING This equipment can be fitted with a quick assembly kit P N 076006 in order to very quickly connect and disconnect a power source fitted to the cooling unit Pleaser refer to the kit s u...

Page 12: ... elektrisch und wärmeisolierende Handschuhe Tragen Sie bitte Schweißschutzkleidung und einen Schweißschutzhelm mit einer ausreichenden Schutzstufe je nach Schweißart und strom Schützen Sie Ihre Augen bei Reinigungsarbeiten Kontaktlinsen sind ausdrücklich verboten Schirmen Sie den Schweißbereich bei entsprechenden Umgebungsbedingungen durch Schweißvorhänge ab um Dritte vor Lichtbogenstrahlung Schwe...

Page 13: ...ig der Umgebungsbedingungen stets auf isolierendes Schuhwerk TRANSPORT UND TRANSIT DES GERÄTS Am besten entleeren Sie das Kühlaggregat vor dem Transport Transportieren Sie das Gerät nicht oberhalb von Personen oder Gegenständen GERÄTEINSTALLATION Stellen Sie das Gerät auf einen Boden mit einer maximalen Neigung von 10 Achten Sie auf eine gute Belüftung und ausreichend Schutz bzw Ausstattung der Rä...

Page 14: ...leert haben kann sich die Ansaugung der Pumpe als schwierig erweisen und einen mangelnden Wasserdurchfluss verursachen Für eine korrekte Ansaugung wird empfohlen den mitgelieferten Ansaugschlauch II 6 zu verwenden und die folgenden Anweisungen zu befolgen Füllen Sie den Kühlmitteltank bis zum maximalen Füllstand Der Tank hat ein Fassungsvermögen von 3 Litern Verbinden Sie den Ansaugschlauch mit de...

Page 15: ... Kühlaggregat deaktiviert werden OFF Lesen Sie dazu bitte die Schnittstellenan leitung der Stromquelle SCHNELLBEFESTIGUNG OPTIONAL Dieses Material kann mit einem Schnellbausatz ausgestattet sein Art Nr 076006 um eine Stromquelle die auf diesem Kühlaggregat montiert ist sehr schnell zu befestigen und zu entfernen Zur Überprüfung der Kompatibilität siehe die Anleitung des Bausatzes 076006 MITTEILUNG...

Page 16: ...egún aplicaciones Protéjase los ojos durante operaciones de limpieza Las lentillas de contacto están particularmente prohibidas A veces es necesario delimitar las zonas mediante cortinas ignífugas para proteger la zona de soldadura de los rayos del arco proyecciones y de residuos incandescentes Informe a las personas en la zona de soldadura de que no miren los rayos del arco ni las piezas en fusió...

Page 17: ...refrigeración antes de transportarlo No transporte el material por encima de otras personas u objetos INSTALACIÓN DEL MATERIAL Coloque el equipo en un suelo con una inclinación máxima de 10 Coloque la máquina en una zona lo suficientemente amplia para airearla y acceder a los comandos No utilice en un entorno con polvos metálicos conductores El material debe estar protegido de la lluvia torrencial...

Page 18: ...ués de vaciar completamente el depósito el arranque de la bomba puede ser difícil y generar un fallo de caudal de agua Para cebarlo correctamente se recomienda utilizar la manguera de cebado suministrada con el producto II 6 y seguir las siguientes instrucciones Llene el depósito de refrigerante hasta su nivel máximo El depósito tiene una capacidad de 3 litros Conecte la manguera de cebado al cone...

Page 19: ...aparato conectado algunos minutos después de soldar para permitir que se enfríe Para utilizar una antorcha TIG con refrigeración por aire es necesario desactivar la unidad de refrigeración OFF Para ello consulte el manual de la interfaz del generador CIERRE RÁPIDO OPCIONAL Este equipo puede estar equipado con un kit de montaje rápido ref 076006 para montar y des montar rápidamente un generador mon...

Page 20: ...неупорной ткани без отворотов которая покрывает полностью все тело Работайте в защитных рукавицах обеспечивающие электро и термоизоляцию Используйте средства защиты для сварки и или шлем для сварки соответствующего уровня защиты в зависимости от использования Защищайте глаза при операциях очистки Ношение контактных линз воспрещается В некоторых случаях необходимо окружить зону огнеупорными шторами...

Page 21: ...ОРУДОВАНИЯ Желательно слить жидкость кулера перед его транспортировкой Не переносить это оборудование над людьми или предметами УСТАНОВКА АППАРАТА Установите оборудование на пол с максимальным уклоном 10 Предусмотрите достаточно большое пространство для хорошего проветривания источника сварочного тока и доступа к управлению Не использовать в среде содержащей металлическую пыль проводник Le matérie...

Page 22: ...льзования или после полного опорожнения бака заливка насоса может быть затруднена и вызвать нарушение потока воды Для правильной заливки рекомендуется использовать заливочный шланг поставляемый с изделием II 6 и следовать приведенным ниже инструкциям Заполните бачок охлаждающей жидкости до максимального уровня Бак имеет емкость 3 литра Подсоедините заливной шланг к выпускному патрубку охлаждающей ...

Page 23: ...льзования горелки TIG с воздушным охлаждением блок охлаждения должен быть деактивирован OFF Для этого обратитесь к инструкциям по интерфейсу источника ДОПОЛНИТЕЛЬНОЕ БЫСТРОСЪЕМНОЕ КРЕПЛЕНИЕ Это оборудование может быть оснащено комплектом для быстрой сборки см 076006 для быстрого присоединения и снятия источника установленного на этом холодильном агрегате Для проверки совместимости см брошюру о ком...

Page 24: ... een elektrische en thermische isolatie garanderen Draag een lasbescherming en of een lashelm die voldoende bescherming biedt afhankelijk van de lastoepassing Bescherm uw ogen tijdens schoonmaakwerkzaamheden Het dragen van contactlenzen is uitdrukkelijk verboden Soms is het nodig om het lasgebied met brandwerende schermen af te schermen tegen stralingen projectie en wegspattende gloeiende deeltjes...

Page 25: ...aatsen of te transporteren Til het apparaat niet boven personen of voorwerpen INSTALLATIE VAN HET MATERIAAL Plaats het apparaat op een ondergrond met een helling van maximaal 10 Zorg voor voldoende ruimte om de machine te ventileren en om toegang te hebben tot het controle board Niet geschikt voor gebruik in een ruimte waar stroomgeleidend metaalstof aanwezig is Het apparaat moet worden afgescherm...

Page 26: ...et volledig ledigen van de tank kan het voorkomen dat de pomp moeilijk opstart en dat de watertoevoer niet perfect verloopt Voor het realiseren van een correcte opstart wordt aanbevolen om de meegeleverde slang te gebruiken lI 6 en de volgende raadgevingen op te volgen Vul het reservoir voor koelvloeistof tot het maximale niveau Het reservoir heeft een capaciteit van 3 liter Koppel de slang aan op...

Page 27: ...el enkele minuten aanstaan om het af te laten afkoelen Om een TIG toorts met luchtgekoeld koelsysteem te gebruiken moet het koelsysteem gedeactiveerd worden OFF Raadpleeg hiervoor de handlei ding van de bediening van de generator SNELBEVESTIGING OPTIONEEL Dit materiaal kan worden uitgerust met een snelbevestigingskit art code 076006 om zo snel een generator snel te kunnen monteren of demonteren Om...

Page 28: ...applicazioni Proteggere gli occhi durante le operazioni di pulizia Le lenti a contatto sono particolarmente sconsigliate Potrebbe essere necessario limitare le aree con delle tende ignifughe per proteggere la zona di saldatura dai raggi dell arco dalle proiezioni e dalle scorie incandescenti Informare le persone della zona di saldatura di non fissare le radiazioni d arco e neanche i pezzi in fusio...

Page 29: ...ità di raffreddamento prima del trasporto Non far passare il dispositivo sopra a persone o oggetti INSTALLAZIONE DEL DISPOSITIVO Mettere il dispositivo su un suolo in cui l inclinazione massima è di 10 Prevedere una zona sufficiente per aerare il dispositivo di corrente di saldatura e accedere ai comandi Non usare in un ambiente con polveri metalliche conduttrici Il dispositivo deve essere al sicu...

Page 30: ... svuotato completamente il serbatoio l inneso della pompa può risultare difficoltoso e causare una mancanza di flusso d acqua Per innescarlo correttamente è raccomandato utilizzare il tubo di innesco fornito con il prodotto II 6 e seguire le seguenti indicazioni Riempire il serbatoio con del liquido di raffreddamentofino al suo livello massimo Il serbatorio ha una capacità di 3 litri Collegare il ...

Page 31: ...to alla presa dopo la fine della saldatura per permetterne il raffreddamento Per utilizzare una torcia TIG con raffreddamento aria è necessario disattivare l unità di raffreddamento OFF Per fare ciò consultare il manuale dell interfaccia del generatore FISSAGGIO RAPIDO OPZIONALE Questa apparecchiatura può essere dotata di un kit di montaggio rapido rif 076006 per montare e smontare rapidamente un ...

Page 32: ...izolację elektryczną i termiczną Należy stosować odpowiednią ochronę spawalniczą lub przyłbicę zapewniającą wystarczający poziom ochrony w zależności od aplikacji Chronić oczy podczas czyszczenia Szkła kontaktowe są szczególnie zabronione Czasami konieczne jest wydzielenie obszarów za pomocą ognioodpornych kurtyn w celu ochrony obszaru spawania przed promieniowaniem łuku odpryskami i żarzącymi się...

Page 33: ...ZĘTU Zaleca się opróżnienie urządzenia chłodzącego przed transportem Nie należy przenosić urządzenia nad ludźmi lub przedmiotami INSTALACJA MATERIAŁU Umieść urządzenie na podłodze o maksymalnym nachyleniu 10 Zapewnić wystarczającą strefę do chłodzenia źródła prądu spawania i do łatwego dostępu do panelu sterowania Nie stosować w środowisku gdzie występują pyły metali przewodzących Materiał należy ...

Page 34: ...ENIA CHŁODZĄCEGO Przy pierwszym użyciu lub po całkowitym opróżnieniu zbiornika używanie pompy może być trudne i powodować brak przepływu wody Aby prawidłowo ją podłączyć zaleca się użycie węża do zalewania dostarczonego z produktem I 19 i postępowanie zgodnie z poniższymi instrukcja mi Napełnij zbiornik płynu chłodzącego do maksymalnego poziomu Zbiornik ma pojemność 3 litrów Podłącz wąż zajarzania...

Page 35: ...a minut aby ostygł Aby użyć palnika TIG chłodzonego powietrzem konieczne jest wyłączenie jednostki chłodzącej Aby to zrobić należy zapoznać się z instrukcją obsługi interfejsu źródła prądu OPCJONALNIE SZYBKOZŁĄCZKA Urządzenie to może być wyposażone w zestaw szybkiego montażu nr ref 076006 do szybkiego mocowania i zdejmowania generatora zamontowanego na tej jednostce chłodzącej Aby sprawdzić kompat...

Page 36: ...ratuursensor Sensore di temperatura Czujnik temperatury 52105 8 Radiateur Radiator Radiator Radiador Radiator Radiatore Radiator 71751 9 Réservoir Tank Behälter Tanque Tank Serbatoio Zbiornik S81141 10 Capteur de niveau d eau Water level sensor Wasserstandssensor Sensor de nivel de agua Sensor waterniveau Sensore del livello di acqua Czujnik poziomu wody 71766 11 Capteur de débit d eau Water flow ...

Page 37: ...37 KOOLWELD 1 Schéma électrique CIRCUIT DIAGRAM SCHALTPLAN DIAGRAMA ELECTRICO ЭЛЕКТРИЧЕСКАЯ СХЕМА ELEKTRISCHE SCHEMA SCEMA ELETTRICO 10 11 M 2 M 2 M 1 2 4 4 4 7 13 15 ...

Page 38: ...efactor bij 40 C Ciclo di correzione a 40 C 0 58 Pression maximale Maximum pressure Maximaler Druck Presión máxima Максимальное давление Maxi male druk Pressione massima Maximale druk Pmax 0 52 MPa 75 psi Capacité réservoir Tank capacity Füllmenge Kühlflüssigkeit Capacidad del tanque Вместимость резервуара Tankcapaciteit Capacità del serbatoio 3 L 0 66 gal US Température de fonctionnement Function...

Page 39: ...e RU Минимальный уровень охлаждающей жидкости NL Minimum koelvloeistofpeil IT Livello minimo del refrigerante PT Nível mínimo de refrigerante PL Minimalny poziom płynu chłodzącego FR Matériel conforme aux Directives européennes EN Device complies with europeans directives DE Gerät entspricht europäischen Richtlinien ES Aparato conforme a las directivas europeas RU Устройство соответствует директив...

Page 40: ...JBDC 1 rue de la Croix des Landes CS 54159 53941 Saint berthevin Cedex FRANCE www gys fr contact gys fr ...

Reviews: