32
1234567890123456
1234567890123456
1234567890123456
1234567890123456
1234567890123456
1234567890123456
1234567890123456
1234567890123456
1234567890123456
1234567890123456
1234567890123456
1234567890123456
1234567890123456
1234567890123456
1234567890123456
1234567890123456
1234567890123456
1234567890123456
1234567890123456
1234567890123456
1234567890123456
1234567890123456
1234567890123456
1234567890123456
1234567890123456
1234567890123456
1234567890123456
1234567890123456
1234567890123456
1234567890123456
1234567890123456
1234567890123456
1234567890123456
1234567890123456
1234567890123456
1234567890123456
1234567890123456
1234567890123456
1234567890123456
1234567890123456
1234567890123456
1234567890123456
1234567890123456
1234567890123456
1234567890123456
1234567890123456
1234567890123456
1234567890123456
1234567890123456
1234567890123456
1234567890123456
1234567890123456
1234567890123456
1234567890123456
1234567890123456
1234567890123456
1234567890123456
1234567890123456
1234567890123456
1234567890123456
1234567890123456
1234567890123456
1234567890123456
1234567890123456
1234567890123456
1234567890123456
1234567890123456
1234567890123456
1234567890123456
1234567890123456
1234567890123456
1234567890123456
1234567890123456
1234567890123456
1234567890123456
1234567890123456
1234567890123456
1234567890123456
1234567890123456
1234567890123456
1234567890123456
1234567890123456
1234567890123456
1234567890123456
1234567890123456
1234567890123456
1234567890123456
1234567890123456
1234567890123456
1234567890123456
1234567890123456
1234567890123456
1234567890123456
1234567890123456
1234567890123456
1234567890123456
1234567890123456
1234567890123456
1234567890123456
1234567890123456
1234567890123456
1234567890123456
1234567890123456
1234567890123456
1234567890123456
1234567890123456
1234567890123456
1234567890123456
1234567890123456
1234567890123456
1234567890123456
1234567890123456
1234567890123456
1234567890123456
1234567890123456
1234567890123456
1234567890123456
1234567890123456
1234567890123456
1234567890123456
1234567890123456
1234567890123456
1234567890123456
1234567890123456
1234567890123456
1234567890123456
1234567890123456
1234567890123456
1234567890123456
1234567890123456
1234567890123456
1234567890123456
1234567890123456
1234567890123456
1234567890123456
1234567890123456
1234567890123456
1234567890123456
1234567890123456
1234567890123456
1234567890123456
1234567890123456
1234567890123456
1234567890123456
1234567890123456
1234567890123456
1234567890123456
1234567890123456
1234567890123456
1234567890123456
1234567890123456
1234567890123456
1234567890123456
1234567890123456
1234567890123456
1234567890123456
1234567890123456
1234567890123456
1234567890123456
1234567890123456
1234567890123456
1234567890123456
1234567890123456
1234567890123456
1234567890123456
1234567890123456
1234567890123456
1234567890123456
1234567890123456
1234567890123456
1234567890123456
1234567890123456
1234567890123456
1234567890123456
1234567890123456
1234567890123456
1234567890123456
1234567890123456
INSTALLATION AND SERVICE MANUAL 959R
184981-02
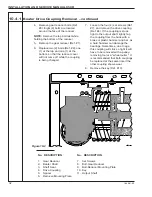
Figure 10-2
No. DESCRIPTION
1. Gear Reducer
2. Beater Shaft
3. Shaft Seal
4. Drive Coupling
5. Spacer
6. Reducer-Mounting Plate
No. DESCRIPTION
7. Set Screws
8. Bolt-Gear Reducer
9. Bolt-Reducer Mounting Plate
10. Key
11. Output Shaft
10.4.1
Beater Drive Coupling Removal – continued
4. Remove gear reducer bolts (Ref.
#8). Eight (8) bolts are located
around the face of the reducer.
NOTE:
Remove the top bolt last while
holding the bottom of the reducer.
5. Remove the gear reducer (Ref. #1).
6. Replace two (2) bolts (Ref. #8), one
(1) at the top and one (1) at the
bottom, so that the reducer cover
will not come off while the coupling
is being changed.
7. Loosen the four (4) set screws (Ref.
#7), and remove the drive coupling
(Ref. #4). If the coupling is stuck
tight to the output shaft, lightly tap
the coupling from the back with a
brass or plastic hammer and bar, as
a hard hammer can damage the
bearings. Sometimes, due to age,
this coupling will stick so tight it will
have to be removed with a pulley-
removing tool or a "wheel puller." It
is recommended that both couplings
be replaced at the same time if the
other coupling shows wear.
8. Remove the key (Ref. #10).

