123456789012345
123456789012345
123456789012345
123456789012345
123456789012345
123456789012345
123456789012345
123456789012345
123456789012345
123456789012345
123456789012345
123456789012345
123456789012345
123456789012345
123456789012345
123456789012345
123456789012345
123456789012345
123456789012345
123456789012345
123456789012345
123456789012345
123456789012345
123456789012345
123456789012345
123456789012345
123456789012345
123456789012345
123456789012345
123456789012345
123456789012345
123456789012345
123456789012345
123456789012345
123456789012345
123456789012345
123456789012345
123456789012345
123456789012345
123456789012345
123456789012345
123456789012345
123456789012345
123456789012345
123456789012345
123456789012345
123456789012345
123456789012345
123456789012345
123456789012345
123456789012345
123456789012345
123456789012345
123456789012345
123456789012345
123456789012345
123456789012345
123456789012345
123456789012345
123456789012345
123456789012345
123456789012345
123456789012345
123456789012345
123456789012345
123456789012345
123456789012345
123456789012345
123456789012345
123456789012345
123456789012345
123456789012345
123456789012345
123456789012345
123456789012345
123456789012345
123456789012345
123456789012345
123456789012345
123456789012345
123456789012345
123456789012345
123456789012345
123456789012345
123456789012345
123456789012345
123456789012345
123456789012345
123456789012345
123456789012345
123456789012345
123456789012345
123456789012345
123456789012345
123456789012345
123456789012345
123456789012345
123456789012345
123456789012345
123456789012345
123456789012345
123456789012345
123456789012345
123456789012345
123456789012345
123456789012345
123456789012345
123456789012345
123456789012345
123456789012345
123456789012345
123456789012345
123456789012345
123456789012345
123456789012345
123456789012345
123456789012345
123456789012345
123456789012345
123456789012345
123456789012345
123456789012345
123456789012345
123456789012345
123456789012345
123456789012345
123456789012345
123456789012345
123456789012345
123456789012345
123456789012345
123456789012345
123456789012345
123456789012345
123456789012345
123456789012345
123456789012345
123456789012345
123456789012345
123456789012345
123456789012345
123456789012345
123456789012345
123456789012345
123456789012345
123456789012345
123456789012345
123456789012345
123456789012345
123456789012345
123456789012345
123456789012345
123456789012345
123456789012345
123456789012345
123456789012345
123456789012345
123456789012345
123456789012345
123456789012345
123456789012345
123456789012345
123456789012345
123456789012345
123456789012345
123456789012345
123456789012345
123456789012345
123456789012345
123456789012345
123456789012345
123456789012345
123456789012345
123456789012345
123456789012345
123456789012345
123456789012345
123456789012345
INSTALLATION AND SERVICE MANUAL 959R
184981-02
5
4
Uncrating and Inspecting the Freezer
1. As soon as the freezer is received,
and while the carrier is still present,
inspect the shipping crate for any
damage which may have occurred in
transit. If the crate is broken, torn or
punctured, note the damage on the
carrier's freight bill and call the
carrier's local agent immediately,
requesting prompt inspection by
their personnel.
4.1 Uncrating the Freezer
2. The freezer should always be stored
or moved in its normal upright
position and moving should be
accomplished by an appropriate
method of large appliance handling.
Do not move the freezer by "walk-
ing" it on the corners of the skid, and
do not uncrate the freezer until it has
been transferred as close as pos-
sible to its location site.
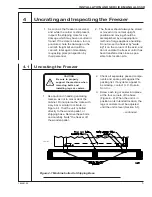
Figure 4-1 Machine bolted to Shipping Base
CAUTION
Be sure to properly
support the machine when
removing bolts and
installing legs or casters.
1. Use caution in handling uncrating
tools so as not to mar or dent the
cabinet. Do not pierce the crate with
a pry bar or similar tool. Note, in
Figure 4-1, that the unit is bolted
directly to the wooden pallet, or
shipping base. Remove these bolts
and carefully "walk" the freezer of f
the wooden pallet.
2. Check all separately packed compo-
nents and spare parts against the
packing list. If any items appear to
be missing, contact H. C. Duke &
Son, Inc.
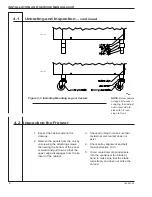
3. Screw each leg or caster into place
at the four corners of the base
(Figure 4- 2). When the unit is in
position at its intended location, the
legs or casters must be adjusted
until the unit is level (Section 5.1).
– continued
FRONT

