background image

Owner’s Manual                                              

                        HK3819 / HK5523 

Page  4 

SET UP, FLUSHING, PRIMING, SPRAYING, SHUT DOWN 
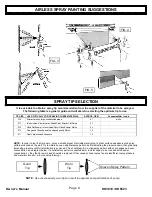
 
 
Setting Up: 

1.

Attach siphon assembly to intake valve. 

2.

Connect Bleed hose to return fitting. 

3.

Attach gun to hose.  

4.

Attach paint hose to outgo nipple. 

5.

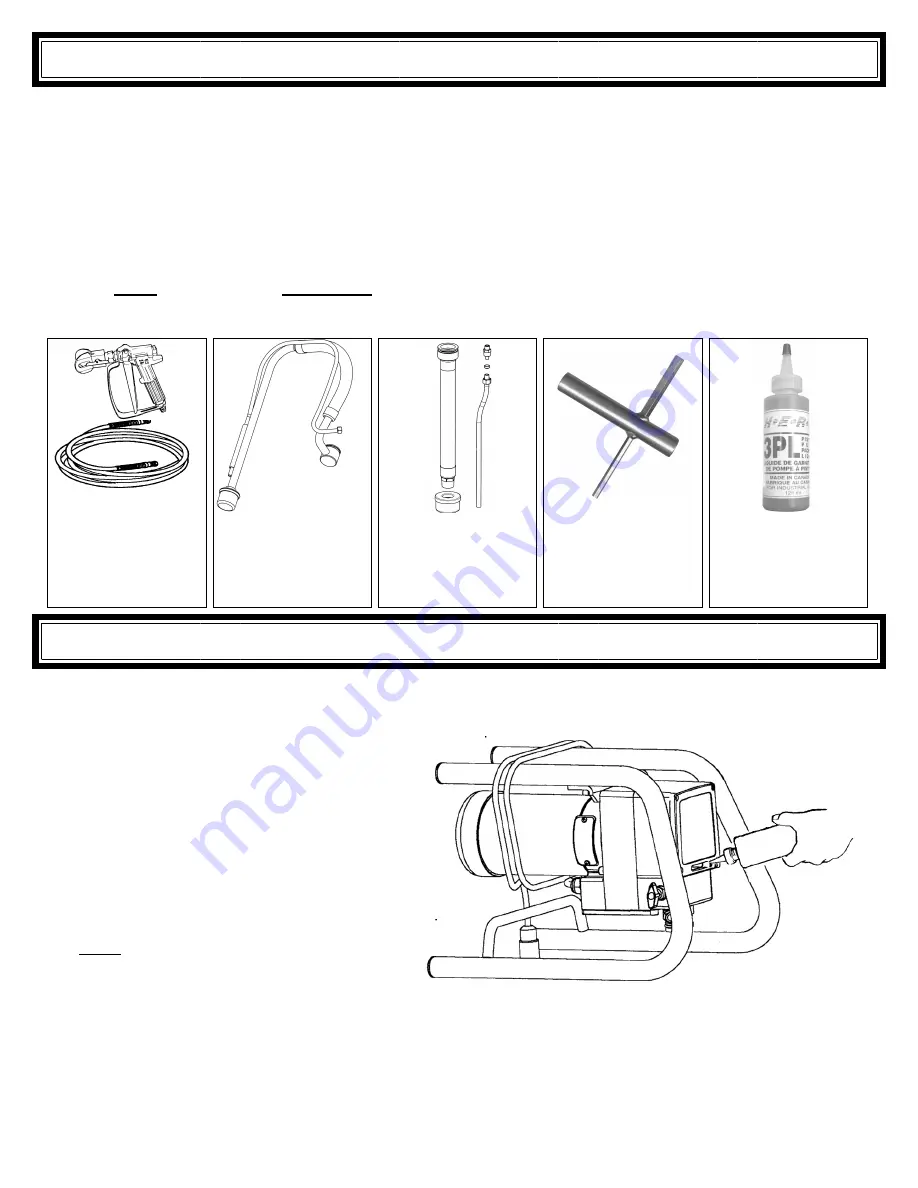
Check packing lubricant. This will help prevent 
buildup of materials on the piston rod thus extend-
ing packing life. To add lubricant, tilt back unit and 
insert pointed nozzle of the 3PL liquid into the slot-
ted area in the front of the unit. Add only a small 
amount . This should be done each time it is used. 
Before each use, flush the pump with the correct 
thinner for the paint being used.  

NOTE: The unit 

MUST be stored with mineral spirits at all times. 


INTRODUCTION & UNPACKING 

Congratulations on your purchase of a new H.E.R.O. H2K airless paint sprayer. We are sure you will enjoy owning and operating 
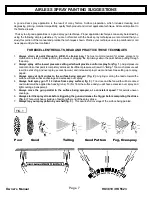
your new sprayer. With H.E.R.O. airless spray equipment you will enjoy the features and benefits of this airless. You are spraying 
paint, not air, and the paint is driven to the painting surface in a clean, fan shaped spray which penetrates all cracks and corners. 
To attain these results, you must adjust the pressure as low as possible. We recommend that you become familiar with your        
H.E.R.O. unit. Discuss with your dealer the useful accessory items they do offer - various types of tips, extension poles for hard to 
reach areas, extra hose, etc. Use of accessory items is often  the difference between a good job and an excellent one !    
 
Your H.E.R.O. airless sprayer has been fully tested and carefully packaged to avoid damage. It should be carefully 
examined upon arrival to determine that the unit shows no signs of freight damage.  

If any parts are found broken or 

damaged, immediately contact the carrier and arrange for an inspection of the concealed damaged. Claims for 
damage MUST be made by the CONSIGNEE and not the shipper. The carrier accepts full responsibility for the 
safe delivery of merchandise upon pick-up from the shipper. 
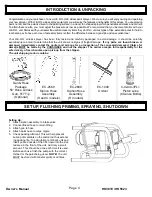
The unit shipping carton contains:
 

4-02-40-3PL1 

Piston Lube 

(8 Ounce Bottle) 

Gun & Hose    

Package 

50’ Hose, Airless 

Gun, 517 Tip 

(Optional) 

EC-2560 

Siphon Hose  

Assembly 

(S and C models) 

EC-2600 

Siphon Hose  

Assembly 

(H models) 

EC-1000 

Unitool 

Summary of Contents for H2K 3819

Page 1: ...ng Priming 5 Shut Down and Pressure Relief Procedures 6 Airless Spray Painting Suggestions 7 8 Tip Selection 8 9 Troubleshooting 9 Repair Procedures 10 11 Piston Cartridge Assembly Repairs 12 13 Press...

Page 2: ...less pump are warranted only to the extent that these parts are warranted by their respective manufacturers Warranty claims on these items must be made directly to such manufacturers or their local au...

Page 3: ...arnings contained in this operating and instruction manual and as displayed on the face of the equipment Never place fingers near spray tip of gun Never point gun toward any part of the body or that o...

Page 4: ...riven to the painting surface in a clean fan shaped spray which penetrates all cracks and corners To attain these results you must adjust the pressure as low as possible We recommend that you become f...

Page 5: ...ve for approximately one minute Turn unit off 14 When spraying latex paint repeat the flushing procedures with clear water When spraying oil based paints continue with Priming instructions Priming Pri...

Page 6: ...a worn tip 3 Check all fluid connection points for possible leaks Correct before continuing 4 Spray Paint NOTE For best results read and practice the spray techniques shown on pages 6 7 Shut Down 1 T...

Page 7: ...ain the paint before putting through the pump 2 Always spray at the lowest pressure setting which will provide a uniform spray fan fig 1 Adjust pressure control knob so that paint is completely atomiz...

Page 8: ...Stains 18 011 Clear Varnishes and Lacquers 12 NOTE In order to test if a tip is worn spray a small amount of suitable material on to a test surface and observe the spray pattern produced on the wall T...

Page 9: ...switched ON 3 Pump at full pressure 4 Pressure Control set too low 5 Fuses on motor controller 1 Plug unit in to a 120V 60HZ 2 Flip On Off switch to ON 3 Follow pressure relief instructions 4 Slowly i...

Page 10: ...ack into a vertical position this provides greater access to the fluid section while making repairs HK1000 HK2500C 1 Complete Pressure Relief Procedures as described on page 4 2 Unplug unit from elect...

Page 11: ...e crush washer Ref 33 into the intake housing Ref 34 2 Insert Intake Seat Ref 32 into the intake housing ensuring The beveled side of seat faces upwards 3 Place the intake ball Ref 31 on to the intake...

Page 12: ...ed at a more convenient time Remove the Piston Cartridge Assembly as per the instructions on page 9 1 To dismantle the piston cartridge assembly push the piston valve body Ref 13 down through the cyli...

Page 13: ...f 20 onto cylinder The cylinder o rings are always placed on the inner side of the cylinder facing each other Back up o rings are always on the outer side of the cylinder Far ends 10 Slide cylinder Re...

Page 14: ...ximum pressure is adjusted Thread down the top nut Ref 80 making sure that the stem is held securely with a screwdriver until the nut contacts the housing 11 Check the pressure of the unit again 12 Th...

Page 15: ...e knob through the housing counter clockwise until it bottoms out Drop new ball into valve housing Apply a liberal amount of grease to both sides of seat Place into end of housing with the tapered end...

Page 16: ...Owner s Manual HK3819 HK5523 Page 16 PARTS BREAKDOWN...

Page 17: ...Owner s Manual HK3819 HK5523 Page 17 CART PARTS BREAKDOWN...

Page 18: ...Owner s Manual HK3819 HK5523 Page 18 WIRING SCHEMATIC...

Page 19: ...all 1 4 1 17 HK2060 Piston Valve Seat Washer 1 18 HK2605 Piston Valve Seat 1 19 HK2100 Cylinder Back Up Washer 2 20 HK2095 Cylinder O Ring 2 21 HK2200 Cylinder SS 1 22 HK2215 Cylinder Retaining Clip 1...

Page 20: ...rew Socket Head 5 16 x 3 4 2 58 HK3600 Prime Valve Assembly Includes Ref 59 67 ASSY 59 11A 3CP Prime Valve Crush Washer 1 60 HK3040 Prime Valve Seat 1 61 HK2055 Prime Valve Stem O Ring 1 62 HK3605 Pri...

Page 21: ...Models 6 HP DC Motor 220 VAC Less Endbell 3819 Models 9 HP DC Motor 220 VAC Less Endbell 5523 Models 1 1 1 1 97 HK5460 Motor Fan 1 98 HK5466 Motor Fan Cover Screw 3 99 HK5462 Motor Fan Cover Red 3819...

Page 22: ...3 06 40 6000 Sliding Handle High Boy Models 1 124 633F Sliding Handle Spring Clip High Models 2 125 HK6550 High Boy Cart Less Ref 121 123 124 126 127 1 126 67 16A 10 Pneumatic Wheel 2 127 HW6088 Axle...

Page 23: ...Y BURNABY B C CANADA PHONE 604 420 6543 800 494 4376 FAX 604 420 8725 PURCHASED FROM __________________________ __________________________ __________________________ __________________________ MODEL _...

Page 24: ...P O BOX 75 CUSTER WASHINGTON 98240 0075 WARNING DO NOT OPERATE THIS EQUIPMENT WITHOUT READING AND UNDERSTANDING ALL SAFETY AND OPERATING INSTRUCTIONS SEE PAGE 2 3 OWNERS MANUAL AND PARTS LIST Version...

Reviews: