background image


22


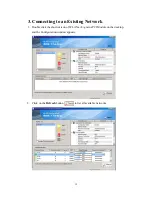
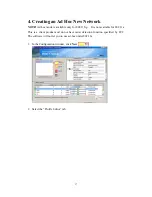
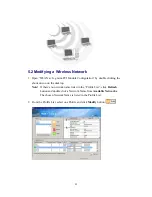
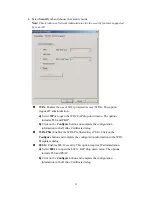
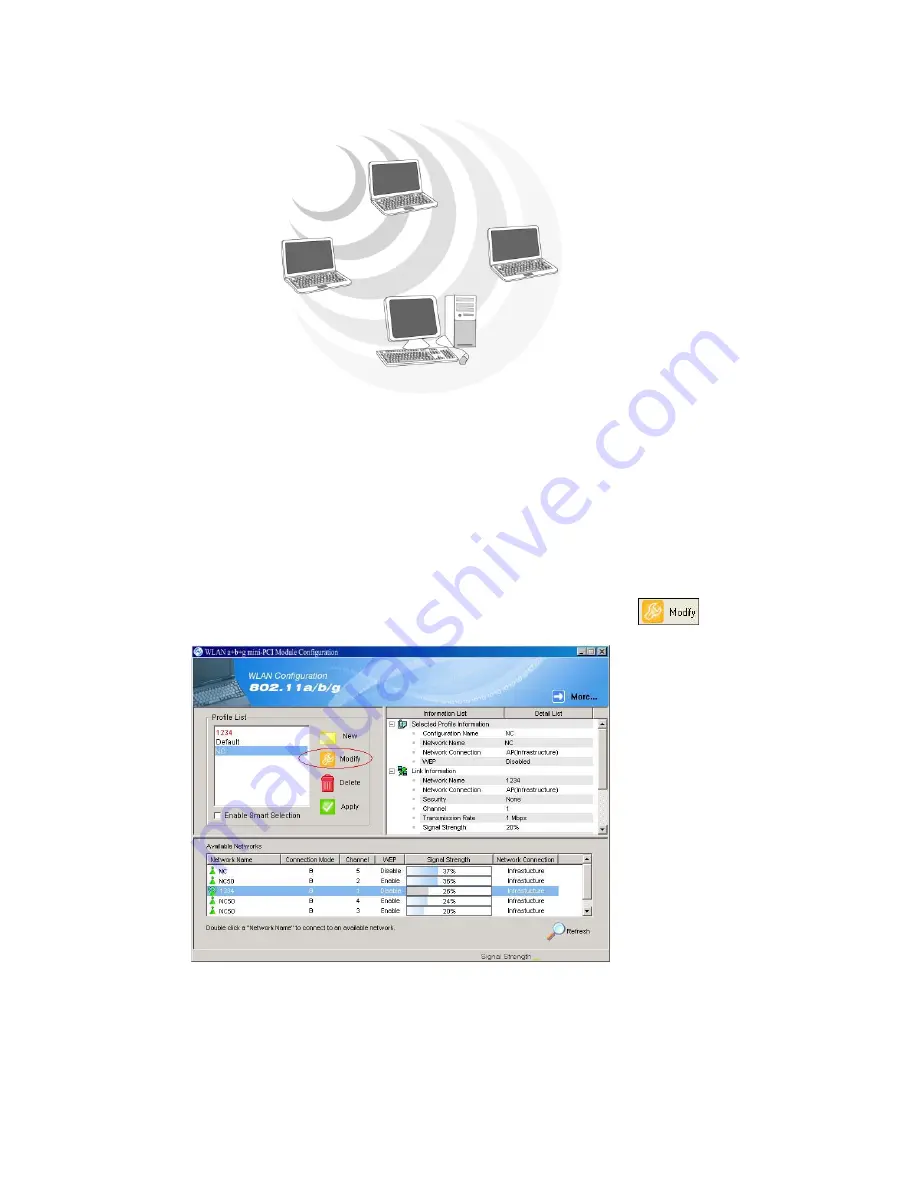
5.2 Modifying a Wireless Network   

1.


Open “WLAN a+b+g mini-PCI Module Configuration” by double clicking the 

shortcut icon on the desktop.     

Note!

   If there’s no network name listed in the “Profile List”, click 

Refresh


button and double click a Network Name from 

Available Networks

.   

The chosen Network Name is listed in the Profile List. 
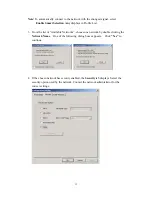
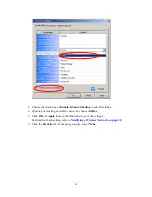
2.


From the Profile List, select one Profile and click 

Modify

 button 


Summary of Contents for DNMA-83

Page 1: ...WLAN mini PCI Card H3C DNMA 83 User Manual Version 1 0 Nov 2007 ...

Page 2: ...a retrieval system or transmitted in any form or by any means whether electronic mechanical photocopying recording or otherwise without the prior writing of the publisher Windows 98SE 2000 ME XP are trademarks of Microsoft Corp Pentium is trademark of Intel All copyright reserved ...

Page 3: ...ing measures Reorient or relocate the receiving antenna Increase the separation between the equipment and receiver Connect the equipment into an outlet on a circuit different from that to which the receiver is connected Consult the dealer or an experienced radio TV technician for help This device complies with Part 15 of the FCC Rules Operation is subject to the following two conditions 1 This dev...

Page 4: ...ements etc NOTE In the event that these conditions can not be met for example certain laptop configurations or co location with another transmitter then the FCC authorization is no longer considered valid and the FCC ID can not be used on the final product In these circumstances the OEM integrator will be responsible for re evaluating the end product including the transmitter and obtaining a separ...

Page 5: ...Provided to OEM Integrators The end user should NOT be provided any instructions on how to remove or install the device Service Center in U S A Company Name 3Com Corporation Company Address 350 Campus Drive Marlborough MA 01752 3064 U S A Service Center in Canada Company Name 3Com Canada Company Address 466 Speers Road 3rd Floor Oakville ON L6K 3W9 ...

Page 6: ...INSTALLATION 11 3 CONNECTING TO AN EXISTING NETWORK 12 4 CREATING AN AD HOC NEW NETWORK 17 5 MODIFYING A WIRELESS NETWORK 21 5 1 INFRASTRUCTURE MODE AND AD HOC MODE 21 5 2 MODIFYING A WIRELESS NETWORK 22 5 3 DEFAULT SETTINGS WINDOWS XPZERO CONFIGURATION 29 5 4 SUPER A G SETTING 錯誤 尚未定義書籤 APPENDIX A FAQ ABOUT WLAN 30 APPENDIX B SPECIFICATION 32 ...

Page 7: ...iest way to wireless networking This User Manual contains detailed instructions in the operation of this product Please keep this manual for future reference System Requirements z A laptop PC contains 32 MB memory or greater 300 MHz processor or higher z Microsoft Win 2000 ME 98 Second Edition XP ...

Page 8: ... installation for Windows To re install the driver please first uninstall the previously installed driver See Chapter 2 3 Uninstallation in this User Manual Follow the steps below to complete the driver utility installation 1 Insert the Installation Software CD into the CD Rom Drive 2 Click Next 3 Read the License Agreement and click Yes ...

Page 9: ...8 4 Click Next to continue or click Browse to choose a destination folder 5 Click Next 6 Click Yes to create a shortcut icon on your desktop ...

Page 10: ...9 7 Click Finish 8 You should now see a shortcut icon on your desktop ...

Page 11: ...will request the original Windows CD during the installation process When the installation is finished you ll have to restart your computer 2 Windows Me Please restart your computer when the installation is finished 3 Windows 2000 XP Select Install the software automatically when the window with this option appears and then click Next to continue installation ...

Page 12: ... uninstallation please close all running programs 1 Click Start Programs WLAN a b g mini PCI Module UnInstall WLAN a b g mini PCI Module 2 Choose Remove Click Next 3 Click OK to start Uninstall 4 Click Finish Uninstall is now completed ...

Page 13: ...onnecting to an Existing Network 1 Double click the shortcut icon of WLAN a b g mini PCI Module on the desktop and the Configuration window appears 2 Click on the Refresh button to list all available networks ...

Page 14: ... 3 From the list of Available Networks choose one network by double clicking the Network Name One of the following dialog boxes appears Click Yes to continue 4 If the chosen network has security enabled the Security tab displays Select the security option used by the network Contact the network administrator for the correct settings ...

Page 15: ...14 5 If selecting WPA or 802 1X select the EAP type then click on the Configure button to select the certificate 6 If selecting WPA PSK click on the Configure button to enter the PassPhrase ...

Page 16: ... User must enter 5 characters ex ab3 c 13 chars User must enter 13 characters ex ab3 kf08 kdk d 16 chars User must enter 16 characters ex ab3 kf08 kdk456 For WEP key please contact with MIS administrator 8 Click on OK or Apply if using the other tabs when done to save the settings 9 Once connected the icon or in front of the name of the Connected Network you can check the signal strength from the ...

Page 17: ...click the shortcut icon to open the Utility 2 From the Windows System Tray you should see the signal icon Right click it and select Disable Zero Configuration Option 2 1 Go to Control Panel and double click Network Connections 2 Right click Wireless Network Connection of WLAN a b g mini PCI Module and select Properties 3 Select Wireless Networks tab and uncheck the check box of Use Windows to conf...

Page 18: ...e only for 802 11b g It is not available for 802 11a This is a client product and do not have radar detection function specified by FCC The software will not let you to use ad hoc under 802 11a 1 In the Configuration window click New 2 Select the Profile Editor tab ...

Page 19: ...settings 4 If joining or creating an Ad Hoc network choose Ad Hoc 5 Click OK or Apply if using the other tabs to save the settings For details of each setting refer to Modifying a Wireless Network on page 20 6 Click the Security tab If not using security select None ...

Page 20: ...19 7 If security is used select Pre Shared Key and click on the Configure button ...

Page 21: ...ttings The new Network Name is listed in the Profile List The driver does not allow channel selection in Ad Hoc mode Instead the driver starts with an initial channel then checks channel status If the channel is busy the driver automatically uses a different channel For details of each setting please see chapter 5 ...

Page 22: ...other by first going through an Access Point AP Wireless devices can communicate with each other or can communicate with a wired network When one AP is connected to wired network and a set of wireless stations it is referred to as a BSS Basic Service Set Ad Hoc Mode Ad hoc mode is also called peer to peer mode or Independent Basic Service Set IBSS In ad hoc mode devices communicate directly with e...

Page 23: ...licking the shortcut icon on the desktop Note If there s no network name listed in the Profile List click Refresh button and double click a Network Name from Available Networks The chosen Network Name is listed in the Profile List 2 From the Profile List select one Profile and click Modify button ...

Page 24: ...ith the best signal strength Network Connection Specifies the mode of the network Two options are Infrastructure and Ad Hoc Power Saving Minimizes power consumption while maintaining network connectivity and high data transfer performance In Ad Hoc mode Power Savings function cannot be enabled The power management options are Off PC Card is powered up at all times Normal PC Card sleeps less often ...

Page 25: ...Options are Normal Range and Extended Range This function can let user to determine the transfer range in 802 11b mode Extended Range can prolong the transfer range with a lower data transmitting rate Scan Mode Options are Active Scan Passive Scan and Auto In Active Scan the driver sends out the probe request frames from each channel and collects the response frames from the responding In Passive ...

Page 26: ... Click on the Configure button and complete the configuration information in the Define Certificate dialog WPA PSK Enables the WPA Pre Shared Key PSK Click on the Configure button and complete the configuration information in the WPA Passphrase dialog 802 1x Enables 802 1x security This option requires IT administration a Select 802 1x to open the 802 1x EAP drop down menu The options include TLS ...

Page 27: ... menu Use any Certificate Authority The Default Setting Select this radio button to use any Certificate Authority CA for authentication Choose a Certificate Authority Select this radio button to choose the desired Certificate Authority for authentication from the drop down menu Server Domain Name The the RADIUS server name or the domain name used for the network access Login Name The username used...

Page 28: ...exadecimal 0 9 A F or ASCII text all keyboard characters Default Encryption Key Allows you to choose one encryption key First Second Third or Fourth as the transmit key which encrypts transmissions from the PC Card Unique Key Defines the per session encryption key for the current network configuration Not used in Ad Hoc mode Shared Keys Use these fields to enter the wireless network s encryption k...

Page 29: ...n the key does not update to the previous value 8 Click OK to save the settings 9 Select TCP IP Property tab Enter the settings and click OK to save the settings If the network uses DHCP server choose Obtain an IP address automatically If the network does not use DHCP server choose Use the following IP address to set the relative settings For the IP configuration information please contact the net...

Page 30: ...e Wireless Network Connection of WLAN a b g mini PCI Module and make sure this connection is Enabled 3 Right click the Wireless Network Connection of WLAN a b g mini PCI Module and then click Properties 4 Select Wireless Networks tab and select Use Windows to configure my wireless network settings check box Note Clear the check box of Use Windows to configure my wireless network settings will disa...

Page 31: ...the parameters of the spread spectrum signal being broadcast If a receiver is not tuned to the right frequency a spread spectrum signal looks like background noise There are two main alternatives Direct Sequence Spread Spectrum DSSS and Frequency Hopping Spread Spectrum FHSS 4 What is DSSS What is FHSS And what are their differences Frequency Hopping Spread Spectrum FHSS uses a narrowband carrier ...

Page 32: ...nectivity the wireless LAN must incorporate a number of different functions Each node and access point for example must always acknowledge receipt of each message Each node must maintain contact with the wireless network even when not actually transmitting data Achieving these functions simultaneously requires a dynamic RF networking technology that links access points and nodes In such a system t...

Page 33: ... and CCK Complementary Code Keying 5 5 11Mbps and OFDM Orthogonal Frequency Division Multiplexing with BPSK for 6 9Mbps QPSK for 12 18Mbps 16QAM for 24 36Mbps 64QAM for 48 54Mbps Host interface Mini PCI form factor Mini PCI Version 1 0 type 3A Channels support 802 11n b g US Canada 11 1 11 Major European country 13 1 13 France 4 10 13 Japan 11b 14 1 13 or 14th 11g 13 1 13 China 13 1 13 802 11n a 1...

Page 34: ...Hz BW 20 m 130Mbps MCS15 2 Nss 20MHz BW 20 m 300Mbps MCS15 2 Nss 40MHz BW Operation OS supported Linux Kernel 2 6 15 or later Windows 2K TBD XP TBD Vista TBD PCB Dimension 50 8mm L H x 59 6mm W x 1 0mm T Security 64 bit 128 bit 152 bit WEP Encryption 802 1x Authentication AES CCM TKIP Encryption Operation mode Infrastructure Ad hoc mode TBD Transfer data rate 802 11b 1 2 5 5 11Mbps 802 11g 6 9 12 ...

Page 35: ...oft 2K XP Compliant FAA S W audio On Off support EMC certificate FCC part 15 USA IC RSS210 Canada TELEC Japan ETSI EN301893 EN60950 Europe VCCI CLASS B Media access protocol CSMA CA with ACK architecture 32 bit MAC Antenna connector 3 x SMT Ultra miniature coaxial connectors ...

Reviews: