21
..Done.
System image is starting...
Cryptographic algorithms tests passed.
Line con0 is available.
Press ENTER to get started.
Press
Enter
. The device is ready to configure when you see the following prompt:
<H3C>
4.
Configure basic settings for the device.
For information about configuring basic settings, see the configuration guide and command
reference for the device.
3
Replacement procedure
CAUTION:
•
Before removing any non hot-swappable hardware options, remove power from the device
completely. To remove power from the device, first press the power button. Wait until the power
button/LED turns off and then remove the power cords. For more information about the power
button/LED, see chassis views and technical specifications in
H3C MSR3610-I ICT Converged
Gateway Series Hardware Information and Specifications
.
•
Avoid accidentally pressing the power button when the device is operating. Doing so will power
off the device and cause service interruption.
IMPORTANT:
•
The barcode on the device chassis contains product information that must be provided to local
sales agent when you return a faulty device for repair.
•
Keep the tamper-proof seal on a mounting screw on the chassis cover intact, and if you want to
open the chassis, contact H3C for permission. Otherwise, H3C shall not be liable for any
consequence.
Replacing a SATA drive
CAUTION:
•
The drive can be removed only when the drive LED (HD) is off.
•
You can remove the drive when the device is operating and must wait for a minimum of 10
seconds before re-installing it or installing a new drive.
No drive is provided with the device. Purchase one as needed.
To replace a SATA drive:
1.
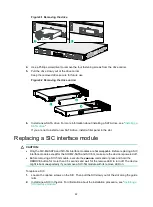
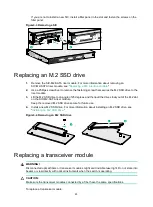
(Optional.) If the device is operating, use a paper clip to press the HD button until the HD LED is
off.
2.
Press the red button on the drive carrier to release the locking lever.
3.
Hold the locking lever and pull the drive out of the slot.


